| HISTORY |
Fonderie Miniature 1/48 Vautour IIB
| KIT #: | 6025 |
| PRICE: | $60.00 when new |
| DECALS: | Two options |
| REVIEWER: | Spiros Pendedekas |
| NOTES: | Short run multimedia kit |
| HISTORY |
The Sud-Ouest Aviation (SNCASO) Vautour was an early 50’s mid-sized combat jet, typically employed in the bomber and attack roles, but also having some usage as an interceptor.The type sported a shoulder mounted swept wing and an all-moving tail, with power provided by a pair of powerful SNECMA Atar 101 turbojet engines carried in underwing located pods. It was equipped with a (fashionable for those times) bicycle-type landing gear with the main wheels located at the fore and aft fuselage undersides, augmented by smaller stabilizing units fitted into the engine pods. A quite sizable weapons bay was located at the central fuselage, along with substantial internal fuel tankage to feed the fuel thirsty Atars.
The dedicated IIB bomber version lacked any sort of radar arrangement or many of the contemporary navigational aids and attack systems that were installed upon several aircraft performing the same role during this era, with aiming performed via a WWII era Norden bombsight, with the bombardier sitting within the glazed nose section.
Both the Vautour IIA and IIB were restricted to performing missions only under clear-weather operations during daylight, with the IIN "all weather" interceptor, having been furnished with a radar, being not as restrictive, having some capacity to conduct both nighttime and adverse weather operations .
While the Vautour’s
lack of advanced targeting and navigation equipment was found not to be a
crippling limitation during its service in Israel (the only other customer
of the type), where the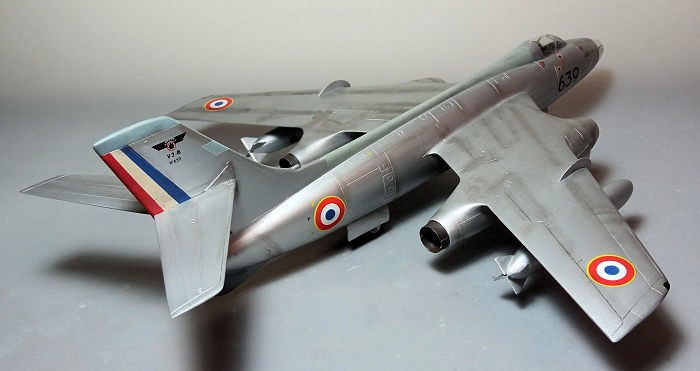 weather of the local climate was generally favorable and daylight missions
commonplace, when operated in Europe, these restrictions were considered to
be a major disadvantage. As a result, the Armée de l'air never deployed
their single-seat Vautour IIA fleet in a frontline capacity and the majority
of its IIB bombers were quickly converted to the improved Vautour IIBR
standard, which was used to perform photo reconnaissance missions instead.
weather of the local climate was generally favorable and daylight missions
commonplace, when operated in Europe, these restrictions were considered to
be a major disadvantage. As a result, the Armée de l'air never deployed
their single-seat Vautour IIA fleet in a frontline capacity and the majority
of its IIB bombers were quickly converted to the improved Vautour IIBR
standard, which was used to perform photo reconnaissance missions instead.
The Vautour IIA was capable of carrying various armament, including 30 mm cannons, up to four removable underwing rocket pods or 4,000lb of bombs and up to 3,000lb of bombs or alternatively a maximum of 232 68 mm rockets in the bomb bay. The Vautour IIB bomber could be used to carry and deploy nuclear weapons in addition to its conventional arsenal and was indeed utilized as a nuclear weapon platform, being replaced by the more potent Dassault Mirage IV as soon as it became available.
Seeing combat with Israel, the type undertook various missions and roles during the Six-Day War and the War of Attrition, among others. Only one air-to-air kill was recorded, with the Israeli Vautours replaced by the A-4 Skyhawks in 1970.
Though not uncomplex and with a number of limitations (something not too uncommon for many aircraft types of the era), the Vautour was a potent platform that could have in fact fared much better than it did, should it have not been hampered by the deleterious combination of budget limitations and political factors which, to take Tom Cleaver’s words, “created a domestic political fight over what was the right place to invest: either in proven products, such as those of Dassault - producer of the Mystere IVA, then developing the Super Mystere and designing the Mirage - or to risk purchase of an "unproven" aircraft in such quantity” (such was the Vautour). The subsequent deluging of the Armée de l'air with F/RF-84s and F-100D/Fs offered by the U.S. at “bargain prices" that took place by that time practically eliminated the need for any version of the Vautour, essentially giving the kiss of death to this ambitious, potent project.
Of the initial order for 480 units issued by the Armée de l'air, only 149
were built (including the three prototypes and six pre-production machines),
with 31 of them purchased by Israel and for a comprehensive presentation and
operational use of the plane, you need to read no further than Tom’s
excellent review and ditto build of the cousin
IIN kit.
| THE KIT |
 Fonderie
Miniature came in 2001 with their quarter scale vautour IIN and IIA
kits, followed by the IIB bomber version in 2005, all of them being
one-off releases, never reissued ever since (and I suppose this mainly
has to do with those short run molds’ life limit). These were by all
means complex kits, very challenging to build, but, on the other hand,
the only viable offerings for a detailed 1/48 Vautour. The specific kit
is the IIB bomber version and for an in depth look at its contents you
might read its preview found
at the ever growing MM archives.
Fonderie
Miniature came in 2001 with their quarter scale vautour IIN and IIA
kits, followed by the IIB bomber version in 2005, all of them being
one-off releases, never reissued ever since (and I suppose this mainly
has to do with those short run molds’ life limit). These were by all
means complex kits, very challenging to build, but, on the other hand,
the only viable offerings for a detailed 1/48 Vautour. The specific kit
is the IIB bomber version and for an in depth look at its contents you
might read its preview found
at the ever growing MM archives.
Well, it was 2006, when I saw up close and personal an aluminum doped
Armée de l’air Vautour as a static display outside the SNECMA Moteurs
factory in the French Bordeaux area. Getting immediately hooked by its
unconventional looks, a love affair was born. Of pure lack, I found a
copy of the even by then hard to find FM kit at the definitive Maurice
Verdeun Modélisme hobby shop in Bordeaux the same afternoon, offered at
the normal (for an F-M kit and for the time) price of around $60. Having
no other choice than grabbing it, I then let it mature in my shelf of
doom for a good 15 years, with only recently deciding to give it a go.
| CONSTRUCTION |
Knowing from Tom's
article the challenges of the kit, what I did first was to perform the
radical act of deeply studying the instructions (which, in essence, is
merely a “building and painting suggestions” leaflet), in order to establish
some sort of construction sequence. Upon getting a more or less clear idea
of what goes where I began removing all styrene parts from the sprues and
cleaning them from the large amounts of flash present. No mold agent was
present in my example, so no washing was necessary.
 After
having all styrene parts detached from the sprues and cleaned from flash,
the two fuselage halves were joined with the resin cockpit tub, instrument
panel, bombardier’s rear bulkhead and the two main wheel bays trapped in
between. This was an operation easier said than done, as all resin parts
needed multiple sessions of trimming and test fitting. Since pure
cyanoacrylate provides strong but fragile bonds (meaning the resin bits
might detach if mishandled during building (Yours Truly pattern), I decided
to use a 1:1 home brewed mix of cyanoacrylate and liquefied styrene, hoping
the later agent will partially melt the styrene surface and provide a more
flexible, durable bond, something that seemed to work.
After
having all styrene parts detached from the sprues and cleaned from flash,
the two fuselage halves were joined with the resin cockpit tub, instrument
panel, bombardier’s rear bulkhead and the two main wheel bays trapped in
between. This was an operation easier said than done, as all resin parts
needed multiple sessions of trimming and test fitting. Since pure
cyanoacrylate provides strong but fragile bonds (meaning the resin bits
might detach if mishandled during building (Yours Truly pattern), I decided
to use a 1:1 home brewed mix of cyanoacrylate and liquefied styrene, hoping
the later agent will partially melt the styrene surface and provide a more
flexible, durable bond, something that seemed to work.
Both seats had their nice PE frames added to their resin main bodies (a not
too easy operation for the bombardier’s one, as it is molded onto the rear
bulkhead). Seats’ main frame color was Revell 365 Patina Green (for the
“apple” color instructions stated), whereas the cushions were painted black.
The equally nice PE seat belts were painted French blue with silver buckles
and affixed by judicious bending, with a drop of cyanoacrylate securing them
in place.
Basic interior color was Hu32 (a black gray shade - close to RLM66), with
black instrument panel, consoles and various boxes, which were then dry
brushed with silver and had some red and white “knobs” done with a fine
brush. To beef up the instrument panel looks, I could not resist the
temptation to add a more or less suitable leftover instrument decal on it,
which, with the help of decal softening solution, succumbed onto the
molded-on instruments, offering a charming (though not accurate) result.
A sort of ventilation hole featuring a splitter in the middle is located
down the starboard fuselage side (the Israeli IIBs contain two) and was
created by opening a hole at the fuselage and gluing a thin sheet styrene
piece the middle to look like the real thing.The two arc runners where the
stabilizers slide onto are supplied in PE and were attached to the fin with
CA glue. The bland cooling air entry located at the fin base was drilled out
for extra realism, whereas the drag chute empty rear opening was rendered
more realistically by inserting a bulbous shaped styrene piece, painting it
a linen shade, to represent the packed-in chute.
The two engine/auxiliary ge ar
pods were next assembled by joining their left and right halves, trapping
the resin compressor faces and the side wheel bays in between, again using
the improvised liquefied styrene/cyanoacrylate mixture (and, again, the
operation was easier written than done - fit was very challenging). The
assembled pods were then attached under the top wing halves, followed by the
inner and outer lower wing halves. Engine compressors were painted steel,
whereas the nice resin exhausts were painted Testors Burned Metal (and left
off, to be attached after painting).
ar
pods were next assembled by joining their left and right halves, trapping
the resin compressor faces and the side wheel bays in between, again using
the improvised liquefied styrene/cyanoacrylate mixture (and, again, the
operation was easier written than done - fit was very challenging). The
assembled pods were then attached under the top wing halves, followed by the
inner and outer lower wing halves. Engine compressors were painted steel,
whereas the nice resin exhausts were painted Testors Burned Metal (and left
off, to be attached after painting).
An immense filing and sanding session took place before attaching the wings
to the fuselage, since otherwise access between the engines and the fuselage
would be difficult. Once satisfied, the wings were attached, where I
strengthened the butt joints with two metal pins at each root, to make sure
the heavy wings would not sag over time (yes, the stabilizing wheels would
help, but, believe it or not, I have experienced models with bicycle type
landing gear having their wings sagged, raising the rear main wheels to the
air!). The wing filets were thinned down and attached during this time, as
well.
Not sure If I was going to use them, I then went on assembling the 5-piece
wing tanks. By studying net pics, I found out that the kit provided wing
tanks' pylon locating holes are wrongly offset, meaning they were filled and
sanded smooth.
Overall fit was nothing less than challenging, presenting various gaps at
most joints, the wing-to-pod ones being the most challenging. Also, all
resin parts needed judicious trimming in order to fit in place, without
interfering when their corresponding subassemblies were put together. A plus
in the above tedious procedure was the workability and overall quality of
the plastic itself.
Treatment of gaps was initially done with multiple applications of liquefied
styrene, followed by "normal" filling and sanding. Faithful to my "El
Cheapo" approach, I then "primed" the model with some leftover black paint
that remained in the airbrush after painting my 1/72
Revell (MPM) P-70. That priming revealed a few more
discrepancies. After a final filling and sanding session, I blanked the
cockpit and bombardier’s office with wet tissue and took the Vautour to the
paint shop!
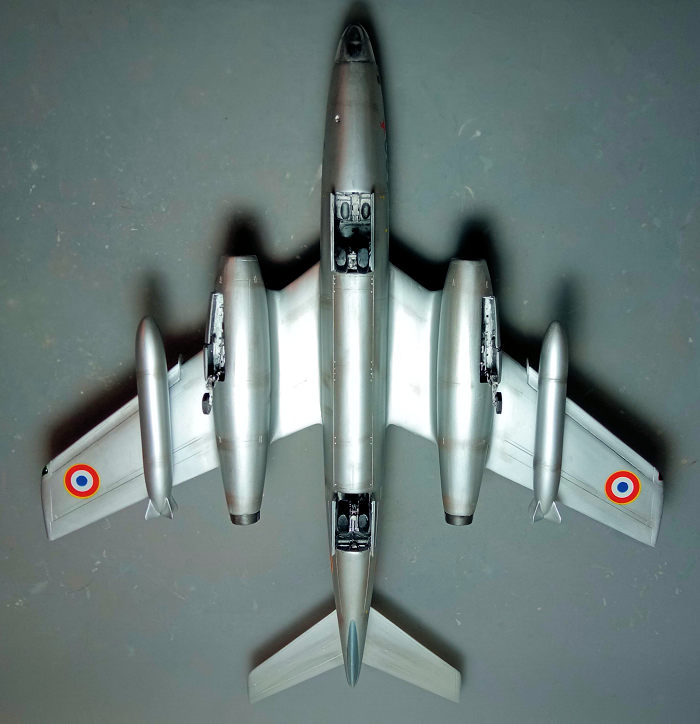
| COLORS & MARKINGS |
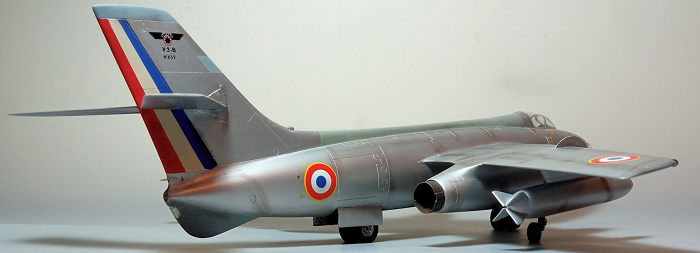 I gave
the complete model a coat of Hu11 Silver, including the doors’ both sides
and wheel bays. The wing tanks and tail planes received the same silver, as
well. Though Hu11 is, by specification, non-buffable, I went on buffing it
with a soft lint-free cloth, which gave the model a deeper, more shiny look.
After some masking, (and consulting net reference, since coloring varied,
depending on the example and date), the ventral fin, the fin top and a small
front sector on it (the latter two being the VHF2 and VHF1 antennas
respectively) were painted a medium gray, whereas the spine was painted a
light gray. The French tricolor rudder flash was next, painted red, white
and blue after successive masking.
I gave
the complete model a coat of Hu11 Silver, including the doors’ both sides
and wheel bays. The wing tanks and tail planes received the same silver, as
well. Though Hu11 is, by specification, non-buffable, I went on buffing it
with a soft lint-free cloth, which gave the model a deeper, more shiny look.
After some masking, (and consulting net reference, since coloring varied,
depending on the example and date), the ventral fin, the fin top and a small
front sector on it (the latter two being the VHF2 and VHF1 antennas
respectively) were painted a medium gray, whereas the spine was painted a
light gray. The French tricolor rudder flash was next, painted red, white
and blue after successive masking.
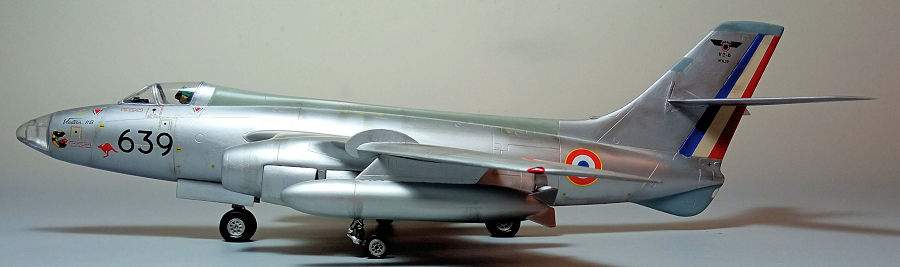
As a note on the overall shade, though pure unpainted metal might be a
strong candidate, I believe french Vautours, at least from a point onwards,
were painted in some sort of silver gray or polished aluminum shade, but, of
course, this is just an assumption, not claiming accuracy.
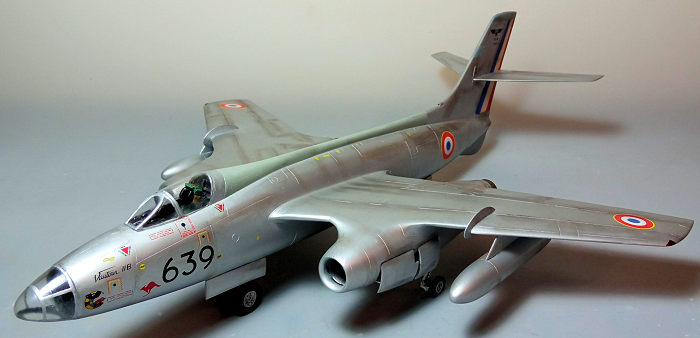
I then went on applying the decals, which, to my pleasure, behaved
excellently, with the good amount of stenciling provided adding realistic
looks to the model. A coat of Future sealed them.
| FINAL CONSTRUCTION |
Feeling
motivated after painting and decaling, I went on assembling and fitting
the main gear legs with their wheels and doors into their resin bays, a
challenging procedure, as the “structural” parts were white metal, the
oleo scissors and door hinges PE and the wheels resin. Carefully
studying the instruction drawings and using net available “detail” pics
I systematically managed to attach everything in place, with the bird
proudly standing on its main feet!
Legs, wheel rims, door innards and wheel bays were painted “steel”
(zinc, green zinc or even “ochre” shades have also been observed for the
latter two, but, to my understanding, all-steel is an equally safe
choice) and tires were black. Instructions advised that PE wiring and
scratch built plumbing can be added, but, feeling my sanity envelope
already pushed beyond normal limits, I decided not to take further
action and not only leave everything “as is” (which nevertheless looked
reasonably busy), but also to put the project to sleep, in order to
recharge and figure out a practical way to attach the white metal side
gear units onto their inclined bays (which, in reality, were the
engines’ turbine frames…).
After almost a year’s hibernation (and, truth be told, a number of less
complex modeling projects completed), the Vautour awoke and had its side
gear struts assembled and attached in position with slow setting
cyanoacrylate (which allowed some corrections, in order to obtain a
reasonable alignment). Since the aforementioned legs were not molded
straight, they were prior straightened by bending them to shape by hand.
Pieces of stretched sprue represented their actuators.
The auxiliary resin wheels had their PE rims attached and, after lightly
filed to look weighted (as was witnessed in reality), were glued in
position (again with slow setting cyano, which allowed positioning them
 in
order for all wheels touching the ground). The doors were finally
attached in position, with small pieces of stretched sprue representing
the tiny rods that connected them with their bays. Painting approach was
exactly the same as with the main units and this concluded the landing
gear saga.
in
order for all wheels touching the ground). The doors were finally
attached in position, with small pieces of stretched sprue representing
the tiny rods that connected them with their bays. Painting approach was
exactly the same as with the main units and this concluded the landing
gear saga.
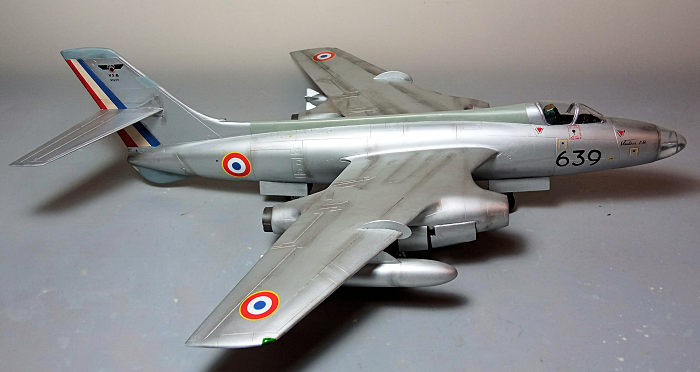
Waffling back and forth whether to attach the wing tanks or not, I
finally voted on attaching them, since, to my eye, the overall result is
overall more aesthetically pleasing (though, undeniably, the looks of
those side wheel units hanging out of the wing mounted engine pods are
definitely distinctive). As a side note, the wing tanks were used but
seemingly not that frequently (I guess it had to do with the opposing
factors of endurance versus performance for the specific mission - those
fuel-thirsty Atar engines definitely did not lack thrust, but the bird
was heavy…). The tail planes, which could not be attached prior to
painting of the tricolor fin flash, were carefully glued at this time,
as were the exhaust nozzles.
I decided to apply some black wash all over, which accentuated all panel
lines and also gave the landing gear area an oily, more realistic look.
Some dark brown and dark pastels were also used to offer some shade
variation at the monotonous NMF (translation: I was lazy applying
different shades of NMF to create “paneling” effect”), with a final
satin coat giving the bird its final finish.
The vac transparencies were next, where the bombardier’s glazing was
easily trimmed to shape, but the main canopy was a real mis-match: not
only it sat too high (this was quite uneventfully fixable), but also its
rear part was angled narrower than the corresponding fuselage section.
Since the canopy angles looked correct, compared with net available
drawings, the only plausible explanation is that I might have filed the
fuselage section at too wide an angle during construction. Nevertheless,
I trimmed the canopy to shape as much as I could, then attached it and
faired the gap (and, in fact, all transparencies’ gaps) with white glue
(Tom Cleaver’s life saving advice). All frames were hand painted (and
being well defined really helped here).
The ventral fin located rear navigation light (not present on all
Vautours - faired over at cases) was rendered by a piece of clear
styrene attached to the opening and filed to shape, then polished. The
quite sizable wing tip lights were represented by applying red and green
clear paints, before calling the distinctive looking bomber done!
| CONCLUSIONS |
This is a
definitely complex, demanding kit, which will put the modeler’s skills
to good use. The styrene parts present a lot of flash, feature a pebbly
surface and fit is challenging in most areas, this being further
complicated by the use of resin, PE and white metal parts, with
instructions being a mystical experience by themselves, requiring deep
study, in order to figure out what goes where.
That said, by looking at the finished model, general shape looks
spot-on, the details provided by the resin and PE are really superb, the
white metal parts are acceptable (despite some of them requiring
straightening, not that big a deal), the vac formed transparencies are
nice, clear, and with well defined frames, not showing the slightest
hint of yellowing after all these years (that the main canopy’s fit was
below average at the rear can be almost certainly be avoided during
fuselage construction, by test fitting the canopy) and the decals are
really superb.
Translation of all the above is that, though this is a challenging kit
to build, all the ingredients are there, in order to come up (after a
lot of work) with a detailed and accurate 1/48 Vautour. This kit has
become a rarity to find nowadays (as of 2023 and I doubt we will ever
see a more mainstream one in 1/48, not even a rebox of it, as the FM
molds are likely past their “service life”) and is offered at high
prices (to the region of $100 or even higher), but is your only viable
option, since the “other” option, the Heller 1/50, is ancient,
simplistic and practically impossible to find, having to pay an
astronomical price for it anyway.
Happy Modeling!
5 December 2023
Copyright ModelingMadness.com. All rights reserved. No reproduction in part or in whole without express permission.
If you would like your product reviewed fairly and fairly quickly, please contact the editor or see other details in the Note to Contributors.