Revell 1/48 F-89J Scorpion
| KIT #: | 4568 |
| PRICE: | $25.00 when new |
| DECALS: | Two options |
| REVIEWER: | Spiros Pendedekas |
| NOTES: |
| HISTORY |
The origins of the F-89 (the name Scorpion came from the elevated tail and high-mounted horizontal stabilizers) can be traced back in summer 1945, when USAAF issued a specification for a twin engine night fighter to replace the P-61 Black Widow. When the revised specification that came soon after dictated, among others, a maximum speed of 460 knots, it became clear that jet propulsion would be the practical way to go. Northrop proposed the N-24, a two seat, swept-wing jet, which was approved in early summer 1946 as project XP-89.
 The
evaluation of the full scale mockup a few months later led to a number of
significant changes in overall design that were systematically incorporated to
the project, the most important being the adoption of a straight wing instead of
the initial swept one, in order to improve the low speed flying characteristics
which were found unfavorable during wind tunnel tests. Other important
modifications included relocation of the tail planes higher onto the vertical
stabilizer to improve their effectivity (not only they were affected by the
exhaust gasses, but were also blanked by the wing at high angles of attack),
seating of the crew under a single canopy, replacement of the magnesium wing
sections with aluminum, extra protection of the fuel tankage which was right
atop the engines and deletion of the initially specified rear gun.
The
evaluation of the full scale mockup a few months later led to a number of
significant changes in overall design that were systematically incorporated to
the project, the most important being the adoption of a straight wing instead of
the initial swept one, in order to improve the low speed flying characteristics
which were found unfavorable during wind tunnel tests. Other important
modifications included relocation of the tail planes higher onto the vertical
stabilizer to improve their effectivity (not only they were affected by the
exhaust gasses, but were also blanked by the wing at high angles of attack),
seating of the crew under a single canopy, replacement of the magnesium wing
sections with aluminum, extra protection of the fuel tankage which was right
atop the engines and deletion of the initially specified rear gun.
The flights performed by the prototype from the end of summer 1948 onwards, clearly indicated that the plane was significantly underpowered, leading to the adoption of the more powerful J-33-A-21 afterburning engines in place of the initially envisaged J35-A-9, together with a weight reduction program. Changes in armament and avionics took place as well, along with some aerodynamic refinements (the latter being dictated after a crash landing and, later on, a crash). The resulting prototype was redesignated YF-89A, more or less looking like the follow-on production aircraft, the F-89A, with the first of them accepted by the USAF as an evaluation machine on 28 September 1950.
All 18 F-89As that were completed were mainly used for tests and trials and were soon upgraded to the F-89B standard, outfitted with new avionics. The F-89C that followed featured various improvements, in order to mostly solve the serious engine problems the “B” variant exhibited. However, not only these problems persisted, but also other major issues showed up, the most serious being structural deficiencies of the wings. After a number of groundings the Air Force gave up on the F-89C in 1954, with the variant passing to the Air National Guard, operating till 1960.
The plane matured to the F-89D standard, featuring, among others, structural modifications, to eliminate the problems its predecessor was plagued with. It was equipped with a new Hughes E-6 fire control system with AN/APG-40 radar and an AN/APA-84 computer. Armament consisted of two wingtip pods carrying fifty-two 2.75-inch "Mighty Mouse" FFAR rockets. A total of 682 F-89Ds were built.
 Next was the F-89H,
featuring the E-9 fire control system and the distinctive wingtip pods, each
holding three Falcons (usually three semi-active radar homing GAR-1s and three
infrared GAR-2s) and 21 FFARs, for a total of six missiles and 42 rockets.
Problems with the fire-control system delayed the -H's entry into service, by
which time its performance was notably inferior to newer supersonic
interceptors, so it was phased out of USAF service by 1959.
Next was the F-89H,
featuring the E-9 fire control system and the distinctive wingtip pods, each
holding three Falcons (usually three semi-active radar homing GAR-1s and three
infrared GAR-2s) and 21 FFARs, for a total of six missiles and 42 rockets.
Problems with the fire-control system delayed the -H's entry into service, by
which time its performance was notably inferior to newer supersonic
interceptors, so it was phased out of USAF service by 1959.
The final variant was the F-89J, of which no new plane was produced but emerged from modifying 350 -D units. It featured tip tanks and could carry one MB-1 Genie nuclear rocket under each wing. The type served with the Air Defense Command through 1959 and ADC-gained units of the Air National Guard through 1969. All in all, no less than 1052 Scorpions were built, including the two prototypes.
Though not an absolutely hot but nevertheless good performer and despite being plagued with serious issues in its early life (not at all uncommon for jets of that era), the distinctively looking Scorpion matured to an ample interceptor, forming the backbone of North American air defense during the 50s, then serving with Air Force Reserve and Air National Guard during the 60s. Never having shot in anger, the fact that such an early jet remained active for so long can possibly indicate, among others, that a relatively conservative, yet well designed platform which has its teething problems properly solved can have a long, notable career.
| THE KIT |
Revell came in the early 90s with their quarter scale Scorpions offered in two versions, the “C” and the “D/J”, with both versions featuring four common sprues, with either one or two extra sprues individual to each of them. With the overall posture nicely dictating Monogram heritage, the kit was initially welcomed by the modeling world, who finally got a very nice 1/48 version of the iconic Scorpion. As it often happens, the kit that was beforehand high on modelers’ wishing lists, the kit eagerly awaited and warmly welcomed, did not sell extremely well, let alone built too often through the years. This might have been the reason that it was reboxed a few times only during the 90s and then, after almost 25 years, the "C" version in 2023, as a “50th Anniversary Gift Set”.
The specific kit is the
initial “D/J” version, found still wrapped in 2003 at one sadly now closed
toy/hobby shop in my hometown, carrying a low price tag, with the attractive box
art depicting a USAF bird with shark teeth nose art. Upon opening the well known
blue Revell, big and relatively flimsy top opening box, I was greeted with
around 100 silver gray styrene parts arranged in six sprues. Two of them contain
the fuselage and wing halves, while the other four contain everything else.
Molding is crisp, though I did notice some easily removable flash in a couple of
areas. Panel lines are all raised and quite well done, with the overall shapes
of parts looking accurate to my inexperienced eye.
 Cockpit is well represented with good looking seats, control stick and
instrument panels (you have to choose the right ones for your version), while
the side consoles feature nice molded-on details. The distinctive landing gear
is equally well represented, with the main legs including convincing brake
calipers, the bay walls and door innards looking realistically busy and the
distinctive wheels looking fine.
Cockpit is well represented with good looking seats, control stick and
instrument panels (you have to choose the right ones for your version), while
the side consoles feature nice molded-on details. The distinctive landing gear
is equally well represented, with the main legs including convincing brake
calipers, the bay walls and door innards looking realistically busy and the
distinctive wheels looking fine.
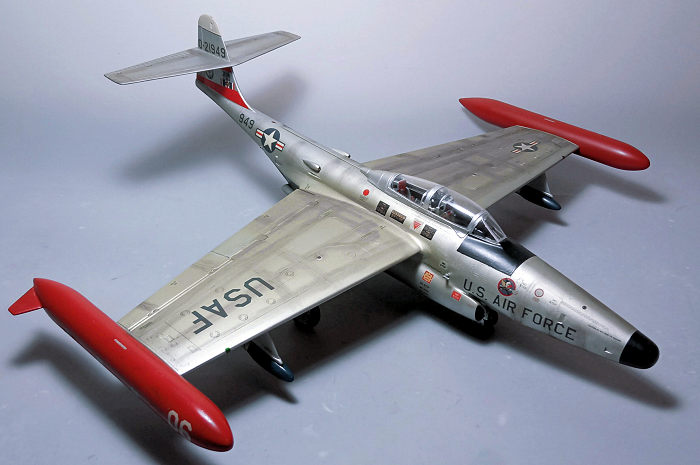
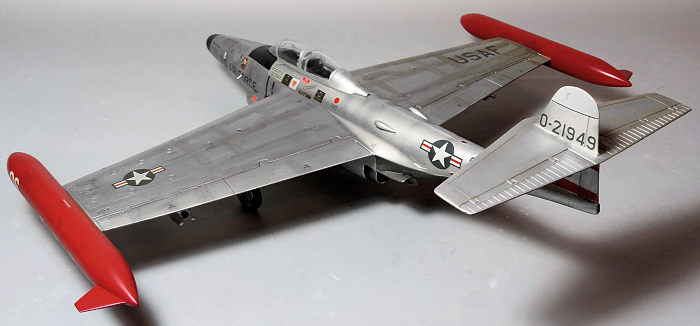
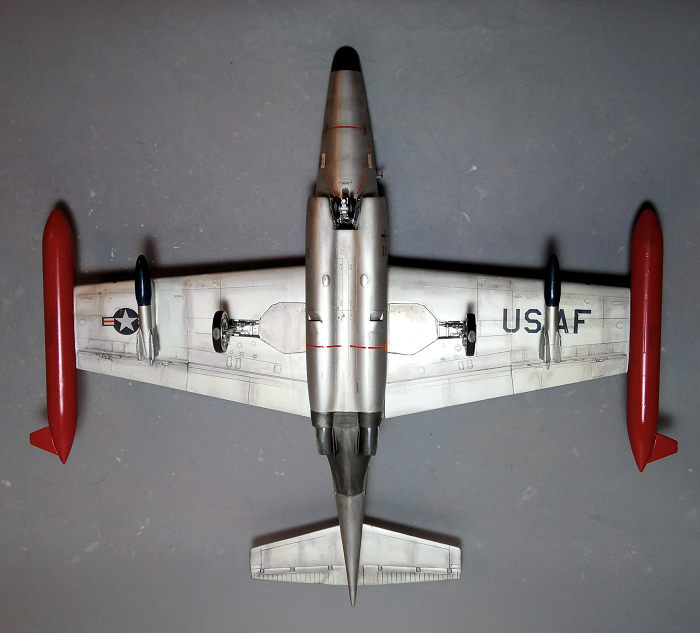
All aerodynamic surfaces look well done. The engines feature good looking compressor faces and realistically deep exhausts. A variety of external stores is provided, including the iconic wing pods and small underwing tanks of the “D” version and the two “Genies”, four “Falcons” and larger wing tip tanks of the “J” version.
No complaints from the transparencies, being nicely molded and clear. Since the model is a definitive candidate for severe tail sitting, a clear aft supporting rod is provided should your attempts fail. Instructions are typical Revell style of past times, nice, simple and followable, with the seemingly uncomplicated construction spread in 44 clear and concise steps with full color callouts.
Two schemes are provided, for a “D” Air Force and a “J” ANG machine, with the decals sharply printed but very matte, hoping they have aged well. Those birds carried a ton of maintenance stenciling and this is beautifully provided by Revell, only asking your patience to apply them.
Instructions want you to first join the fuselage halves (be sure to stuff sufficient weight in the front area, the nose gear seems strong enough to hold it), then assemble and attach the cockpit underneath, followed by the intakes, exhausts, wings, tailplanes, landing gear, choice of external stores and finally attaching the canopy, ending a seemingly uncomplex build.
| CONSTRUCTION |
I started by putting together the cockpit, choosing the correct instrument panels for the "J" version I was building. Basic cockpit color, including the seat frames, was a medium gray. Stick grips, top shades, instrument panels and side consoles were painted black, with the latter two having their nicely molded-on details silver dry brushed and various switches picked up with red, white and yellow paint. The seats had their head cushions painted red and their seat belts light gray. Surely, the cockpit out of the box looks sufficient, especially under a closed canopy (my go-to lazy approach).
 I then went on joining
the fuselage halves. Since the nose landing gear looked very strong, I decided
not to take risks with this classic candidate for severe tail sitting and
trapped some 50 grams of fishing weights at the invisible area fore of the
cockpit. I next successively attached the twin compressor faces, the cockpit,
which was dropped off from the undersides, the fuselage bottom, the intakes and,
finally, the nose radome.
I then went on joining
the fuselage halves. Since the nose landing gear looked very strong, I decided
not to take risks with this classic candidate for severe tail sitting and
trapped some 50 grams of fishing weights at the invisible area fore of the
cockpit. I next successively attached the twin compressor faces, the cockpit,
which was dropped off from the undersides, the fuselage bottom, the intakes and,
finally, the nose radome.
Having a complete fuselage, the wings were then assembled and attached, followed by the nicely molded one-piece tailplane and, finally, the fin top, thus concluding basic assembly, which was relatively uncomplicated and quite pleasant. Overall fit was good, only needing some attention at the usual places (like the wing roots, intakes and the nose radome).
Upon filling and sanding being commenced, only then I added the sensitive 2-piece, top located air scoops (their openings were widened by micro-drilling, to look more realistic). The two Genie pylons were attached by this time, as well (I was really tempted to add the four Falcon pylons, but I read that they were not that often carried, so I went for “cleaner” looks).
Since all landing gear parts, bays and door innards exhibited a more or less polished aluminum shade, I took my usual lazy road and attached everything on, sans the wheels, in order to paint them “silver”, together with the rest of the airframe. After a final sanding session, I blanked the cockpit opening with wet tissue and took the Scorpion to the paint shop!
| COLORS & MARKINGS |
 I
first painted the radome and front anti glare area black, then masked them off
and gave the complete model a coat of Hu11 Silver, which I lightly buffed upon
drying, in order to give it a deeper, shinier look (as a note, a number, if not
all operational Scorpions were seemingly painted light gray after a point
onwards, but NMF is also a solid choice for, at least, earlier days. Just to be
on the safe side, I gave the nevertheless glossy but sensitive silver a coat of
Future and proceeded to decaling.
I
first painted the radome and front anti glare area black, then masked them off
and gave the complete model a coat of Hu11 Silver, which I lightly buffed upon
drying, in order to give it a deeper, shinier look (as a note, a number, if not
all operational Scorpions were seemingly painted light gray after a point
onwards, but NMF is also a solid choice for, at least, earlier days. Just to be
on the safe side, I gave the nevertheless glossy but sensitive silver a coat of
Future and proceeded to decaling.
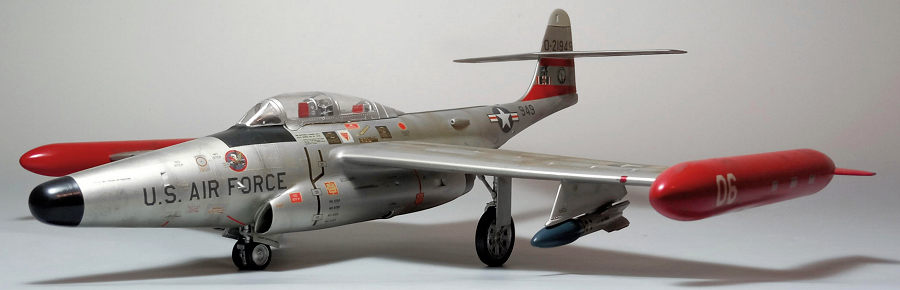
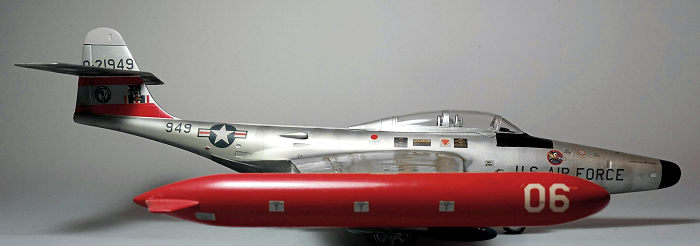
I used the kit decals, in order to represent #0-2149 machine (This is an Iowa
ANG plane, one of the last in service. Ed). Despite their age,
the decals behaved in an acceptable manner, easily detaching from their backing
paper and solidly adhering to the silver coated surfaces. The plethora of
stencils provided by Revell were really comprehensive and added a very realistic
look to the model. A coat of Future sealed the decals.
| FINAL CONSTRUCTION |
The wingtip tanks were assembled, filled, sanded smooth and painted
Hu60 Scarlett which matched the shade of the red decal sections on the fin.
After having their serial number and maintenance stenciling decals applied,
they were attached to the wingtips. I normally do not attach ordnance, as it
saves time, effort and provides cleaner looks (translation: I am lazy), but
I decided to add the two distinctive Genie nuclear headed missiles, which I
elected to paint silver with dark blue warhead (an assumption, as all-white,
or even silver with just a small part of the nose painted black or
blue-black are witnessed).
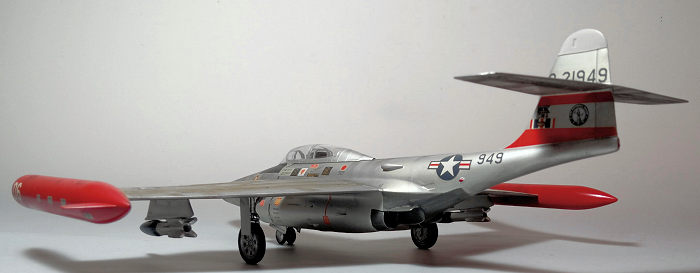 The two piece exhausts were attached and, together with their deflector
plates, were attached in position. All were painted Testors Burned Metal.
The twin wheels at the front and the distinctive broad but thin-profiled
2-piece main wheels (a necessity dictated by the thin wings) were tad filed
to look weighted (not much, since, featuring low tire side profiles, were
inflated to high pressures), had their rims painted silver, their tires
black and attached in place.
The two piece exhausts were attached and, together with their deflector
plates, were attached in position. All were painted Testors Burned Metal.
The twin wheels at the front and the distinctive broad but thin-profiled
2-piece main wheels (a necessity dictated by the thin wings) were tad filed
to look weighted (not much, since, featuring low tire side profiles, were
inflated to high pressures), had their rims painted silver, their tires
black and attached in place.
It was by this time that I noticed something about the bird’s posture not being too convincing: by comparing with net pics, the model’s nose sat far too low, giving a much higher-tail stance from what the distinctive “Scorpion” looks would justify. What I did was to brutally detach the front leg and make it taller by attaching a roughly 2mm styrene piece that had the same base dimensions as the leg’s attachment area. The above process effectively raised the nose, with the model more or less exhibiting the posture typically seen.
Time for some weathering, which, in my case, consisted of a black wash at the landing gear area to bring out its detail and application of dark brown and black pastels to represent grime, engine staining or even panel shading, with an overall satin cote giving the bird its final hue.
The transparencies had their well defined framing hand painted and attached, followed by the two pitot tubes. Blobs of red and green clear paint represented the wing tip lights, before calling the Scorpion done!
| CONCLUSIONS |
Though getting elderly, this is a very nice kit and still (2023) your only choice for the iconic Scorpion: overall shape looks very accurate, molding is crisp with little flash, panel lines, though raised, are nicely done, detail is very good (the key areas of cockpit and landing gear included), fit is equally good with only little extra attention required, transparencies are super and decals are very comprehensive, still behaving adequately after almost 30 years!
Construction itself was straightforward, not that complex and quite pleasant, making the model suitable even for the less experienced among us. Out of the box a very nice representation of the Scorpion can emerge, with some aftermarket available (mainly white metal gear legs and resin seats and wheels, apart from decals) promising to add that special detailing flavor.
It is quite interesting
that we do not see that solid kit built very often (and I do not think the
raised panel lines is such a put-off) hence the not too common reissuing (the
2023 reissue, as "50th Anniversary Gift Set”, including some basic paints, a
brush and glue, took place almost 25 years after the last one). If you fancy
building the type, opting for a relatively uncomplex build and coming up with a
great result even out of the box, then this kit is for you.
Happy Modeling!
15 January 2024
Copyright ModelingMadness.com. All rights reserved.
No reproduction in part or in whole without express permission. If you would like your product reviewed fairly and fairly quickly, please
contact
the editor
or see other details in the
Note to
Contributors.