KP 1/72 Yak-23
| KIT #: | 15 |
| PRICE: | $14.00 |
| DECALS: | Three options |
| REVIEWER: | Joe Essid |
| NOTES: | Simple build. Transparent decals. |
| HISTORY |
 Some aircraft remind me of thoroughbred
horses. The Spitfire, FW-190D, Mustang, or several Italian warbirds with
inline engines come to mind. The Sabre, early MiG jets, and Me-262 are
sharks. Others, like the P-47, Hawker Tempest, or English Electric
Lightning resemble burly athletes who can sprint faster than their size
portends. Then there are the killer insects and deadly mantas of modern
jet design.
Some aircraft remind me of thoroughbred
horses. The Spitfire, FW-190D, Mustang, or several Italian warbirds with
inline engines come to mind. The Sabre, early MiG jets, and Me-262 are
sharks. Others, like the P-47, Hawker Tempest, or English Electric
Lightning resemble burly athletes who can sprint faster than their size
portends. Then there are the killer insects and deadly mantas of modern
jet design.
The Yakovlev-23, aka "Flora" to NATO? A Communist vacuum cleaner? Some weird Elf's silver boot? With its long nose and bubble canopy, however, it’s also clearly built for business. It reminds me of certain X-planes from the US, and one story about a Yak-23 smuggled to Wright-Patterson Air Force Base bears that out. When a group of Sabre pilots asked about the strange jet on the runway, they were told it was an Bell X-5. That plane had variable-swept wings and a canopy up front, but no matter. The ruse worked.
So did the Yak-23, well enough to prepare a generation of Soviet-bloc fighter pilots to fly MiG-15s and ever-faster jet aircraft that followed. Poland had planned to build the fighter under license, but the arrival of the superior MiG-15 made the point moot.
| THE KIT |
 KP’s Yak, molded in white and with petite
raised-panel lines, has been around since 1981, when the Iron Curtain was
still in place and I was failing out of aerospace engineering at UVA. The
kit exemplifies the simplicity of East-Bloc kits from way, way back: under
30 parts, young Comrade. A patriotic worker’s salary could easily handle it.
KP has re-released its Yak-23 several times, most recently in 2017, and as
our editor cautioned me, early-issue decals are transparent but improved
with the reissues. You get decals for natural-metal schemes with Polish,
Czech, and Civil markings. The last represent a record-breaking aircraft. As
Kacper Kolibowski notes for this jet, "On 21st September 1957, Andrzej
Abłamowicz flying the SP-GLK set two world climbing records in this size
class of aircraft: 3,000 metres in 119 seconds and 6,000 metres in 197
seconds."
KP’s Yak, molded in white and with petite
raised-panel lines, has been around since 1981, when the Iron Curtain was
still in place and I was failing out of aerospace engineering at UVA. The
kit exemplifies the simplicity of East-Bloc kits from way, way back: under
30 parts, young Comrade. A patriotic worker’s salary could easily handle it.
KP has re-released its Yak-23 several times, most recently in 2017, and as
our editor cautioned me, early-issue decals are transparent but improved
with the reissues. You get decals for natural-metal schemes with Polish,
Czech, and Civil markings. The last represent a record-breaking aircraft. As
Kacper Kolibowski notes for this jet, "On 21st September 1957, Andrzej
Abłamowicz flying the SP-GLK set two world climbing records in this size
class of aircraft: 3,000 metres in 119 seconds and 6,000 metres in 197
seconds."
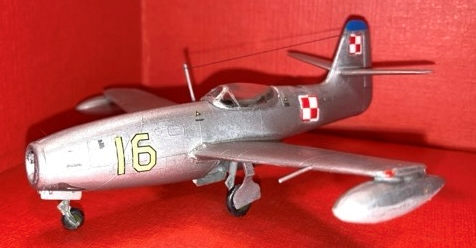
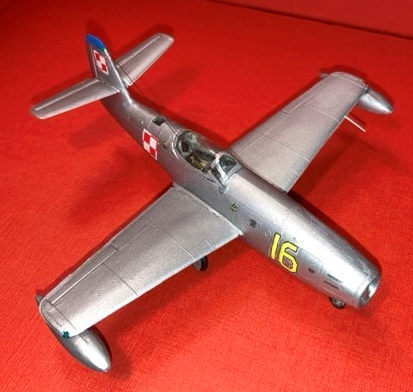
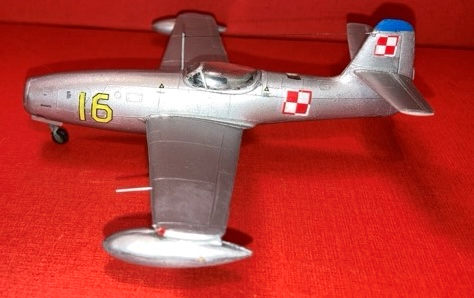
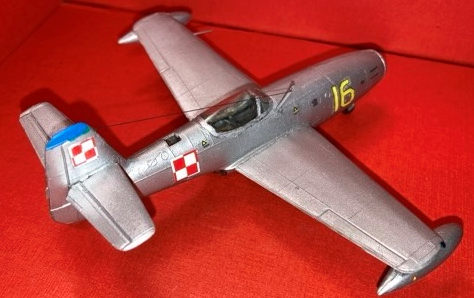
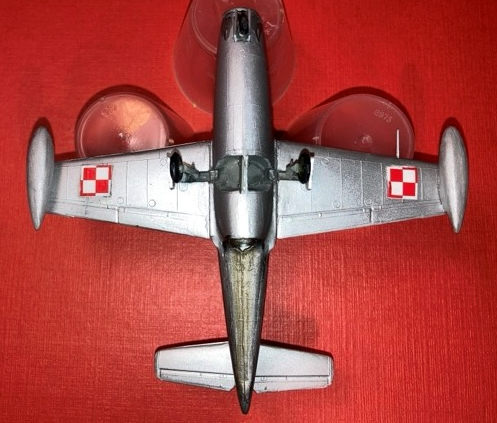
I planned to build the kit mostly OOB as Yellow 16 of the Polish Air Force, currently preserved in excellent condition at Krakow’s aviation museum. I’d have liked to have seen that plane in person in 2006, when I visited the country. I hope to get there again with good friends from Warsaw; one of them is a keen student of former Soviet military equipment from his days as a Young Pioneer.
| CONSTRUCTION |
With so few parts, the instructions contain only four steps. My kit had a lot of flash on its thick plastic parts, and the quite opaque canopy, though fitting better than some reviewers have found, concealed a simplistic interior.
 I began with that cockpit, tarting it up with
masking-tape seat belts, picking out dial faces and controls on the fuselage
sidewalls with a Prismacolor pencil and dry brushing in white. I chose a US
Haze Gray with a bit of blue added initially, but then decided on a darker
gray based on color photos of surviving Yak-23s, especially Yellow 16. Not
much would show through the kit canopy, in any case. It’s the thickest
bubble canopy I’ve ever seen.
I began with that cockpit, tarting it up with
masking-tape seat belts, picking out dial faces and controls on the fuselage
sidewalls with a Prismacolor pencil and dry brushing in white. I chose a US
Haze Gray with a bit of blue added initially, but then decided on a darker
gray based on color photos of surviving Yak-23s, especially Yellow 16. Not
much would show through the kit canopy, in any case. It’s the thickest
bubble canopy I’ve ever seen.
Parts fit mediocre but acceptably, and this plane needs some weight in that long nose. I reload ammo for target-shooting, so a dinged-up .38 special bullet went over the front gear. 125 grains of lead was probably overkill but it gives the tiny kit some heft when I pick it up. The gear legs are short and thick, too, so I’ve no worry about them breaking.
With the fuselage halves in place, the wings and horizontal stabilizers went on easily but left some gaps I had to fill with CA. Likewise the intake at the front. I brushed the canopy with Future and, contrary to my usual habits, attached and masked it as soon as it had dried 48 hours. Leaving off the gear for the moment, I hauled out my airbrush.
| COLORS & MARKINGS |
My wife loaned me a light table she uses for sewing projects, where I traced masters for stencils I would use to retain a white background for the decals. The masters let me mark stencils on yellow Frog tape. These tape stencils went on after I had airbrushed the kit with Mission white primer.
 I wanted to use Mission Duraluminium after fixing
a few seams, but I did not like the result. Thus I resprayed the plane in
Tamiya Bare Metal from a rattle-can. Once dry I found more imperfections;
some additional CA, putty, and paint made the Yak look rather good. The gun
doors, the area aft of the engine, as well as the nozzle itself, got brushed
in Armory gunmetal, thinned a bit. On the real deal a different alloy
beneath the plane prevented over-heating the fuselage. I dry-brushed Testors
Jet Exhaust on the nozzle and along the underside, my one bit of weathering
for this kit.
I wanted to use Mission Duraluminium after fixing
a few seams, but I did not like the result. Thus I resprayed the plane in
Tamiya Bare Metal from a rattle-can. Once dry I found more imperfections;
some additional CA, putty, and paint made the Yak look rather good. The gun
doors, the area aft of the engine, as well as the nozzle itself, got brushed
in Armory gunmetal, thinned a bit. On the real deal a different alloy
beneath the plane prevented over-heating the fuselage. I dry-brushed Testors
Jet Exhaust on the nozzle and along the underside, my one bit of weathering
for this kit.
The thin decals, 1996 issue, proved randomly fragile. I destroyed one of the Polish national insignia completely and stupidly put another on backward. Luckily, I’d been back to Front Line, just in time for their 40% off holiday sale. I snagged their final copy of the Yak-23 with an eye to building the bird on the clear stand included in the box, as tested by the USAF and wearing American markings. The second kit's decal sheet proved more durable. Photos taken in Krakow show lots of small red stencils on Yellow 16. I had only black ones left over from an Airfix F-86, but they nicely varied the metallic monochrome of the plane's fuselage. The tiny Yank decals look Polish enough in 1/72. When they dried, it was time for a top coat of Tamiya Semi-Gloss.
I’ve tried various methods for painting (or using metal foil) on canopy frames, but for this kit I just cut out lots of small Frog-tape semicircles using a stencil-maker. Pressing the tape onto the canopy, I brushed it with Citadel Silver, a wargaming acrylic color so close to Tamiya Bare Metal that I used it to touch up around the decals and in other spots.
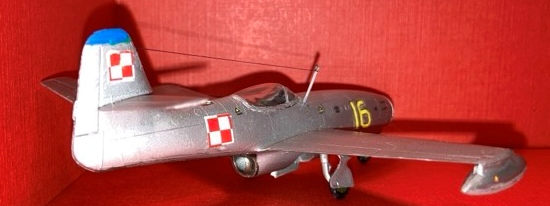 I painted the hubs for the wheels in a dark green
and the top of the vertical stabilizer in a blue close to Yellow 16’s. KP's
illustration of the plane does not show this blue; the plane in Krakow does,
providing more relief from all the bare metal! Flash photography picked up
some unevenness in finish from touching up the wingtip-tanks, but in natural
light it's good enough for the display case! Life is too short and more kits
await.
I painted the hubs for the wheels in a dark green
and the top of the vertical stabilizer in a blue close to Yellow 16’s. KP's
illustration of the plane does not show this blue; the plane in Krakow does,
providing more relief from all the bare metal! Flash photography picked up
some unevenness in finish from touching up the wingtip-tanks, but in natural
light it's good enough for the display case! Life is too short and more kits
await.
By dribbling Testors clear-parts cement/maker, I filled the square opening behind the canopy; my kit either did not include the tiny window or it went missing during the build. I then attached the landing gear, radio mast, and strung a bit of EZ-Line to call Yak’s flying aluminum boot done.
| CONCLUSIONS |
This simple build provided a great deal of fun and only required about six hours of my time, spread over two weeks. The box art seems weirdly nostalgic for a 1981 kit, reminding me of Heller’s and Airfix’s kits from decades earlier. I recommend the Yak for any modeler with an interest in early jets.
There have been some aftermarket options available for KP’s canopy, if you can find them and if you find the kit to your liking instead of the more modern and also inexpensive Special Hobby example in this scale. One caveat there: a review of Special Hobby's Yak, over at Britmodeller, revealed fitment issues though with a nicer canopy. So roll the dice and pick one. A Yak-23 looks great parked next to your Sabres and Mig-15s. I look forward to a quick build of my second KP Yak, sporting USAF livery.
| REFERENCES |
Wikipedia page at https://en.wikipedia.org/wiki/Yakovlev_Yak-23
Kacper Kolibowski, " Yakovlev Yak-23 / Як-23" 15 December 2020 https://afterburner.com.pl/yakovlev-yak-23-%D1%8F%D0%BA- 23/
29 January 2024 Copyright ModelingMadness.com. All rights reserved. No
reproduction in part or in whole without express permission from the editor.
If you would like your product reviewed fairly and fairly quickly, please contact the editor or see other details in the Note to Contributors.