Bandai 1/100 Zaku
by Tom Berto
| THE STORY & BUILD |
Our modeling club decided to do a challenge build three years ago – a shelf-of-doom challenge won by a masterful P-51B. Following that, our youngest member proposed a group Zaku build, which I wasn’t thrilled about. Then, after about thirty seconds, I felt the glow of an idea. I imagined a conversation, well into the future, of the destruction of a statue made from a Zaku II, with the destruction ordered by a general with esoteric literary tastes, and delegated to a major:
- - - - -
“How did it go, Major?”
“Quite well, sir. All goals were met, with only a few hitches.”
“Go ahead and give me a quick walk-through.”
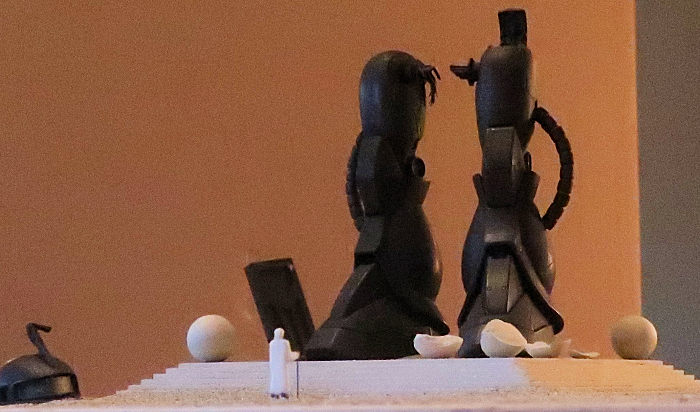
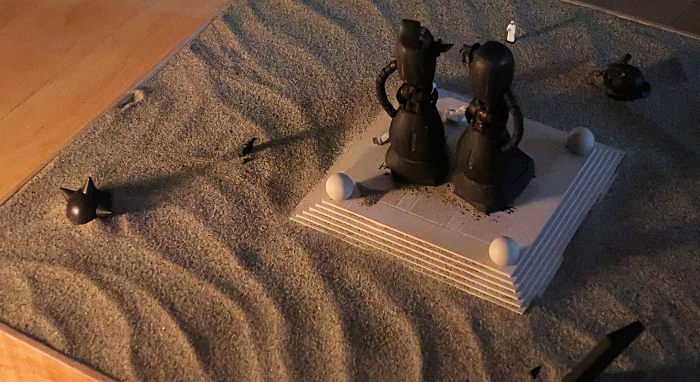
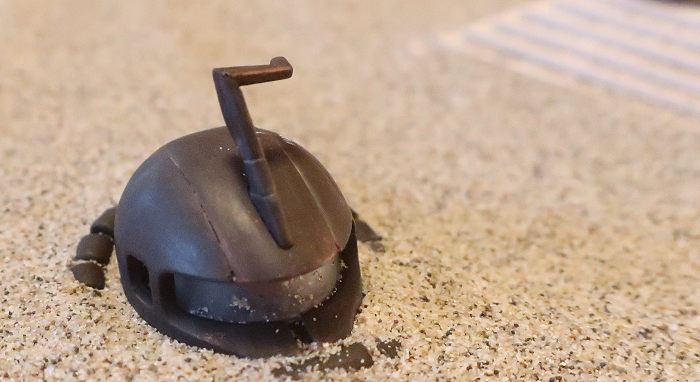
“Yes, sir. As you know, the mobile suit had been there for well over 200 years, but everything held up but the paint and the elastomers. To pose it as a statue, they had welded all of the joints to fixed angles – so we couldn’t just unbolt it to take it apart, and had to resort to explosives. We blew the head off first. It had been gutted, so it was light and flew all the way off the pedestal. It landed crest-first, but rolled mostly upright. It was out of our way, so we left it where it stopped. The shoulder shields also flew a usefully far distance, so we left them where they landed.”
“We lasered off the weapon mockups and blew the arms apart at elbows and shoulders. The left fore-arm embedded itself in the sand and we didn’t have the time to dig it out, so we left that, too.”
“We got the torso out, as directed. Nothing re-usable, but the steel is sound and is on the way to the scrappers, as well as lots of copper from the mains. No fissile material. On the suit’s left we were able to get a clear path with our laser, and got through the power and data cables in one cut. On the right we ripped the torso off the leg, using the crane. The legs are still there, as you specified... and, uh, we were wondering about them, sir. Why are we leaving them?”
“Ever read Shelley, Major?”
“No, sir.”
“Ahh! Well that’s where your answer lies.”
“Thank you, sir. I’ll look her up, and –“
“Him. Percy Shelley. Mary was his second wife. She was a writer, too. But Percy wrote a sonnet that was pretty famous in the day. Would you like to hear it, Major?”
“Uhh – yes sir!”
- - - - - - -
“I met a traveller from an antique land...”
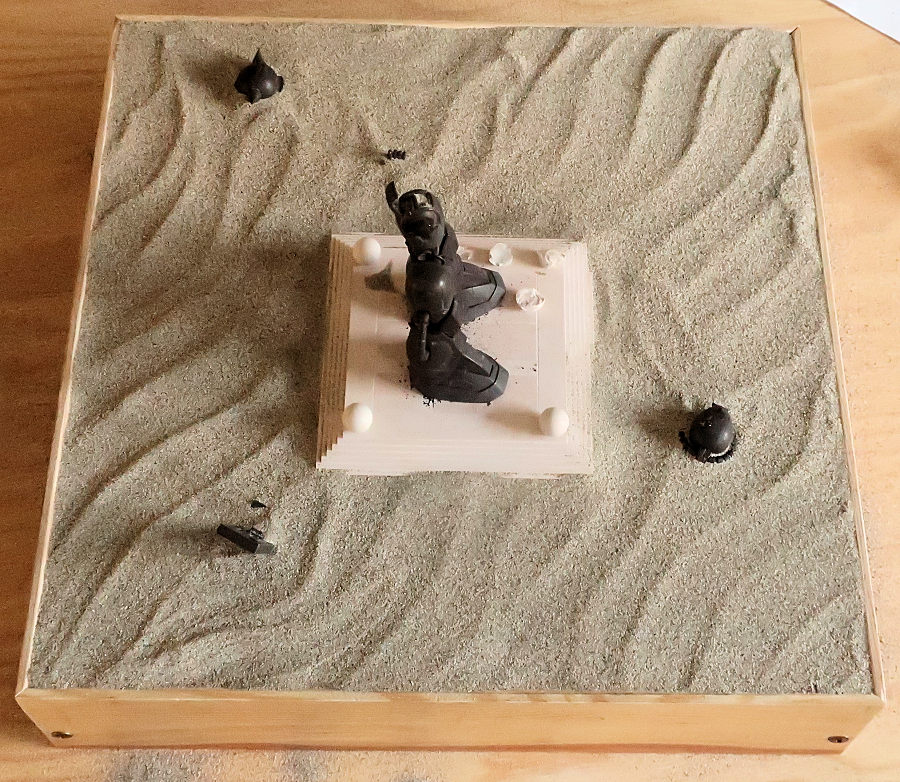
The inclusion of the figure was key to providing scale to the diorama. I didn’t have a suitable Bedouin figure, so I designed one and had a friend 3D print it. Scraping off the usual striations added to the sense of flow in the garment, but it’s no masterpiece. I drilled through the extended hand with a #80 drill, then heated that drill to oxidize it – for use as a walking stick. I printed on a spear-like bottom, so I could poke him into the diorama. He looks on, as if thinking: “I’m here, and you’re not.”
“Who said: Two vast and trunkless legs of stone...”
I bought a Bandai Master Grade MS-06 F/J Zaku II, opened with only a few minor parts missing. The Master Grade scale is 1/100th. A fifty-foot tall Zaku would make a fine statue, erected by some arrogant fascist future blowhard. I saved time, as I didn’t have to build the torso or the weapons – a small part of the appeal of the diorama. And steel, in the desert, takes on a dark satin brown that would be easy to paint. The assembly of the kit parts was trivial, as the parts are designed to press together. Yet they are posable. Here is some serious and subtle mechanical engineering behind making parts which press together, yet are posable – slightly rubbery plastics in the pivots, precise consideration of press fits, friction. I was impressed. I would have liked to have been able to read the instructions, but I blame myself for not knowing Japanese. The parts are numbered on each sprue, like almost any kit, and their shapes have enough variety that it’s only a minor IQ test to assemble these kits from the drawings. I glued the individual segment halves together and sanded/puttied the joints that were supposed to not show (there are definite gaps at some joints). I did not glue the posable joints solid.
To demonstrate the scavenging that happens to anything interesting left untended in the desert, I made a hatch on one of the legs. I got lucky here: the kit came with two central bands for the head, and the unused one was the perfect size and shape to serve as a hatch. This was a late decision – I had already assembled the top of the leg – so cutting into the leg top was a bit more laborious. I carved away the matching pocket from the top of the leg, then boxed it in and detailed it with chunks of plastic sheet and short cut lengths of plastic tube. The tube was a COVID test swab stick – it felt like styrene, looked like styrene, glued like styrene. That positive test resulted in me being “confined to quarters”, but I shook off the virus (Edward Jenner helped), and got my revenge by using the tube as raw material.
I machined leg pivots out of brass and glued them in. On one leg, I stuffed in pieces of insulated copper wire and a piece of plastic tube, then cut then off at an angle, simulating a laser cut. On the other side, I glued in longer wires, then stripped the ends and flayed the conductors, to make them look like mangled power cables.
“Stand in the desart. Near them, on the sand,...”
I made a hollow square wooden shell out of ¾” pine. Each side had a slot near the top that captured a sheet of 1/2” acrylic. Acrylic machines precisely, but doesn’t cost a fortune. Being able to see through it was a bonus. The acrylic would serve as a mount plate for all the other parts, with a ½” hole drilled through for each, and it allowed me to pour on thick layer of sand – but having it near the top meant I didn’t need to use as much sand. I chose sand from the top of a particular dune in the Mojave Desert – choosing the top as I guessed that the top of the dune would have a higher fraction of the smaller grains. The stuff is extremely fine: average grain size appeared to be about 0.012”, or 1.2” in 1/100th scale.. so rocks, not sand. But it fools my eye, and scale sand would be an inhalable health hazard, like glass powder is. After display, the sand is removed from the diorama and put back in the gallon jug which I filled in the desart.
“Half sunk, a shattered visage lies, whose frown,
And wrinkled lip, and sneer of cold command,...”
Zaku heads have a nasty, robo-macho look to them. As if they are frowning. And the lip and the knobby armored cables seem wrinkled, as molded. The only “shattering” I did was to bend the little commander’s crest, by cutting it and gluing it at an angle, an scraping away the plastic to make it look like bent sheet metal. The sort of damage that would occur then the head hit crest first. I sandblasted the clear visor to frost it.
One of the missing parts was the spring that slips under the armor beads, so I wrapped the plastic armature with fine copper wire. The beads (and those on the legs) stand out in this kits, as the only poorly-molded parts – badly formed ends, flash. The beads are slightly different sizes, so for each, I cut off the thread from a long fine screw that was the right diameter to lightly hold the beads, then chucked them threaded rod in a hand drill, and spun it while filing, then sanding the beads to a rounded shape. Deburring and de-flashing these beads would have been drudgery, otherwise. One of the head beads was missing, so I turned one on a lathe.
Other than rusting, the one thing certain to happen to untended steel objects in the desert is that they become targets. They are corroded, and perforated. In this case, I filed a groove in the head armor, to simulate an off-center shot.
The head and all the other parts were mounted on rod of ½” acrylic. I glued acrylic tubes to the underside of the acrylic baseplate. They each had a ½” central hole, were aligned with the holes in the baseplate, and each had a threaded hole in the side for a screw to lock the rod. That way, I could set the parts at any angle or height I wanted, lock them firmly in place, then removed them when I wanted to take store the diorama.
“Tell that its sculptor well those passions read.
Which yet survive, stamped on these lifeless things,...”
Zaku IIs are perfect for use in this particular diorama. With their mech-humanoid heads and bulging mesomorphic limbs, they look nasty, powerful, heartless, and grandiose. Like a military commander who was lord of all he surveyed, and knew it. For a while.
“The hand that mocked them and the heart that fed:..”
‘Mock’ in this case is not referring to ‘mockery’, but was used in the same sense as ‘mock-up’ – so the hands that mocked the Zaku are those of the designers and mold-makers of this kit.. and me.
“And on the pedestal...”
I machined the pedestal out of a piece of ¾” acrylic. The steps are 7” rise and 11” run, or 0.070” x 0.110”. I machined a Balkenkreuz onto the top surface, as a nod to the Germanic leanings of the Zeon. (check out the Zeon flag, if you don’t believe me.. where have you seen that before?). I painted the pedestal with a white/tan mix, going slightly darker on the cross.
A trend in corporate landscaping are huge concrete spheres, as large as 36” in diameter. They are as effective as steel bollards for blocking traffic access, although I’d hate to see one get going down a slope after an earthquake. Of course, the future guy who commissioned the statue had to have extra big balls, so I bought a bag of marbles and picked four that were the same diameter – about 9/16”, or 56” in diameter to scale. I had drilled holes at each corner of the pedestal, and glued these in place after painting them. I wanted one to represent a target that had been blown to pieces, so I taped up one of the marbles, put it in bench vise, and closed the vise until I heard it crack. The glass fractured just like a big stone ball might.
"these words appear:
My name is Ozymandias, king of kings:
Look on my works, ye Mighty, and despair!"
“Ozymandias” is a classic sonnet, written by Percy Shelley in late 1817, about the pharaoh Ramesses II, and about how even the most powerful rulers come to nothing, in the end. It came into more prominence in the United States when it inspired an acclaimed episode of a noteworthy American television series. But I like the poem for its message, and it inspired me in a different way.
“Nothing beside remains...”
Well, no. The shoulder armor of the Zaku is just too interesting – the bent angle-iron on one side, the mace-like thing on the other. So I assembled those, and put them on plexiglas rods as well. I glued one of the Zaku hands to another rod, after cutting off the middle finger tip and replacing it with a made-up imaginary sub-structure. I wanted to have a buried hand, like a desperate creature trying to reach up through the sand.
“Round the decay of that colossal wreck,...”
As noted earlier, steel in the dry desert corrodes to a dark satin brown. I airbrushed flat Testors Rubber (little square bottle), then burnished it and dry-brushed it with copper. I did a pin-wash with rust and tan oil paints, thinned with Turpenoid (thanks, Keith!), learning as I went along. I had never done a pin-wash before, and it struck me as moronic that I was trying it out for the first time right at the very end of this project, which stretched out over 18 months (I finished last).
I painted the pedestal with random bits of the flat rubber, to simulate flakes of rust coming off the legs.
“boundless and bare
The lone and level sands stretch far away.”
17” square will have to do. I positioned the parts and poured in the sand, then screeded it with a straight-edge (my limited concrete-pouring experiences helped here), but there were just too many parts in the way for perfectly flat sand, so I settled on brushing in a set of dune-like ripples with a hake brush. I poked the Bedouin in, looking at the legs while the head looks at him.
- - - - -
“Why, uh, thank you, sir. And, sir, here’s the planter you requested.”
“Oh, well done, Major! It will be perfect for the maple in the lobby at headquarters. How’d you make it?”
“I didn’t have to, sir. It’s the tip of the suit’s left middle finger.”
15 March 2024
Copyright ModelingMadness.com. All rights reserved. No reproduction in part or in whole without express permission from the editor.
If you would like your product reviewed fairly and fairly quickly, please contact the editor or see other details in the Note to Contributors.