| KIT #: | 979 |
| PRICE: | $68.99 |
| DECALS: | One option |
| REVIEWER: | Dan Lee |
| NOTES: |
| HISTORY |
“Now we're sitting on the biggest bomb man's ever made.”
-Commander John Koenig
A line which summarizes the late Gerry Anderson's mid 1970s science fiction TV series, Space 1999. I profess that awful and/or cheesy British science fiction occupies a special place in my heart, top among them Space 1999. It is a very guilty and stupid pleasure, long considered one of the worst SF TV shows of all time because of its butchery of science and logic. Despite that it is also one of the premier shows for actual physical special effects and SF model making thanks to SFX giants like Brian Johnson and Nick Allder.
 The show was
based on the (some might consider delusional and others would say hopeful)
premise that mankind poured resources into space exploration and not weapons (or
dealing with man made financial disasters for that matter) during the 1980s and
1990s culminating with the construction of Moonbase Alpha. Alpha was the hub of
human space exploration as well as the control site for the most dangerous and
toxic garbage dumps in human history which were known as Nuclear Disposal Area
One and the much larger Nuclear Disposal Area Two aka Area One and Area Two.
The show was
based on the (some might consider delusional and others would say hopeful)
premise that mankind poured resources into space exploration and not weapons (or
dealing with man made financial disasters for that matter) during the 1980s and
1990s culminating with the construction of Moonbase Alpha. Alpha was the hub of
human space exploration as well as the control site for the most dangerous and
toxic garbage dumps in human history which were known as Nuclear Disposal Area
One and the much larger Nuclear Disposal Area Two aka Area One and Area Two.
In the Space 1999 timeline (September of 1999, naturally) workers and astronauts were dying because of an unknown radiation (later called magnetic radiation.) This “radiation” caused the nuclear waste in Area One and then Area Two to explode. The latter explosion was enough to send the moon flying out of the Earth's orbit and onto its highly unlikely and improbable journey into deep space.
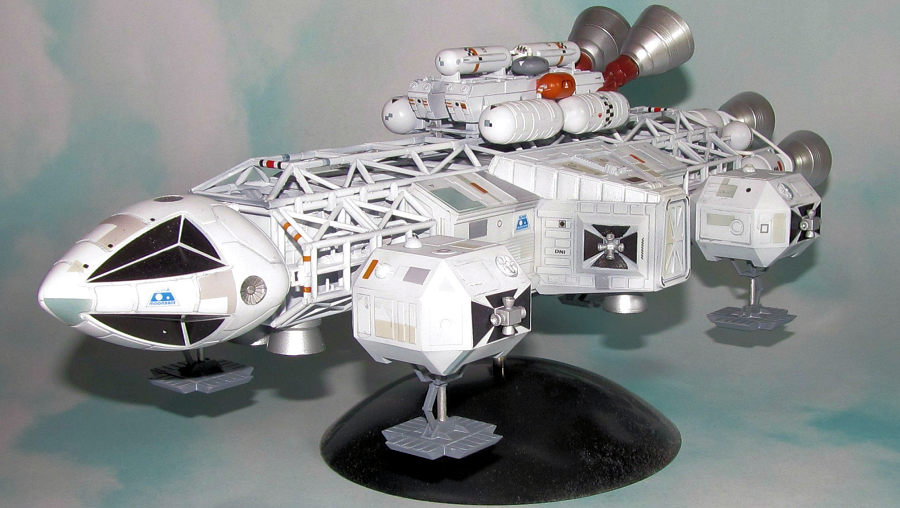
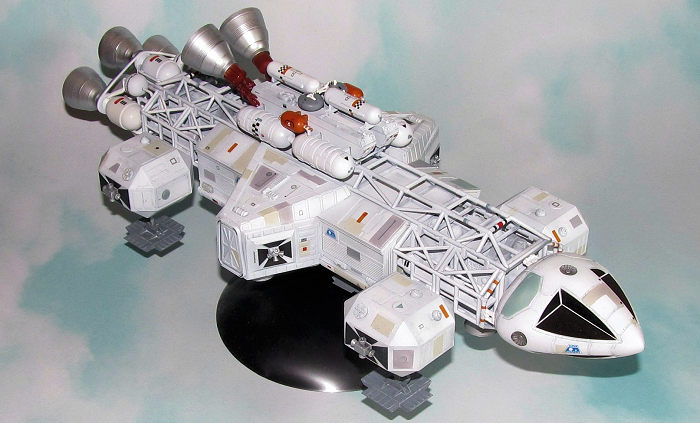
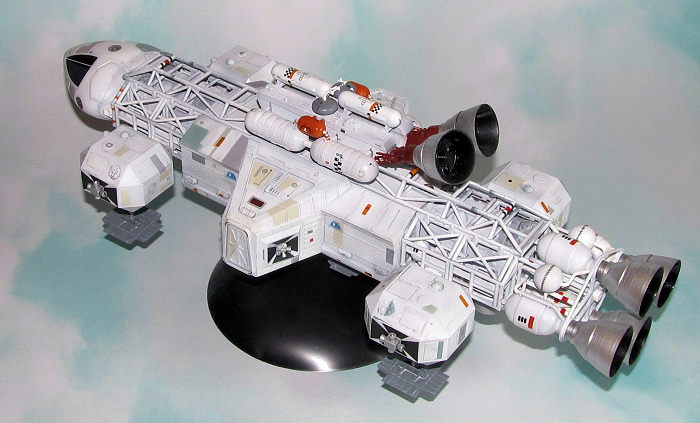
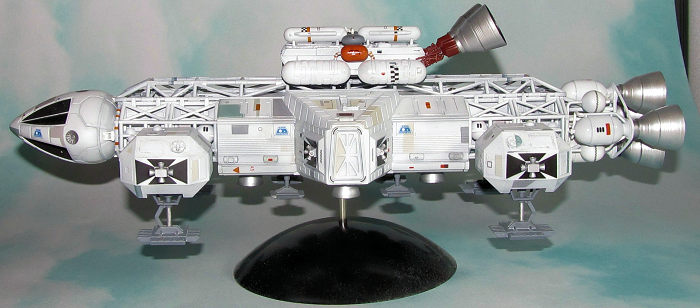
The main attraction for my inner five year old was the spaceships especially the Eagle. Unlike the rest of the show, the Eagle seems like it was designed in a logical and functional manner with a command module, service module which consisted of the frame and four nuclear fusion engines which one could attach a number of different pods to be carried including the following pods: passenger, survey, science, rescue, combat, freighter and cargo.
In the even worse 2nd Season premiere, this Eagle would be shown on screen for the first time and rarely during the rest of the series as it landed on the planet Psychon and they encounter the crazy eyed alien Mentor (Brian Blessed) and his daughter Maya, a shapeshifter who would become the show's female equivalent of Spock.
| THE KIT |
When the series was active, there were several models made including two 1/72 versions of the Eagle which both suffered accuracy issues and from the limitations of molding technology of the time. The original MPC kit is still available, but requires a lot of work (that I don't want to do) to make it close to accurate including cutting out the plastic in between the struts and building new landing gear.
 There has
never been an injection mold version of the Eagle in 1/48 scale till 2015 when
Polar Lights surprised most every Space 1999 fan with their 1/48 scale (or 22”
long) kit. In 2019 Round 2 would release a true 1/72 scale Eagle and in early
2023 would release a 1/72 kit of the Eagle with Lab Pod and Spinal Booster.
There has
never been an injection mold version of the Eagle in 1/48 scale till 2015 when
Polar Lights surprised most every Space 1999 fan with their 1/48 scale (or 22”
long) kit. In 2019 Round 2 would release a true 1/72 scale Eagle and in early
2023 would release a 1/72 kit of the Eagle with Lab Pod and Spinal Booster.
The Eagle kit comes in a large box that is stuffed with some 261 parts on numerous sprues of off white plastic which are for the main body while the engine bell parts and landing gear were on several sprues of a light grey plastic. It also comes with a sprue of clear parts for the command module and passenger module windows. Unlike the 1/48 scale eagle, it does not come with springs for the landing pads. Like the 1/48 kit there is a separate kit for metal engine bells and RCS thrusters, but I didn't purchase it.
An instruction booklet comes with the kit, but the painting/decal instructions are actually on the bottom half of the box so don't throw it away/recycle it immediately. The instructions are clear for the most part so there shouldn't be any issue building it. However, do be careful when assembling the engine pods as the orientation of the parts is critical for smooth assembly.
Finally, there is a rather large decal sheet that will supply most of the generic markings including the Season 2 Moonbase Alpha ID badges as well as random stencil decals to make your Eagle more colorful like the ones seen in Season 2.
| CONSTRUCTION |
I pretty much started this one when I brought the kit home from the hobby shop. The lab pod with airlocks was put together that evening. There were some gaps between the pieces (especially around the airlocks) that needed to be filled with Vallejo plastic putty, but nothing too serious.
Next up were the four landing gear pods. Have to remember that there are slight differences between the forward and rear sets of pods in terms of details and orientation of said parts. That being said, they are a bit less complex than the 1/48 scale pods with springs. In this case, you have two options: landing pads in landing configuration (short) and in flight configuration (long.) I chose in flight as I was going to display it on the stand.
 As with the
1/48 scale kit, the frame was the more fiddly assembly and required a small
quantity of Vallejo putty to seal up all the gaps between the pieces. I did the
same thing I did with the 1/48 scale Eagle which was used cut strips of plastic
card to seal up the underside seams.
As with the
1/48 scale kit, the frame was the more fiddly assembly and required a small
quantity of Vallejo putty to seal up all the gaps between the pieces. I did the
same thing I did with the 1/48 scale Eagle which was used cut strips of plastic
card to seal up the underside seams.
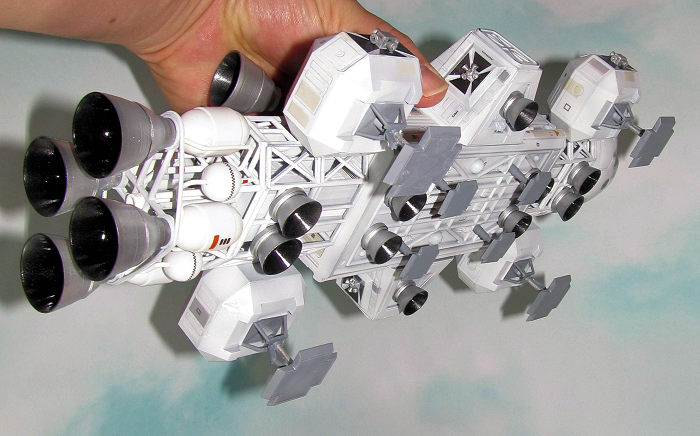
The engine pods were done in the Season 2 configuration which meant I used different parts than what I used for the 1/48 scale kit. The kit provides both S1 and S2 attachment points for the engines. Again, I had a lot of seam filling and sanding to do to remove seams, attachment points and molding marks. I would have to say this took the most effort on the build. External seams were glued together using CA glue and the internal areas were glued with Tamiya Extra Thin Cement.
At the same time I assembled the booster pod doing the same thing as I did with the engines. This one required about the same about of time and effort to clean up the many seams. I worked on the nozzles at the same time. There was a bit of cleaning up of the parts, but I was careful not to wreck any of the detail or mess up the smaller parts.
Lastly, the landing pads were cleaned up, the gaps in the pads were filled and sanded. This meant that all the main subassemblies were done and ready for painting.
| COLORS & MARKINGS |
I sprayed on several coats of flat white as the base coat. I used up roughly a bottle and half of Tamiya Flat White total on this model. I would spend several weeks masking (a half a roll of painters tape) various shapes and painting various colors (for those interested, I used light ghost grey, french creme, RLM65 and a very light grey from Vallejo) on the flat white to get the patchy look I wanted. The booster pack required more painting of various pieces Hull Red and Dark Grey.
 Lastly, the
various engine nozzles were first primed with Tamiya gloss black. Next I sprayed
a mix of Vallejo Air Aluminum and Chrome (not their Metal Color line) for the
boosters, rocket nozzles and OMS nodes. Lastly I masked off the metallic parts
and sprayed the interiors with Tamiya gloss black.
Lastly, the
various engine nozzles were first primed with Tamiya gloss black. Next I sprayed
a mix of Vallejo Air Aluminum and Chrome (not their Metal Color line) for the
boosters, rocket nozzles and OMS nodes. Lastly I masked off the metallic parts
and sprayed the interiors with Tamiya gloss black.
Once the paint was dry, I spent another few weeks decalling the model using many of the Go-Nowhere-Do-Nothing stencils and color patches to give the Eagle the battered S2 look. I used Micro Sol (a half bottle) to get the decals in place.
The command module required several more black decals for the windows and sensors. Unlike the 1/48 scale Eagle, these decals held together and went on without too much issues.
I took Tamiya's light grey and grey premixed panel line wash and used them to dirty up the Eagle a bit. I used a lot of both on the landing pads to show lunar dust and wear. Once the excess was wiped off and dry, I sprayed on Vallejo flat coat on most of the Eagle except the engine nozzles and the booster pack.
Once the painting and decals were done, I glued the various subassemblies together. The most fiddly assemblies were the lab module and the booster pack. Hint, please use the provided screws for the lab module as it is much heavier than the passenger model and prone to coming loose. Once it was put together, I placed it on the stand I have another Eagle for my model collection.
| CONCLUSIONS |
Round 2 should be commended for making these Space 1999 kits. They are well detailed and reasonably easy to build. Unlike the 1/48 Eagle, this one fits more modelers budgets and shelf demands.
Not exactly for beginners, but it is a reasonably easy kit to build requiring some elbow grease and creativity for the markings.
Dan
Lee 26 January
2024 Copyright ModelingMadness.com. All rights reserved. No
reproduction in part or in whole without express permission. If you would like your product reviewed fairly and fairly quickly, please
contact the editor
or see other details in the
Note to
Contributors.