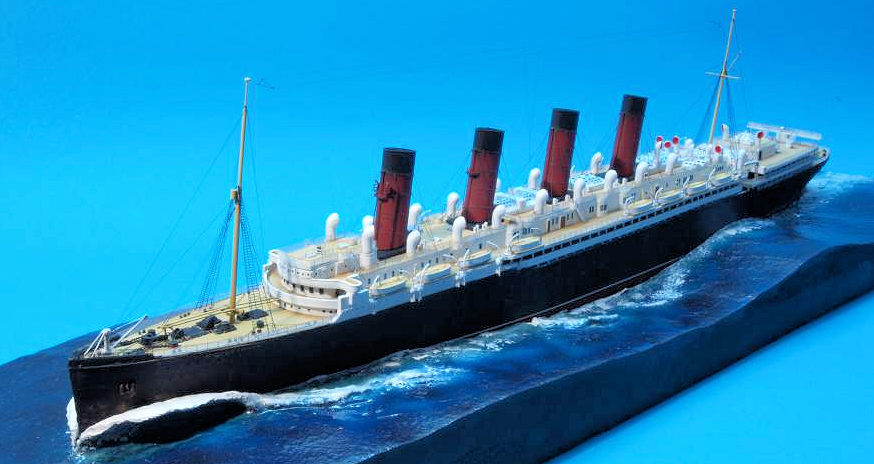
Airfix 1/600 RMS Mauretania
| KIT #: | 04207 |
| PRICE: | |
| DECALS: | |
| REVIEWER: | Frank Spahr |
| NOTES: |
| HISTORY |
Mauretania and her sister ship Lusitania were built for the Cunard Line´s transatlantic service, to counter both the domestic competition of the White Star Line and the foreign competition of the German shipping lines. Both ships were built for size and with luxurious amenities, but with the main focus on a high sustainable speed. The aim was to provide the fastest transatlantic passage and win the „blue ribband“ trophy for this feat. Her near contemporaries, the White Star Line´s trio of Olympic, Titanic and Britannic, less emphasized speed but focused on size and luxury.
The enormous building costs were partly subsidized by a loan from H.M. government which stipulated that in times of war, the vessels should receive guns and be employed as auxiliary cruisers.
Mauretania was built on the Tyne in Newcastle. Her coal-fired powerplant comprised four of the new Parsons turbines. A service speed of 24 knots was part of the government contract. She was laid down on 18 August, 1904 and was launched on 20 September, 1906.
Her trials showed serious vibration issues and made parts of the ship virtually uninhabitable when driven at speed. Several measures were employed to counteract these problems, including internal stiffening and even replacing her screws. She sailed for her maiden voyage on 16 November, 1907. Due to poor weather, she could not sail at full speed and captured the Blue Ribband on her return trip. She would keep it for more than twenty years. She originally sailed from Liverpool via Queenstown (now Cobh in Ireland) to New York.
 Mauretania proved a very popular and long-lived
vessel. During the First World War, she was first laid up, then briefly used as
a troop transport painted dark grey with black funnels. Then she served as a
hospital ship, painted white with a green stripe and buff funnels. During the
later stages of the war she again served as a fast troop ship, painted in two
striking dazzle camouflages.
Mauretania proved a very popular and long-lived
vessel. During the First World War, she was first laid up, then briefly used as
a troop transport painted dark grey with black funnels. Then she served as a
hospital ship, painted white with a green stripe and buff funnels. During the
later stages of the war she again served as a fast troop ship, painted in two
striking dazzle camouflages.
After the war, she was returned to her owners and refitted to her peacetime standard. From 1919 on Cunard ships sailed from Southampton instead of Liverpool.
Cunard was still willing to invest money into an already aging yet popular vessel, both to keep up her speed and her amenities. In 1921, her powerplant was converted from coal to oil. Her turbines were overhauled in 1923. She served on the transatlantic service until 1930, when newer and faster ships replaced her. She kept the blue ribbon from 1907 until 1929, when it was won by the new German liner Bremen. Her last years from 1930 on were spent in the then new business of cruising in warmer climes. In 1932 she was painted white.
The great depression and the merger between Cunard and its main competitor White Star Line brought her end for economic reasons. Amid great public recognition, she sailed on her last voyage. She stopped briefly at the Tyne where she was built, before entering the Firth of Forth. Her masts had been clipped to pass below the Forth bridge on her trip to the breakers´ yard at Rosyth. Numerous items and parts of the furnishings of the beloved ship were auctioned off. They found their way into private collections and even into the interiors of various houses, a cinema and a pub.
| THE KIT |
 This kit was first produced in 1964 and is a typical
example of that age. It is broadly speaking correct, yet lacking in detail and
with some accuracy issues. Smaller items such as lifeboats, cranes, masts and
air vents are on the clunky side, but there´s more. If you read some of the
analyses available on the net these days, you can but despair and would rather
spend your time collecting stamps or knitting. From the too blunt shape of the
bow to the too pronounced shape of the stern, there is virtually nothing that is
really correct. A common issue with older kits arises from the (exaggerated)
thickness of the individual decks. That leads to too low bulkheads and is fairly
hard to correct. You would have to rebuild the upper half of the ship with new,
thinner decks and higher bulkheads to address this issue. That a lot of the deck
details fore and aft are spurious is a mere side issue.
This kit was first produced in 1964 and is a typical
example of that age. It is broadly speaking correct, yet lacking in detail and
with some accuracy issues. Smaller items such as lifeboats, cranes, masts and
air vents are on the clunky side, but there´s more. If you read some of the
analyses available on the net these days, you can but despair and would rather
spend your time collecting stamps or knitting. From the too blunt shape of the
bow to the too pronounced shape of the stern, there is virtually nothing that is
really correct. A common issue with older kits arises from the (exaggerated)
thickness of the individual decks. That leads to too low bulkheads and is fairly
hard to correct. You would have to rebuild the upper half of the ship with new,
thinner decks and higher bulkheads to address this issue. That a lot of the deck
details fore and aft are spurious is a mere side issue.
On the plus side, my copy did not suffer from mould damage issues reportedly found on more recent pressings.
Well, I got this kit as a present many moons back. Being an incurable Airfix addict of limited devotion to accuracy and equally limited skills, I decided to make my personal best of the kit and leave perfection to those that have the means to achieve it.
The kit comes with a small decal sheet, of which only the ship´s names turned out to be usable. The draught marks were non-existent.
| CONSTRUCTION |
I started with assembling the hull halves and gluing some styrene stock to the inside of the hull to accept the mounting screws used during construction. Quite early on I started work on the base in my usual manner. I aimed at a strong swell, as I wanted to show that these vessels had to cross the unforgiving North Atlantic in virtually any weather. For the same reasons, I later added storm covers to the bridge windows and weathering to the hull. Far from being mere pleasure boats despite their unrivalled luxury, these ships were „The only Way across“ in their time, and their hulls showed it after a stormy crossing.
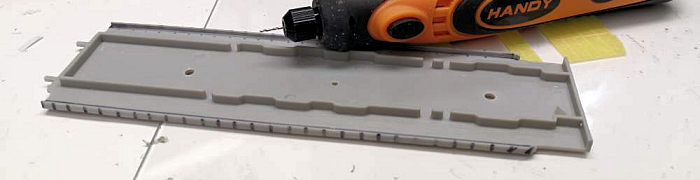
I had decided to add some structure to the hull. So I first drilled open all the (very many) portholes, first using an unwieldy drill from my general tools, until I bought a really nifty small battery operated cordless, USB-rechargeable tool at a model show. That proved to be incredibly useful, as there were a few hundred holes ahead yet.
 I chose not to correct the number and location of the
molded-on portholes, access doors and other details. I did fill the bow with
resin, though, and spent some time sanding it aiming at a sharper shape. I also
filled the very large mounting holes for boat davits in the hull.
I chose not to correct the number and location of the
molded-on portholes, access doors and other details. I did fill the bow with
resin, though, and spent some time sanding it aiming at a sharper shape. I also
filled the very large mounting holes for boat davits in the hull.
Then came the interesting part. I had bought thin self-adhesive aluminum tape and cut that to size to simulate hull planking sheets. I only added the upper of the two alternating layers of sheets, using Q-tips or a fibre glass eraser to burnish the individual pieces to the hull. The portholes were pierced with a steel pin. The result was anything but perfect, but I was reasonably happy with it.
Parallel to that, I worked on subassemblies such as the funnels and the boats. As always, I tried to achieve a consistent level of detail throughout the model and a pleasing result, but not the extreme level of detailing others achieve. So I did not add interiors to the boats, I just cleaned them up a bit and added „canvas covers“ from a thin wire mounted centrally and white glue for the rest. The funnels received some details to make them a bit more credible, but by far not all they actually had.
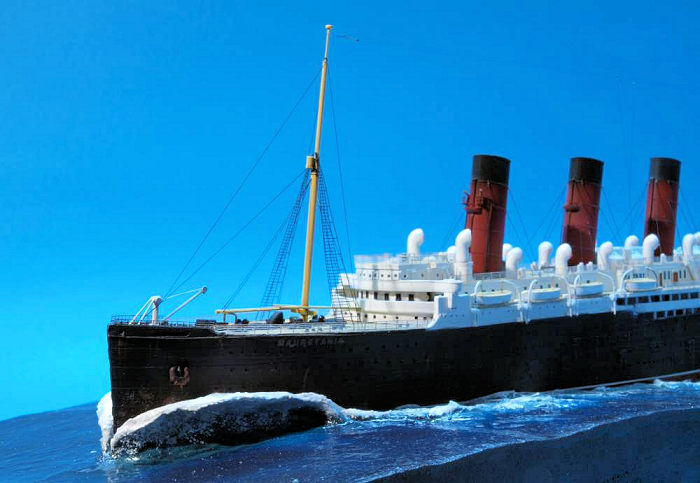
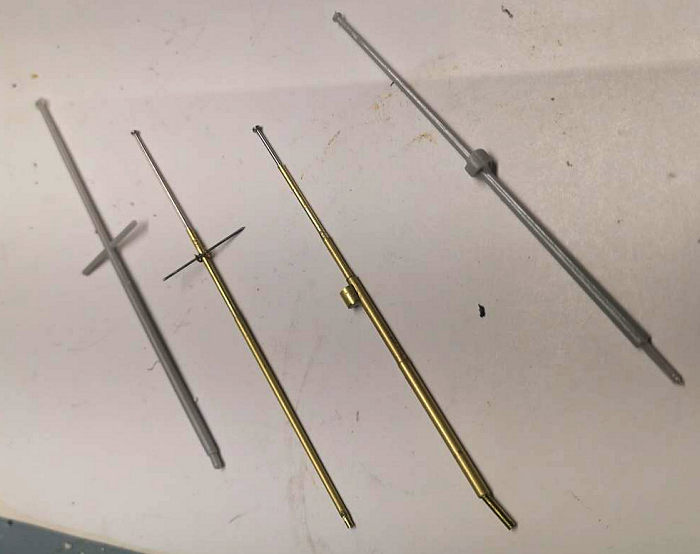 I redid the masts from a variety of brass stock,
aiming at stability and a thinner and more scale-like result. In the end, I had
to redo the foremast to make it a bit thinner yet.
I redid the masts from a variety of brass stock,
aiming at stability and a thinner and more scale-like result. In the end, I had
to redo the foremast to make it a bit thinner yet.
The numerous cowl vents were cleaned up and drilled out to give the opening a more scale-like appearance. The prominent bracing of the larger vents was added from stretched sprue, tedious but necessary.
I chose not to replace or further detail the numerous skylights, but just to paint them as good as I could.
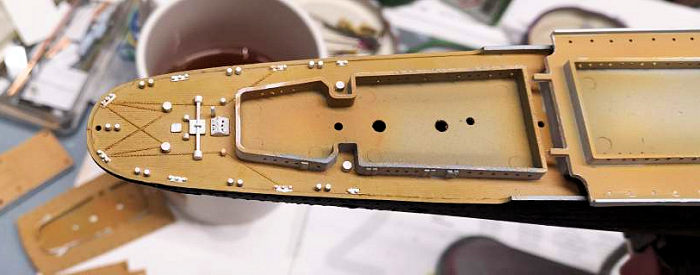
A lot of work went into the very numerous interdeck stanchions. I added these after drilling holes through the next deck level and threading .5 mm styrene rod pieces through them. Those trimmed, the remaining depression was filled with white glue and painted over. I was very happy with my battery-operated handpiece now.
The hull and the various prepared deck sections were sprayed with primer and then sprayed or painted with the requisite acrylic shades. The hull isn´t pure black, but a touch lighter, and has had some drybrushing done to enhance the hull structure. I used the salt chipping technique to simulate the rather intense paint chipping around the bow.
Now I could start assembling the various sections, not without fit issues and corrections. I needed to start adding railings early on, as some areas would become inaccessible pretty soon. That obviously meant more care was needed to avoid damage.
 Construction proceeded quite nicely during March and
April 2023, but then ground to a halt and I only did some more work in August. I
wasn´t quite happy with the massive bow wave and reduced that in size and
thickness, and was wondering about making boat davits, rigging and especially
the ratlines. In the end, I procrastinated quite a while.
Construction proceeded quite nicely during March and
April 2023, but then ground to a halt and I only did some more work in August. I
wasn´t quite happy with the massive bow wave and reduced that in size and
thickness, and was wondering about making boat davits, rigging and especially
the ratlines. In the end, I procrastinated quite a while.
Until at some point I regained the initiative and ordered the GMM PE set for 1:600 liners which includes the requisite ratlines, crane details and boat pulleys, plus antenna spreaders. So I was able to continue by making boat davits and their supports from wire and styrene stock, at a height that would conform to the PE boat pulleys.
Working from the center to the periphery of the model, I first added funnel stays from .1 mm nickel silver wire from Albion Alloys, and afterwards added the numerous railings and inclined ladders on the superstructure. Then came the boats and their handling gear, including representations of scrambling nets.
 Having completed the middle part of the model, I
turned towards the forecastle and added fine anchor chain and chain stoppers,
plus derrick supports and a homemade anchor crane as the kit part was pretty
clunky. Now I could add my prepared mast together with the four loading derricks
stowed away and their rigging. I followed suit with the stern details and the
aft mast.
Having completed the middle part of the model, I
turned towards the forecastle and added fine anchor chain and chain stoppers,
plus derrick supports and a homemade anchor crane as the kit part was pretty
clunky. Now I could add my prepared mast together with the four loading derricks
stowed away and their rigging. I followed suit with the stern details and the
aft mast.
The masts were now rigged using the PE ratlines, thin UNI thread and thin wire. That achieved, I added the fore and aft railings. The last iffy item was the wireless aerial. I made a jig from foam board for the GMM PE parts which were rigged with UNI Caenis. After that was done, the prepared aerial was fixed to the masts and wires were added to the wireless shack between the funnels.
I then did several rounds of paint touchups and some weathering using artist´s oils, and finally added a good coat of Winsor & Newton´s acrylic flat to blend it all in.
The base had been completed in my usual technique and glosscoated with Liquitex High Gloss varnish. The model was now placed on the base and any remaining gaps filled with acrylic gel and cotton wool. I was quite relieved once the model was safe on its base and inside its display box.
| CONCLUSIONS |
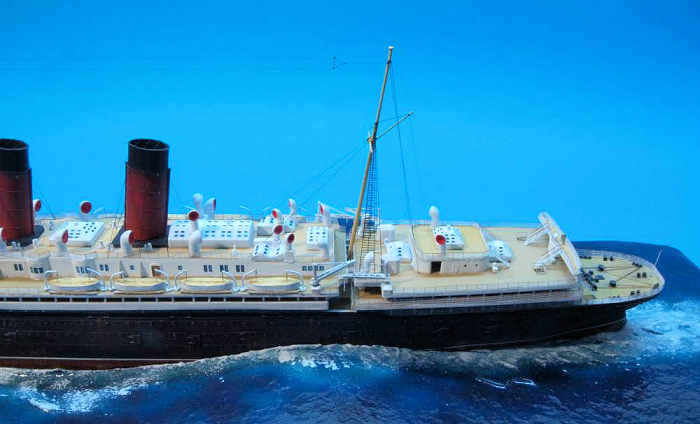
It was another project of what suits me best these days, taking a vintage kit and seeing what I can do with it. Despite the lengthy pauses I very much enjoyed this project, trying to find my own solutions and techniques. I like the look of the finished model, and it´s one you rarely see so it´s something special.
| REFERENCES |
https://en.wikipedia.org/wiki/RMS_Mauretania_(1906)
Maxtone-Graham, John: The only way across. New York 1972
Layton, J. Kent: The Unseen Mauretania 1907. The ship in rare illustrations. Cheltenham 2015
25 March 2024 Copyright ModelingMadness.com. All rights reserved. No
reproduction in part or in whole without express permission. If you would like your product reviewed fairly and fairly quickly, please
contact
the editor
or see other details in the
Note to
Contributors.