Kinetic 1/48 Mirage 2000D/N
| KIT #: | K48120 |
| PRICE: | 90$ |
| DECALS: | Two options |
| REVIEWER: | Francisco Santoro |
| NOTES: | Poor fit in areas, weak landing gear |
| HISTORY |
 The Mirage 2000 was the
successful attempt by Dassault to create a Fourth Generation Fighter and work as
a replacement to the legendary Mirage III. It first flew in 1978, and was
introduced into service in 1984. The 2000N and D variants are dedicated attack
aircraft. The N was designed as a two sitter nuclear bomber (retired in 2018),
while the D was the conventional attack version developed from the N. In total,
according to Wikipedia, 601 Mirage 2000s were manufactured. Users of the
aircraft were/are the Greek Air Force, UAE Air Force, Indian Air Force and, of
course, the French Air Force.
The Mirage 2000 was the
successful attempt by Dassault to create a Fourth Generation Fighter and work as
a replacement to the legendary Mirage III. It first flew in 1978, and was
introduced into service in 1984. The 2000N and D variants are dedicated attack
aircraft. The N was designed as a two sitter nuclear bomber (retired in 2018),
while the D was the conventional attack version developed from the N. In total,
according to Wikipedia, 601 Mirage 2000s were manufactured. Users of the
aircraft were/are the Greek Air Force, UAE Air Force, Indian Air Force and, of
course, the French Air Force.
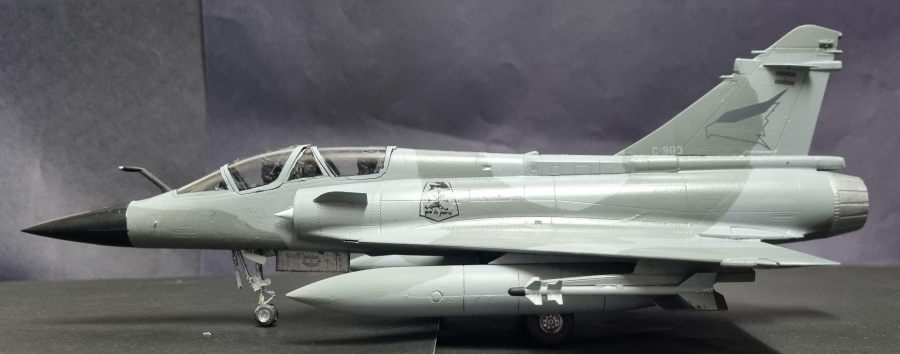
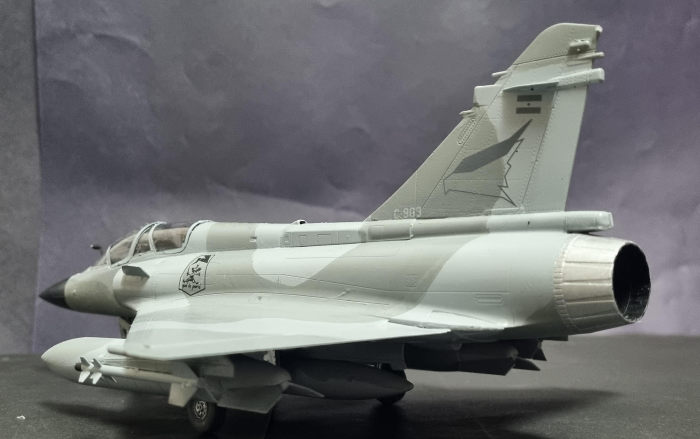
Now comes the what if part. After Malvinas, well entered the XXI Century, Argentina sought a replacement aircraft for the aging Mirage IIIEAs and CJs, and the Mirage 2000C was considered. However, British embargo on their parts made this task impossible. But, what if Argentina got the Mirage 2000C and D for its Air Force? Here’s the result of my idea, an Argentinised version of the Mirage 2000D.
| THE KIT |
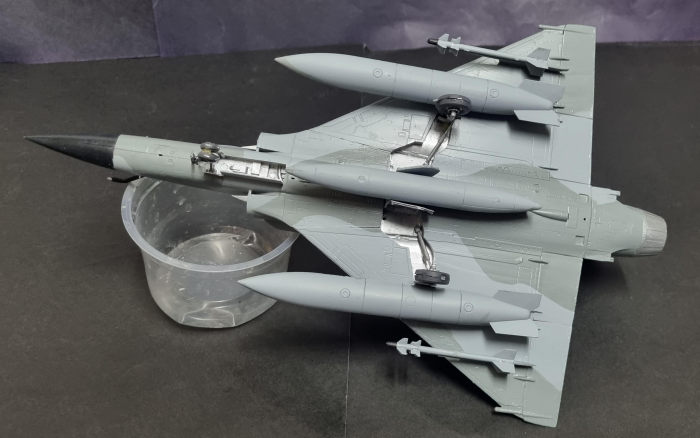
The box is filled to the brim with sprues. They’re individually bagged, which avoids damage when the kit is moved (learn from this Hasegawa and Airfix). Parts are molded in a hard, light grey plastic. Some flash and annoyingly placed ejection pins are featured in the kit. Decals are from Cartograf, and there’re four options. Instructions are in black and white with clearly defined construction steps. If you like to load your plane with as many underwing stuff, then this kit is for you, with three external fuel tanks and plenty of missiles and bombs.
| CONSTRUCTION |
 I began by painting most of
the small parts on the sprues. Cockpit and other parts of it were painted matt
black (Revell Aqua 08 Matt Black), landing gear struts and inside of the gear
doors in silver (Revell Aqua 90 Silver). Before gluing the seats, I had to
remove two large ejector pins from the bottom of the cockpit tub. This proved
difficult because I lacked moving space. The pilot seats were painted matt black
with Olive Drab (Revell Aqua 66 Olive Grey) cushions and yellow ejection handles
and glued to the cockpit tub.
I began by painting most of
the small parts on the sprues. Cockpit and other parts of it were painted matt
black (Revell Aqua 08 Matt Black), landing gear struts and inside of the gear
doors in silver (Revell Aqua 90 Silver). Before gluing the seats, I had to
remove two large ejector pins from the bottom of the cockpit tub. This proved
difficult because I lacked moving space. The pilot seats were painted matt black
with Olive Drab (Revell Aqua 66 Olive Grey) cushions and yellow ejection handles
and glued to the cockpit tub.
With the cockpit dry and every part of it glued together, I dry fitted it to the fuselage halves. Fit was nice, and the cockpit floor served as a roof for the nose gear well. I glued the cockpit and added 25 grams of lead behind it. Once the lead weight glued had dried, I glued the cockpit and nose gear well to one fuselage side, and then added the other fuselage half. This assembly was secured with tape. While the fuselage cured, I glued the vertical stabilizer. This part was also taped to prevent misalignment.
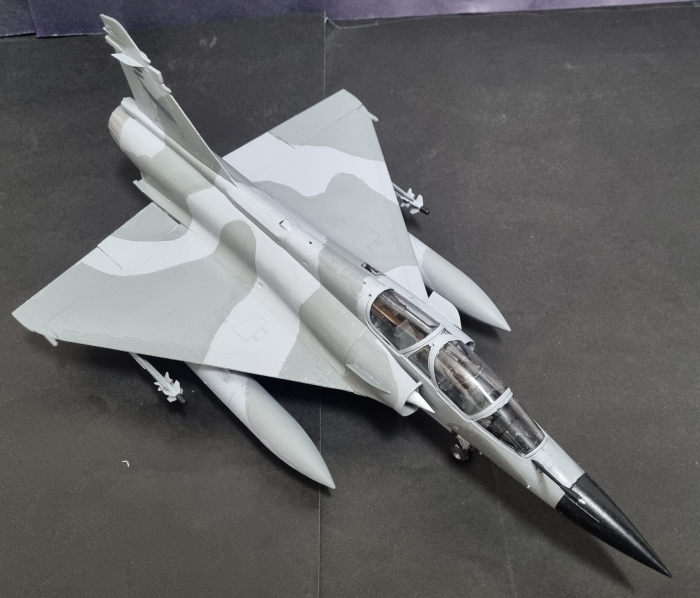
The wings came next. You have the option to display the ailerons in the down or neutral position, with actuator hinges provided accordongly. Wings come as three big parts, a single piece lower wing and two upper wings. Dry fitting showed some gaps, and the culprits were the flash protruding above the ejector pin marks. With these eliminated, the wings fitted nicely. I then glued the flaps and added the hinges.
I dry-fitted the wings to the fuselage. Fit was horrible, with big gaps in the fuselage/wing joint, and a big step in the lower union between the lower wing and fuselage. After much sanding, I was able to eliminate the gaps on the upper surfaces, but a gap showed up on the undersides. This was filled with Vallejo’s putty. Then I glued the spine and other smaller parts that I think would be really boring to describe. The nose cone was glued (not without steps) and the exhaust can was added. The intakes were then assembled and glued in place.
| COLORS & MARKINGS |
 I had two options as far as
camouflage goes: Either an all light grey plane as the Mirage IIIEAs were, or
the more interesting two greys scheme featured in the A-4ARs. I chose the
latter. I painted the aircraft with Revell 76 Light Grey and 43 Neutral Grey.
The nose cone was painted matt black and the exhaust nozzle in Revell Aqua 90
Silver. The model was then coated with Revell Aqua 01 Gloss Varnish. For the
markings, I used Aerocalcas’s sheet 48012, that comes with three A-4AR numerals,
one of these is C-903, a two sitter Fightinghawk. The decals are very thin and
like to stick to the surface, giving you no chance of moving them to the correct
position. After decalling, I matt coated the model with Revell Aqua 02 Matt
Varnish.
I had two options as far as
camouflage goes: Either an all light grey plane as the Mirage IIIEAs were, or
the more interesting two greys scheme featured in the A-4ARs. I chose the
latter. I painted the aircraft with Revell 76 Light Grey and 43 Neutral Grey.
The nose cone was painted matt black and the exhaust nozzle in Revell Aqua 90
Silver. The model was then coated with Revell Aqua 01 Gloss Varnish. For the
markings, I used Aerocalcas’s sheet 48012, that comes with three A-4AR numerals,
one of these is C-903, a two sitter Fightinghawk. The decals are very thin and
like to stick to the surface, giving you no chance of moving them to the correct
position. After decalling, I matt coated the model with Revell Aqua 02 Matt
Varnish.
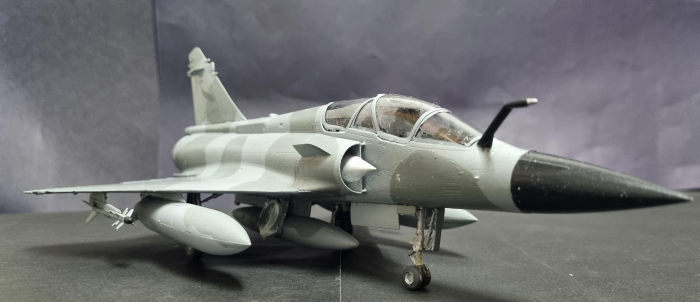
The landing gear was glued. It doesn’t have a very strong friction grab, so I was careful to align them properly. The nose gear is made of three parts: the main leg, the wheel strut and the retraction arm. When the glue had cured, I turned the model upside down. Seeing the struts wouldn’t hold on the long run, I applied some epoxy glue and left it to harden. The wheels were then added. Clear parts were glued with white glue in the closed position. The model was finished.
| CONCLUSIONS |
 I now have two Mirage
2000s. One from Monogram and this one. While the Kinetic kit may be more
detailed (and more expensive), the Monogram kit has the upper hand in fit,
something I think is more important than detail. The landing gear on the
Monogram kit is stronger and fits without risking collapse. The Kinetic kit has
more armament, that’s a plus, and is something I’ve seen the brand do. My
verdict: the Kinetic kit is a mixed bag.
I now have two Mirage
2000s. One from Monogram and this one. While the Kinetic kit may be more
detailed (and more expensive), the Monogram kit has the upper hand in fit,
something I think is more important than detail. The landing gear on the
Monogram kit is stronger and fits without risking collapse. The Kinetic kit has
more armament, that’s a plus, and is something I’ve seen the brand do. My
verdict: the Kinetic kit is a mixed bag.
| REFERENCES |
Wikipedia: https://en.m.wikipedia.org/wiki/Dassault_Mirage_2000
22 January 2024
Copyright ModelingMadness.com. All rights reserved. No reproduction in part or in whole without express permission.
If you would like your product reviewed fairly and fairly quickly, please contact the editor or see other details in the Note to Contributors.