| KIT #: | 9071 |
| PRICE: | $30.00 when new |
| DECALS: | Three options |
| REVIEWER: | Spiros Pendedekas |
| NOTES: |
| HISTORY |
 The origins
of the Tu-22M can be traced back in 1962, when its ancestor, the Tu-22
“Blinder”, by that time introduced in service, was found to be a handful to fly
and, especially, to land, let alone it had serviceability issues. Tupolev Design
Bureau immediately commenced work on a major update which would, at least,
feature a variable-sweep wing and uprated engines. Wasting no time, the company
very soon tested the new design at TsAGI Zhukovsky wind tunnels.
The origins
of the Tu-22M can be traced back in 1962, when its ancestor, the Tu-22
“Blinder”, by that time introduced in service, was found to be a handful to fly
and, especially, to land, let alone it had serviceability issues. Tupolev Design
Bureau immediately commenced work on a major update which would, at least,
feature a variable-sweep wing and uprated engines. Wasting no time, the company
very soon tested the new design at TsAGI Zhukovsky wind tunnels.
With the Sukhoi T-4 project (essentially a response to XB-70 Valkyrie) going by
those times full steam ahead (though later canceled) and the Soviet government
being skeptical on approving an essentially new design so soon after the Tu-22
Blinder had entered service, it is reported that Soviet Air Force and Tupolev,
in order to save face regarding the Blinder’s operational deficiencies and to
stave off criticisms from the ICBM lobby, somehow agreed to pass off the clearly
new project as merely an update of the Tu-22 in their discussions with the
government, the latter granting approval on 28 November 1967.
By all means a new design, only loosely derived from the existing Tu-22 and
using elements from the abandoned Tu-98 (a projected aircraft intended to
replace the Tu-16), the type embodied swing-wing technology, which, for the
time, was among the solid choices of the designers in order to offer short
take-off performance, efficient cruising and good high speed/low level flying
characteristics to the slender but big, heavy airframe.
Initially named Samolyot 145, the plane was given the designation Tu-22M,
indicating it was a derivative of the existing Tu-22. As indicated by sources,
apart from the aforementioned “easiness” to get approved budgets, another
possible reason for giving the above designation was the deliberate hiding of
the aircraft’s performance. It is also believed that the B/C production variants
were designated Tu-26 by the USSR.
The West became aware of the type’s existence not long after the first
pre-production machines were manufactured, with US Intelligence wondering how
this project was approved by the “ICBM by heart” Nikita Khrushchev, who more or
less considered the conventional bomber doctrine obsolete.
 First used
in combat in Afghanistan and capable of dropping large tonnages of conventional
ordnance, the aircraft bombed enemy forts, bases and material supplies. In
October 1988 it was again deployed against the Mujahideen to provide cover to
Soviet forces that were pulling out of the country. The Russian Federation used
the Tu-22M3 in combat in Chechnya during 1995, performing strikes near Grozny
and later in the Syrian civil war and the invasion of Ukraine.
First used
in combat in Afghanistan and capable of dropping large tonnages of conventional
ordnance, the aircraft bombed enemy forts, bases and material supplies. In
October 1988 it was again deployed against the Mujahideen to provide cover to
Soviet forces that were pulling out of the country. The Russian Federation used
the Tu-22M3 in combat in Chechnya during 1995, performing strikes near Grozny
and later in the Syrian civil war and the invasion of Ukraine.
The type inherited its ancestor's poor serviceability and during its service
with the Soviet forces suffered from widespread maintenance problems, attributed
to poor manufacturing quality, with the engines and airframes in particular
having short service lives. While the actual story is quite complicated and
further augmented by the government bureaucracy, which hampered the provision of
spare parts to allow the servicing of the Tu-22M, the net result was that
aircraft grounding time would rise as high as six months, with the reported
availability of the fleet being much lower than 40% in August 1991.
A number of modernization projects have been envisaged, with the most
significant ones being the “3M” mid-life upgrade, signed in September 2014 and
the simpler SVP-24-22, being carried out in 2018.
An impressive sight, this big, aesthetically pleasing bomber is, as of 2023,
still a solid asset, possessing certain favorable capabilities. Production of
all Tu-22M variants totalled 497, including pre-production machines.
| THE KIT |
Esci came in 1989 with
its 1/72 Tu-22M/Tu-26 “B” (the M2 version featuring “F-4” style intakes),
followed by the “C” (the M3, with the “F-14” style intakes) soon after. They
were occasionally reboxed through the years by AMT who had bought Esci, with the
latest reboxing being the 2003 “M3” version by Italeri.
Though lacking in accuracy, these were not bad kits, featuring good molding,
adequate (for the time) detail and, despite the model’s size, offering quite
pleasant, uncomplicated builds. The lack of accuracy in areas was not a too
uncommon trait for USSR models of that era, since access to aircraft details was
minimal, with the kit designers working with whatever reference they had
available and, nevertheless, it is not an “inaccurate” model, looking the part
for sure.
The specific kit is the late 90’s “C” version, bought from a sadly now closed
Athens hobby shop at the very reasonable price of $30 back then and for a more
in-depth look at its contents, you may read its preview found
at the ever growing MM archives.
| CONSTRUCTION |
I started by putting
together the generic cockpit, mainly attaching the instrument panel, yokes,
seats, rear crew stations, rear bulkhead and all four seats onto the cockpit
floor that doubles as a nose wheel well. The cockpit was then trapped between
the front fuselage halves, which had the two small rear crew windows attached
from the innards beforehand.
Though instructions called for light gray, I decided to go with a turquoise
shade (Revell 365 Patina Green) as my basic cockpit color, since it was commonly
found on the Russian jets of the 70s-80s. The seat cushions, yokes, instrument
panel and consoles were painted black. I did not bother further detailing the
nevertheless simplistic and totally fictitious cockpit, as nothing but some
“busyness” was expected to be visible through the thick transparencies.
Moving to the aft fuselage section, I took the decision not to attach the
centrally mounted Kh-22 missile, meaning I had to somehow fill the recessed
belly area, as it looks in reality when the missile is not loaded. To do so, I
cut a suitable flat styrene sheet piece and attached it after a trial and error
procedure.
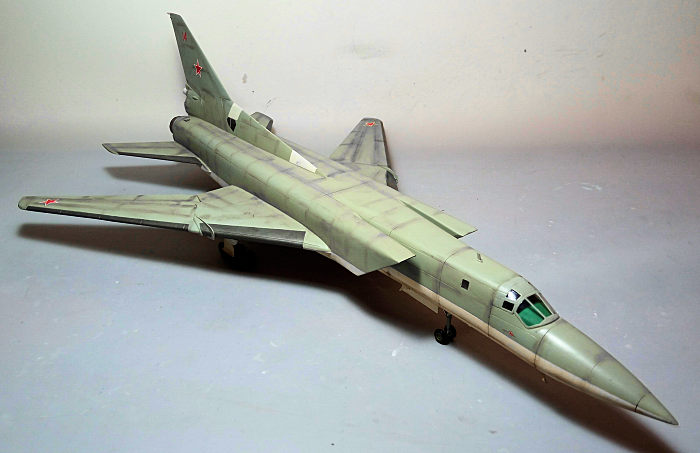
The movable sections of the main wings were next assembled and affixed onto the
lower rear fuselage half. Whereas these wing kit parts are designed to be
movable, I noticed that there would be some overall slack that would compromise
alignment, let alone the fact that I was worried with sagging over time, so I
took the decision to permanently glue the outer wings in retracted position (a
personal preference) and somehow reinforce the non visible part of the joints
with sprue pieces, before attaching the non-moveable wing parts and the top
fuselage section. The pair of 2-piece wing mounted missile pylons were finally
attached in place.

Next was assembly and attachment of the fin and tail planes, the latter laying
onto some sort of filet-like fairings glued to the fuselage sides. The top
munted afterburner cooling scoops were glued at this time, as well, with the
front and rear fuselage sections then glued together.
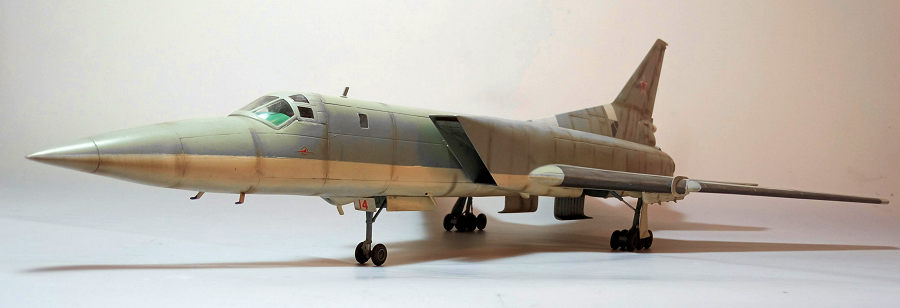
The 2-piece air intakes were assembled and attached in position. In order to
represent the distinctive intake ramps (usually seen retracted upwards upon
engines’ shutdown), I glued two pieces of fine mesh cut to size onto the upper
wall. All intake innards were painted light gray, apart from the rear bland
section that was painted black to add a sense of depth.
Since the kit-provided underside front entry hatch is fictional (the crew enters
their seats through individual top opening doors located at the fuselage), I
glued it shut, then filled and sanded the area flat. The two piece nose was
assembled and attached. Though instructions stated 35g, some 50g of fishing
weight were trapped in, just to be on the safe side, since the nose landing gear
seemed quite capable to withstand the extra weight. Finally, the 2-piece
underwing pylons and the ventral observation cupola were attached in place.
This concluded basic assembly, which was easier than expected for a twin engine
variable sweep bomber (the kit's overall simplicity definitely played its role
here), with overall fit, while not "Tamiya", being acceptable. After some
filling and sanding here and there (nothing too serious), I blanked the cockpit
with wet tissue and took the big bird to the paint shop!
| COLORS & MARKINGS |
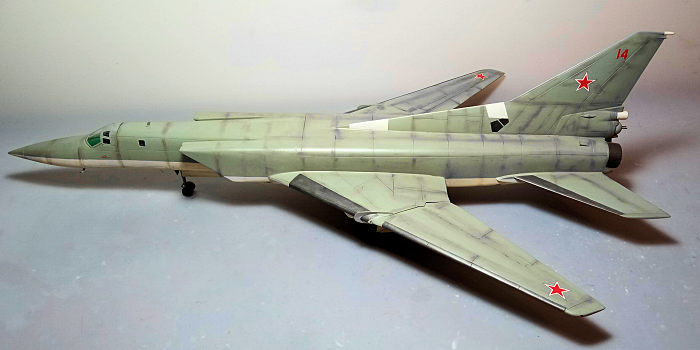
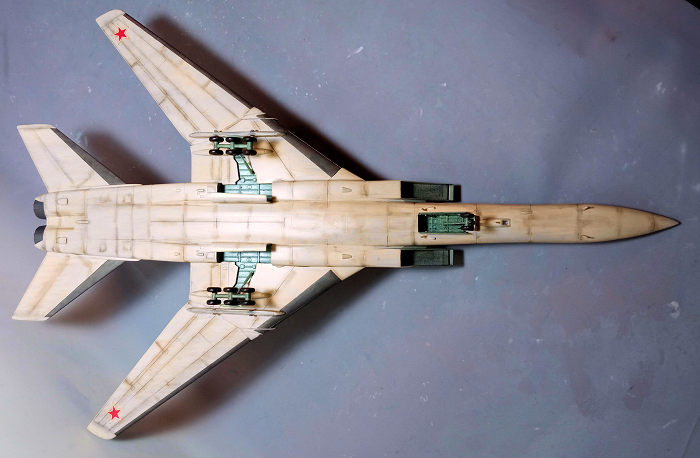
I first gave all
undersides a coat of Hu130 Satin White, then masked it off, continuing with
the topsides, which received a coat of Hu127 US Ghost gray. The wings and
tail planes' leading edges were masked and painted gunmetal, with a coat of
Future preparing the bird for decals.
I used the kit decals, in order to represent Red 14 machine. Though cautious
with those elderly Esci decals, to my surprise, they behaved excellently,
easily detaching from their backing paper and nicely adhering with no
silvering at all, this also applying to the white and black ones that
represented dielectric panels and “meshed” areas respectively! A coat of
Future sealed he decals.
| FINAL CONSTRUCTION |
Landing gear time,
where all three legs were glued in position, followed by the doors and
finally attachment of the 14 wheels, which, with some tweaking before glue
curing, successfully touched the ground. Legs, bays and door innards were
painted Hu87 Steel Gray (dries to a lovely grayish blue shade), oleos were
highlighted with a fine tip silver pen, wheel rims were painted a medium
green and tires were black. The wheels were tad filed to look weighted.
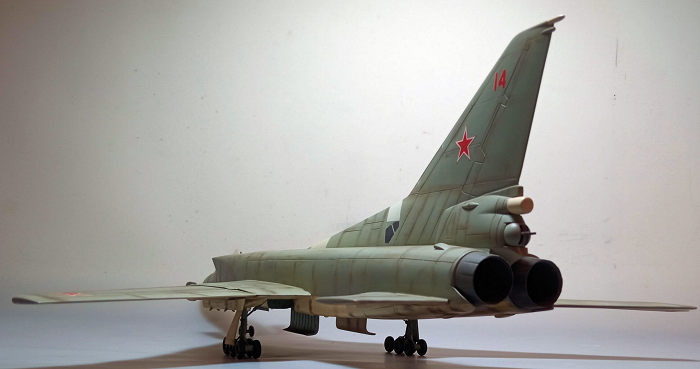
Onto the exhausts, where the otherwise acceptably looking afterburner cans
were shallow, compromising the deep, distinctive looks they have in
reality, so I added an tubular extension of similar diameter, which offered
the afterburners deeper, more realistic looks. After attaching the somehow
plain nozzles to the cans, I painted everything Testors Burned Metal and
attached them in place.
 Time for
some weathering, where I first gave the complete undersides a black wash
which not only accentuated all molded-on details and panel lines, but also
gave the landing gear areas a used, oily look. I then went on applying dark
brown and black dry pastels at every area where dirt, grime or staining
would reside. Though tempted by the recessed panel lines, I refrained from
giving a black wash to the topsides, since the panel lines are on the heavy
side and the wash would give them an unreal, more trenchy look, especially
for 1/72 scale. An almost flat coat gave the bird its final hue.
Time for
some weathering, where I first gave the complete undersides a black wash
which not only accentuated all molded-on details and panel lines, but also
gave the landing gear areas a used, oily look. I then went on applying dark
brown and black dry pastels at every area where dirt, grime or staining
would reside. Though tempted by the recessed panel lines, I refrained from
giving a black wash to the topsides, since the panel lines are on the heavy
side and the wash would give them an unreal, more trenchy look, especially
for 1/72 scale. An almost flat coat gave the bird its final hue.
The various antennas and probes were attached in place and accordingly
painted. The 2-piece twin rear cannon had its ball-shaped housing painted
fuselage color, its barrels gunmetal and was attached in position, followed
by its cylindrical control radar dome, which was painted white and glued
right on top of it.
The canopy had its well defined frames hand painted and attached in
position. Thankfully, its clear but thick glass distorted the cockpit image
adequately, now looking more “busy” than "fictitious". The ventral cupola
transparency somehow disappeared, never to be found again, being replaced by
white glue that dried transparent. Tiny blobs of red and green clear paint
represented the wing tip lights, before calling the imposing bomber done!
| CONCLUSIONS |
Trumpeter came in 2009 with their 1/72 Backfire, offering a modern and
accurate representation of the iconic bomber, clearly superseding the elderly
Esci mold in every area but complexity of construction and price offered (the
latter becoming less and less of an "advantage", since the Esci - and Italeri
kits gradually become collector's items, with their prices rising...). If you
want an accurate 1/72 Backfire, the Trumpeter offering is adamantly the way to
go.
 Esci tried to
do their best back in 1989 with both the molding technology and, particularly,
the type info available. The result was a quite well molded, uncomplex kit, but,
judged with today's standards, it is elderly, simplistic and at areas
inaccurate. That said, there is nothing wrong with building this kit and coming
up with an acceptable result out of the box: the completed model will pass for
nothing else than a charming Tu-22M.
Esci tried to
do their best back in 1989 with both the molding technology and, particularly,
the type info available. The result was a quite well molded, uncomplex kit, but,
judged with today's standards, it is elderly, simplistic and at areas
inaccurate. That said, there is nothing wrong with building this kit and coming
up with an acceptable result out of the box: the completed model will pass for
nothing else than a charming Tu-22M.
An amount of aftermarket stuff might be found online, mainly aimed at the
Trumpeter, with a number of them possibly fitting the Esci, but, frankly, I see
no viable reason in investing on aftermarket for this kit, with the net cost
practically reaching or even superseding that of the vastly superior Trumpeter.
On the positive side, the build itself is surprisingly uncomplicated for a big
jet bomber and quite pleasant, easily tackled by less experienced modelers,
making it a possible candidate for their first big modern bomber attempt.
Happy Modeling!
Spiros
Pendedekas
19 December 2023
Copyright ModelingMadness.com. All rights reserved. No reproduction in part or in whole without express permission.
Thanks to me for picking this one up when it was on sale.
If you would like your product reviewed fairly and quickly, please contact the editor or see other details in the Note to Contributors.