Academy 1/48 F-16A/C
| KIT #: | 12259 |
| PRICE: | $30.00 |
| DECALS: | One option |
| REVIEWER: | John Summerford |
| NOTES: |
| HISTORY |
Courtesy Wikipedia
The General Dynamics F-16 Fighting Falcon is an
American single-engine supersonic multirole fighter aircraft originally
developed by General Dynamics for the United States Air Force (USAF).
Designed as an air superiority day fighter, it evolved into a successful
all-weather multirole aircraft. Over 4,600 aircraft have
 been
built since production was approved in 1976. Although no longer being
purchased by the U.S. Air Force, improved versions are being built for
export customers. In 1993, General Dynamics sold its aircraft manufacturing
business to the Lockheed Corporation, which in turn became part of Lockheed
Martin after a 1995 merger with Martin Marietta.
been
built since production was approved in 1976. Although no longer being
purchased by the U.S. Air Force, improved versions are being built for
export customers. In 1993, General Dynamics sold its aircraft manufacturing
business to the Lockheed Corporation, which in turn became part of Lockheed
Martin after a 1995 merger with Martin Marietta.
The Fighting Falcon's key features include a frameless bubble canopy for good visibility, side-mounted control stick to ease control while maneuvering, an ejection seat reclined 30 degrees from vertical to reduce the effect of g-forces on the pilot, and the first use of a relaxed static stability/fly-by-wire flight control system that helps to make it an agile aircraft. The F-16 has an internal M61 Vulcan cannon and 11 hardpoints.
In addition to active duty in the U.S. Air Force, Air Force Reserve Command, and Air National Guard units, the aircraft is also used by the U.S. Air Force Thunderbirds aerial demonstration team, the US Air Combat Command F-16 Viper Demonstration Team, and as an adversary/aggressor aircraft by the United States Navy. The F-16 has also been procured to serve in the air forces of 25 other nations. As of 2015, it was the world's most numerous fixed-wing aircraft in military service.
| THE KIT |
 Three bags
hold five sprues of light gray styrene with a clear sprue separately bagged with
the singly gray sprue. The decal sheet is also bagged. Molding is crisp and
panel lines are petite. A posable pilot figure is included. Ten parts for
underwing stores are on the sprues, but flagged as not for use. That means the
parts count for this build is 107, including the underwing loads.
Three bags
hold five sprues of light gray styrene with a clear sprue separately bagged with
the singly gray sprue. The decal sheet is also bagged. Molding is crisp and
panel lines are petite. A posable pilot figure is included. Ten parts for
underwing stores are on the sprues, but flagged as not for use. That means the
parts count for this build is 107, including the underwing loads.
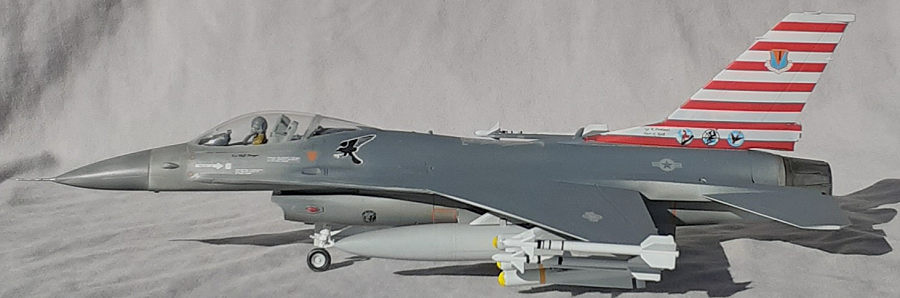
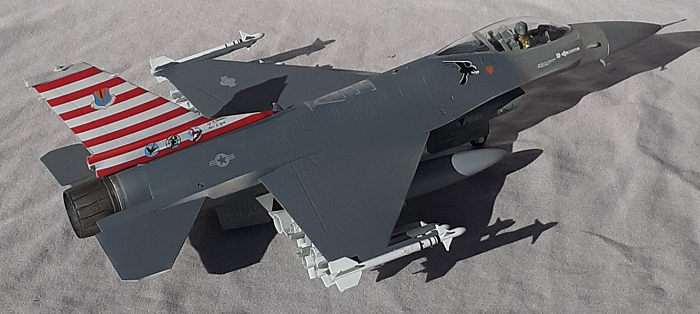
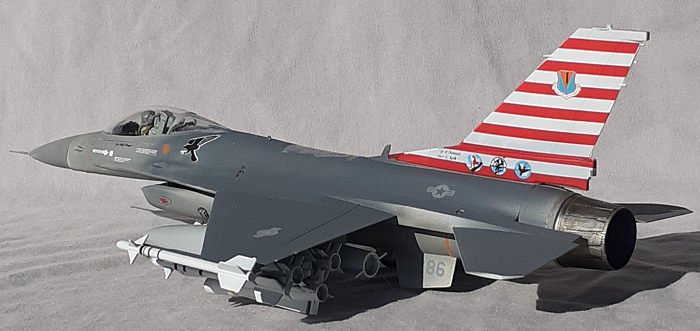
Neither the box lid, tri-fold instruction sheet, or the decal sheet identify which squadron the subject aircraft is from. The decals are well printed. A search on Scale Mates identified the markings being from the 512 TFS Dragons, 86 TFW 84-1286, February 1986 - Ramstein AB DE. F-16.Net has this notation to go with a helpful photo of the subject aircraft: USAF F-16C block 25 #84-1286 of the 86th TFW is decorated with a special tail and with the squadron badges in 1986.
| CONSTRUCTION |
Starting with the seat, the cockpit was built up and this time I elected to use the pilot figure. The tub and the main landing ger bays, were trapped between the upper and lower fuselage halves. Upper wings and stabilators were attached next. The photo from F-16.Net shows the flaps extended and the stabilators drooped. Surgery is required if one wishes to add interest to the model. Getting a tight seam around the upper wings was needed at the roots, but there was still a noticeable gap. Fortunately, the gap is consistent and it looks intentional.
 Completing
the main fuselage assembly is the tail cone. The exhaust cone was painted
separately and put aside for post painting addition.
Completing
the main fuselage assembly is the tail cone. The exhaust cone was painted
separately and put aside for post painting addition.
Also left off for later was the nose cone so that some ballast could be added once the model was ready for paint. That left the fin and rudder to be added next. The instructions call for the canopy to be installed at the final assembly, but to avoid damage to the pilot figure, it added next and masked.
On the underside, the intake and landing gear bays were built up and installed. The nose probe and aft antenna, again were saved for later. That left the ventral fins and wing pylons to be glued in place before checking the balance of the model. Yes, it is a tail sitter, so enough fishing lead was added to the nose cone to ensure a proper stance.
With the main assembly completed, it was time for paint.
| COLORS & MARKINGS |
A rattle can of automotive primer coated the model and revealed that some additional sanding was needed. With that done, the underside was sprayed Neutral Gray and that also wrapped around the cockpit section. The upper side of the fuselage was sprayed Gunship Gray. The nose cone was given a mixture of the two tones.
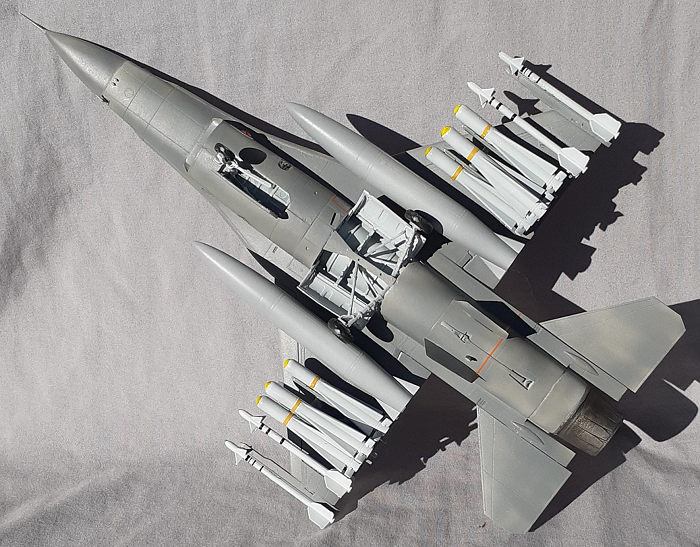
Moving to the ordinance, I discovered some discrepancies in the instructions. In the assembly diagrams, the sidewinders are called out for Light Ghost Gray paint, but the paint diagram indicates White. Even more confusing, the photo of the model on the side of the box side show everything Neutral Gray.
 While
researching on the internet to figure out the correct paint, I also noticed that
the “Maverick” missiles ae identified as AGM-45s, which are Navy weapons. They
are AGM-65s. This load-out got me to wonder what kind of mission the aircraft is
prepared for. Is it air-to-air, or air-to-ground? Also, what’s with the
drop-tanks? I decided that the load-out shows what the F-16 could carry.
While
researching on the internet to figure out the correct paint, I also noticed that
the “Maverick” missiles ae identified as AGM-45s, which are Navy weapons. They
are AGM-65s. This load-out got me to wonder what kind of mission the aircraft is
prepared for. Is it air-to-air, or air-to-ground? Also, what’s with the
drop-tanks? I decided that the load-out shows what the F-16 could carry.
Also frustrating, is that there are only two sets of decal stripes for the Sidewinders, not four, nor are there any decals for the Mavericks. I made my own decals for the Mavericks and painted on simplified stripes for the blank Sidewinders. Those were hidden under the wings.
The fin decals, owing to their size, were difficult to maneuver in place. They also need some Solveaset around the edges. I didn’t get enough of a glossy coat under the rest of the decals and they stand out even with numerous dull coats.
When the last top coat was dry, work move the underside. Starting with the tail cone, then the main landing gear and doors were installed. Next were the under-wing stores. Moving forward, the navigation lights and nose gear came next, followed by the rear antenna and nose probe. The final bit was the pitot glued to the nose.
| CONCLUSIONS |
Our dear friend, Spiros Pendedekas, built this kit two years ago. (https://modelingmadness.com/review/mod/us/usaf/fighter/pen16.htm) He managed to avoid my painting confusion and decaling issues by modeling a Hellenic Air Force Falcon. I concur with his somewhat tepid conclusion that a presentable model is easily achieved. A show stopper will require some aftermarket bits and carful seam filling. This not a complicated model and I spent about 18 hours on it.
19 January 2024
Copyright ModelingMadness.com. All rights reserved. No reproduction in part or in whole without express permission from the editor.
If you would like your product reviewed fairly and fairly quickly, please contact the editor or see other details in the Note to Contributors.