Matchbox 1/72 Siskin III
| KIT #: | PK-25 |
| PRICE: | $5.00 or so (it was a gift) |
| DECALS: | Two options |
| REVIEWER: | George Oh |
| NOTES: | Made for/in China(?) |
| HISTORY |
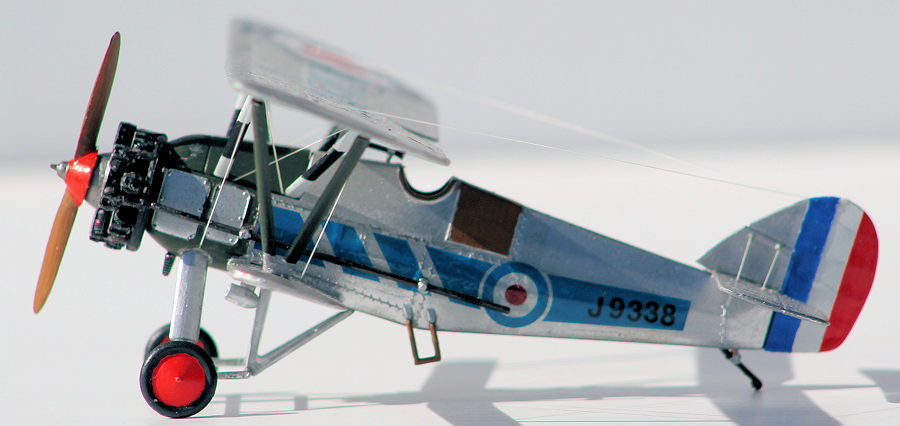
 The Armstrong
Whitworth Siskin III emerged after a four-year (1919 to 1923) evolution that
involved company mergers (Siddeley-Deasy + Armstrong Whitworth), 3 engine
changes (Dragonfly to Jaguar to supercharged Jaguar IVa), and replacing a
composite wood and aluminium frame, covered in doped linen fabric, to make the
first all-metal fighter of the RAF. A single-bay, single-seater biplane, it had
a sesquiplane form (meaning the lower wing was smaller than the top one). But
its most distinctive feature was its undercarriage legs, because their forward
straight legs were (literally) backed-up by additional V-struts (= extra drag?),
and they were all connected by a rectangular frame. Armament was 2 x 303”
machineguns, and it could stay in the air for just over an hour – all
conventional standards for the day. The last Siskins were withdrawn from RAF
service October 1932 as they were being replaced by the newer and more-capable
Bristol Bulldog.
The Armstrong
Whitworth Siskin III emerged after a four-year (1919 to 1923) evolution that
involved company mergers (Siddeley-Deasy + Armstrong Whitworth), 3 engine
changes (Dragonfly to Jaguar to supercharged Jaguar IVa), and replacing a
composite wood and aluminium frame, covered in doped linen fabric, to make the
first all-metal fighter of the RAF. A single-bay, single-seater biplane, it had
a sesquiplane form (meaning the lower wing was smaller than the top one). But
its most distinctive feature was its undercarriage legs, because their forward
straight legs were (literally) backed-up by additional V-struts (= extra drag?),
and they were all connected by a rectangular frame. Armament was 2 x 303”
machineguns, and it could stay in the air for just over an hour – all
conventional standards for the day. The last Siskins were withdrawn from RAF
service October 1932 as they were being replaced by the newer and more-capable
Bristol Bulldog.
| THE KIT |
 Like many
kits in my stash, Scott has previewed this kit here,
Matchbox 1/72 Siskin IIIa, and I can’t add much to improve
his study of it. My kit appears to be a copy that was produced in Asia, or for
the Asian market. I received it as a Christmas gift from my Modelling Club,
probably because I showed interest in it, and because it was very inexpensive. I
started building it because 1) the tradition in the Club is to complete gifted
kits within 12 months of receiving it (= before the next Christmas BBQ), 2)
because it is ungainly-looking yet colourful, and 3) because many Matchbox
biplane kits have a unique yet simple (patented?) feature that makes mounting
the top wing correctly, an absolute breeze. All I want to add to this build, is
rigging.
Like many
kits in my stash, Scott has previewed this kit here,
Matchbox 1/72 Siskin IIIa, and I can’t add much to improve
his study of it. My kit appears to be a copy that was produced in Asia, or for
the Asian market. I received it as a Christmas gift from my Modelling Club,
probably because I showed interest in it, and because it was very inexpensive. I
started building it because 1) the tradition in the Club is to complete gifted
kits within 12 months of receiving it (= before the next Christmas BBQ), 2)
because it is ungainly-looking yet colourful, and 3) because many Matchbox
biplane kits have a unique yet simple (patented?) feature that makes mounting
the top wing correctly, an absolute breeze. All I want to add to this build, is
rigging.
| CONSTRUCTION |
This build was pretty unremarkable. The cockpit detail is limited to a floor, basic seat and pilot (to fill the void) – little of-which can be seen through the small open-cockpit aperture. I left-out the pilot, but added tape seatbelts. Fortunately, the spine and belly seams are on flat surfaces. The single-piece tailplane and single-piece lower wings were attached, then filled as required – especially where the wing joined the flat underside.
 The engine
and the exhaust pipes were painted as separate items then assembled onto the
firewall plate. It could (and would) be attached later, which simplifies the
painting.
The engine
and the exhaust pipes were painted as separate items then assembled onto the
firewall plate. It could (and would) be attached later, which simplifies the
painting.
The unique feature at the core of this build, are the carbanes (= the short fuselage-to-top-wing struts). Each left and right pair are moulded as part of a flat keyed plate. When the plates are brought together, the keys/tabs align them together, and by having the joined plates dry as a single flat plate, the carbanes are positioned correctly, at both the vertical and horizontal angles. This produces a very-rigid carbane structure that can be rigged quite easily (later). The plate of this structure is placed across the nose of the fuselage, and later, it is covered by an upper fuselage piece around-which the carbanes protrude. The very rigidity of the structure allows the rigging material to connect the lower tip of each outer V-strut, to the tops of its adjacent carbanes, without the fear of pulling the carbane/s out of alignment. Also, the very rigidity of the structure allows the upper wing to be mounted securely and correctly in relation to the fuselage and lower wing, without the need for an alignment jig (or whatever you use/d). This greatly speeds-up the rigging and construction process.
| COLORS & MARKINGS |
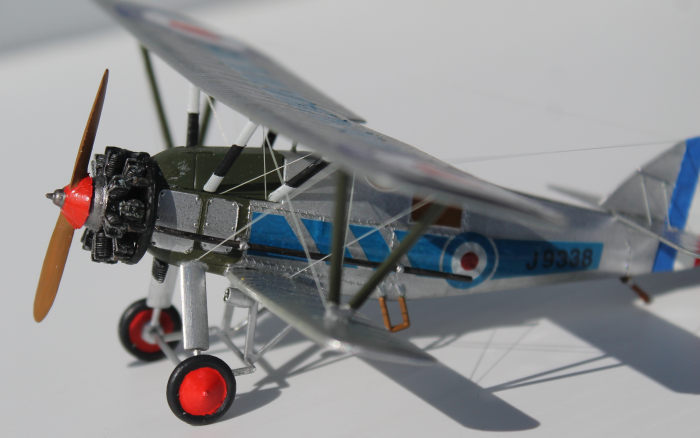 Right from
the start, I separated all or the required parts (airframe, wings & UC bits) and
sprayed them with a very-shiny silver, as befits a well-maintained pre-war
aircraft. As they dried, I sprayed the cabanes white, masked-off the tips, then
brushed the rest black. After masking parts of the fuselage, the nose, the
main/V-struts and the upper fuselage nose piece were all brush-painted a dark
green. This was the colour scheme for the one decaling option.
Right from
the start, I separated all or the required parts (airframe, wings & UC bits) and
sprayed them with a very-shiny silver, as befits a well-maintained pre-war
aircraft. As they dried, I sprayed the cabanes white, masked-off the tips, then
brushed the rest black. After masking parts of the fuselage, the nose, the
main/V-struts and the upper fuselage nose piece were all brush-painted a dark
green. This was the colour scheme for the one decaling option.
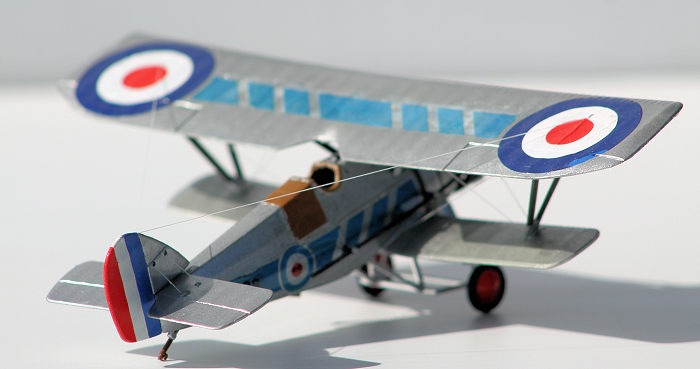
Now I hit a snag. The decals tore when they were slid off the backing sheet. Rats!!! To save them, I covered them with Microscale Liquid Decal Film, but this solution dragged the ink (as though the decals were never sealed after they had been printed). Double Rats!!! The fix was to spray those that remained, with Future, and to paint the Flash on the rudder. The damaged decals meant that 1) I had to change my target decal scheme, so the paint scheme was now wrong and 2) I had to find replacement roundels. Fortunately, I found a set for a Siskin in my decal dungeon, but their blue is different from that of the kit decals. Triple Rats!!!! Despite the coat of Future, the top wing’s blue bar cracked a week AFTER its application. Double DOUBLE Rats!!!!!!! So I'll have to paint over them with - as soon as I find a blue that is very close to the right shade.
| FINAL CONSTRUCTION |
This was when I rigged it with EZ-Line. Doing the cabanes was easy because they were held rigidly in position by their mounting plates. The plate was glued into the nose then covered with the upper nose plate. The rest was a little involved. The opening at the top of the V-strut was measured (with dividers), and the distance was transferred to the fuselage – from the middle of the mounting point for the main UC leg (where the forward flying wire is to be anchored), back to the wing-root (where the rear-most flying wire was to go), and the locations were drilled. The mid-point of a length of EZ-Line was superglued around the outside of the mounting peg at the base of each V-strut, and the fuselage end was attached to the tops of the carbanes. At the same time, the rear flying wires were anchored into their hole (and the outer ends left loose).
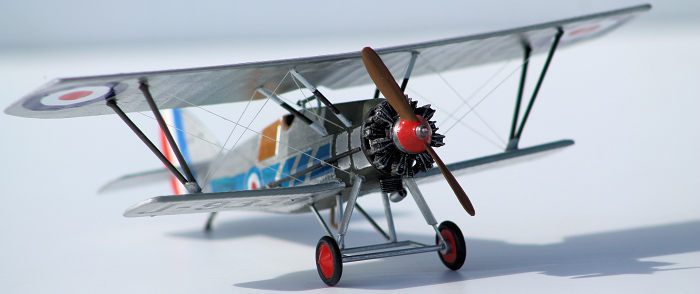 Now, the top
wing was securely attached atop the cabanes, and their orientation was checked.
With the top wing in-place, the tops of the V-struts were dry-fitted. Next day,
the rear flying wires were pulled over the rear tips of the V-struts (in the dry
gap between the tip and the wing) and both were secured with a small amount of
superglue.
Now, the top
wing was securely attached atop the cabanes, and their orientation was checked.
With the top wing in-place, the tops of the V-struts were dry-fitted. Next day,
the rear flying wires were pulled over the rear tips of the V-struts (in the dry
gap between the tip and the wing) and both were secured with a small amount of
superglue.
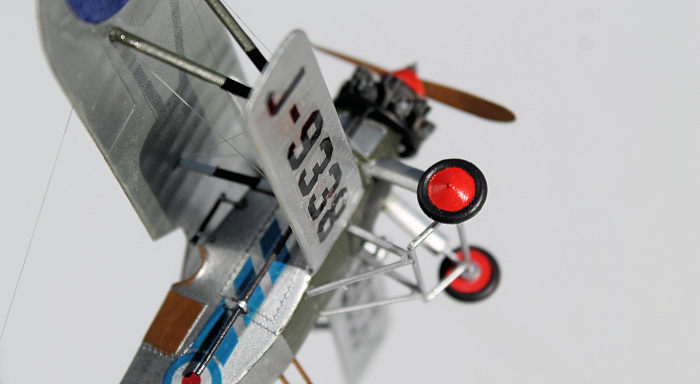
The UC was put-on next. The rectangular frame was dry-trapped between the main legs, which were then glued under the nose. A weight kept the frame flat on the ground, and some creative jigging kept the spacing between the legs right. Stacks of coins held the wings, and the frame, parallel to the ground. Next day, she was put on her back, and then the rear part of the frame was dry-fitted into the back-up V-struts, which were glued in-place under the fuselage. The fit wasn’t perfect, though a little trimming fixed that. Once everything was dry, the frame was glued to the main legs and to the V-struts to form a quite-rigid structure. I didn’t put any rigging under there, because I couldn’t see any in any reference.
The last subassembly to be attached was the engine and the long side-mounted exhaust pipes. You must ensure that they are perfectly horizontal (for aesthetics) and that they connect with the exhaust collector ring. They don’t – so fill the gap with plastic (for rigidity), filler or glue. I’d recommend that a suitably-fine tube be used to sleeve over the exhaust pipes and extend forward into suitable holes drilled into the back of the collector ring. A few detail bits and the rigging from the fin to the upper wingtips completed the build.
| CONCLUSIONS |
The Siskin was only a blip in aviation history, but it was the first stepping stone away from WWI designs. Its charm lies in its unique features, and the fact that Inter-War RAF aircraft seem to be silver with colourful glossy markings.
This build was hindered by the poor quality of the decals, the complex main undercarriage, and the poor fit of the exhaust. But it was also enhanced by that rigid carbane structure. I’ve never seen the like in other biplane models, so perhaps Matchbox has put a copyright on it. I would recommend it to even a young modeller, and/or a first-time biplane rigger.
George Oh
18 December 2023
Copyright ModelingMadness.com. All rights reserved. No reproduction in part or in whole without express permission.
If you would like your product reviewed fairly and fairly quickly, please contact the editor or see other details in the Note to Contributors.