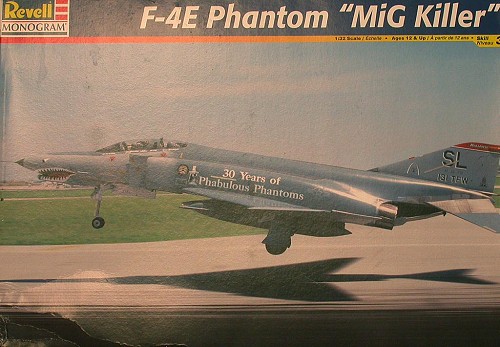
Revell 1/32 F-4E Phantom II
| KIT #: | 85-4668 |
| PRICE: | $39.99 (currently OOP) |
| DECALS: | Two options (Missouri and New Jersey ANG) |
| REVIEWER: | Lee Kolosna |
| NOTES: | Legend cockpit set FL 3204 used |
| HISTORY |
The E model of the McDonnell Douglas F-4 Phantom II provided
the US Air Force with a key piece of armament that had been previously been
missing in its front line fighter: a big gun. The assumption in the late
1950s and early 1960s had been that guns were obsolete in aerial combat
because of the emphasis on air-to-air missiles. Unfortunately, the
reliability of the early missiles in the Vietnam conflict was poor enough
that Air Force pilots frequently found themselves in a turning battle with
a more maneuverable MiG without a close-in weapon to utilize for the kill.
A General Electric M61 six-barrel 20mm Vulcan cannon was added to the nose
of the aircraft to provide another layer of lethality for the versatile
jet. This involved lengthening the nose and incorporating a radar set with
a smaller cross section than seen in the earlier F-4C/D versions. Five
MiGs were consequently downed using the gun exclusively during dogfights
with F-4Es in the later stages of the war. The F-4E became the
most-produced variant of the long-lived Phantom series, with 1387 being
built. They served for over two decades in Air Force and Air National
Guard units until eventually being retired with more modern F-15s and F-16s
in the early 1990s.
| THE KIT |
The Revell F-4E is based on their earlier German F-4F kit.
Note that this is a new-tool offering in this scale and not to be confused
with the ancient Revell F-4E kit that suffered from serious shape issues.
The new molding, in medium gray plastic, features engraved panel lines,
adequately detailed wheel wells, and a somewhat lacking cockpit. Ordnance
included are two different centerline 600 gallon fuel tanks (the earlier
“Royal Jet” tank, and the later F-15 style “High Speed” tank), four AIM-120
AMRAAM missiles, two AIM-7F Sparrow missiles, an ALQ-119 ECM pod, and four
AIM-9L/M Sidewinder missiles. The more modern AMRAAMs and Sidewinders are
carryovers from the F-4F version and unfortunately cannot be used on most
operational F-4Es. I have to qualify myself by writing “most” and not
“all” before a Phantom Phanatic comes up with an obscure example of an E
model with AMRAAM capability. The kit only provides the longer Midas 4 gun
muzzle, which was introduced on Block 48 aircraft and later retrofitted to
earlier versions to deal with problems with engine flameouts incurred by
the ingestion of gun gas exhaust. The rear stabilators are the slotted
kind and the outer wings have leading edge maneuvering slats, so the kit
best represents a mid-production non-TISEO E model. Tamiya’s F-4E kit in
the same scale depicts a very early “hard wing” variant with the initial
gun muzzle, so the Revell kit is preferred when making a model of the more
numerous example of the long-nose Phantom. If one desires a TISEO model,
some moderate scratchbuilding skills will be required to add the dorsal
antenna bump and the wing leading edge seeker.
 As stated above, the kit cockpit is a bit of disappointment,
the weakest part of the model. The Martin Baker ejection seats are
adequate but they lack harnesses. The cockpit has no sidewall detail, and
the canopy sills are nonexistent. There is also no detail in the area
behind the rear ejection seat. One other problem with the kit cockpit is
that the rear seat mounts too low in the tub and should be propped up a bit
if you use the kit parts.
As stated above, the kit cockpit is a bit of disappointment,
the weakest part of the model. The Martin Baker ejection seats are
adequate but they lack harnesses. The cockpit has no sidewall detail, and
the canopy sills are nonexistent. There is also no detail in the area
behind the rear ejection seat. One other problem with the kit cockpit is
that the rear seat mounts too low in the tub and should be propped up a bit
if you use the kit parts.
The clear parts are thin and transparent. The canopies are
molded separately so they may be posed open, but the attachment points are
minuscule and weak. Unlike Tamiya’s canopy pieces, the Revell parts are
molded integral with their frames, which makes things easier on the modeler
in regards to detaching from the sprue and painting. The downside is that
there is no internal detail at all, something very apparent on Phantoms
when the canopies are open. For this, the modeler has to turn to the
aftermarket. Other clear parts include the HUD, the forward navigation
lights (but not the ones mounted on the rear part of the wingtips), the
hydraulic pressure gauge window on the aft fuselage, the anti-collision
beacon, and the two RHAW bumps on the leading edge of each wingtip. I'm
not sure why Revell chose to provide the RHAW domes in clear styrene, as
they are black and opaque on the real jet.
Two sets of wheels are provided, one set being flattened to
depict the aircraft’s weight on the ground. The speed brakes are separate
units, which is good as they are always slightly open when a Phantom is on
the ground and hydraulic pressure bleeds off. The radome is removable to
display a radar dish, and a boarding ladder can be attached to the side of
the cockpit.
Decals appear to be printed by Cartograf and include markings for two Air
National Guard aircraft, one from New Jersey in the Euro I scheme and a 30th
anniversary commemorative aircraft from Missouri in the Hill Gray scheme.
Stenciling is minimal, but that is keeping in line with photographs that
tend to show that Phantoms lost most of their stencils with successive
repaints late in their careers.
 With a MSRP of $29.99, this kit is a bargain, especially
compared with the much more expensive Tamiya offerings, which at the time
of this writing don't cover the later F-4E variants. Unfortunately, the
kit is out of production but can be usually found at model contests and
swap meets and will undoubtedly be re-released sometime in the coming
years. Of course there is no such thing as a free lunch, so there are a
number of issues that need attention from the discriminating modeler:
With a MSRP of $29.99, this kit is a bargain, especially
compared with the much more expensive Tamiya offerings, which at the time
of this writing don't cover the later F-4E variants. Unfortunately, the
kit is out of production but can be usually found at model contests and
swap meets and will undoubtedly be re-released sometime in the coming
years. Of course there is no such thing as a free lunch, so there are a
number of issues that need attention from the discriminating modeler:
 Nose landing gear strut – the
strut is noticeably undersized when compared to the Tamiya unit. One can
decide if this is serious enough of a problem to warrant scratchbuilding
a new one out of brass tubing and scrap styrene. The Revell piece looks
somewhat anemic, but only if you know what you’re looking for.
Nose landing gear strut – the
strut is noticeably undersized when compared to the Tamiya unit. One can
decide if this is serious enough of a problem to warrant scratchbuilding
a new one out of brass tubing and scrap styrene. The Revell piece looks
somewhat anemic, but only if you know what you’re looking for. 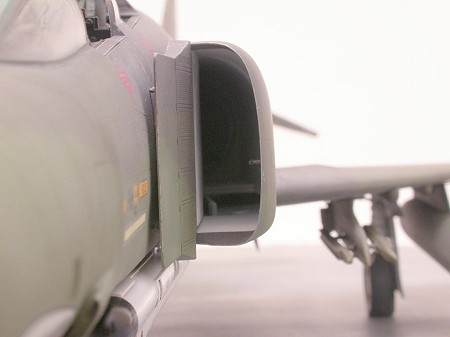 Air Intakes – like every other F-4
model on the planet, the air intakes are far from seamless. One can
choose to try and install the Seamless Suckers resin pieces that were
designed for the Tamiya kit, or one can use FOD covers if you can find
the out-of-production Reheat pieces. A third option is to just ignore
it, as the bare intakes don't look terrible in themselves. They
certainly don’t reflect the real aircraft intakes, but they’re not too
objectionable in their own right.
Air Intakes – like every other F-4
model on the planet, the air intakes are far from seamless. One can
choose to try and install the Seamless Suckers resin pieces that were
designed for the Tamiya kit, or one can use FOD covers if you can find
the out-of-production Reheat pieces. A third option is to just ignore
it, as the bare intakes don't look terrible in themselves. They
certainly don’t reflect the real aircraft intakes, but they’re not too
objectionable in their own right.
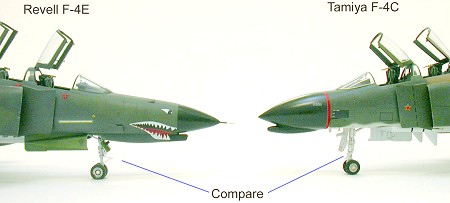
I compare the Revell and Tamiya kits often because it is a frequent and
logical question that should be asked by a modeler considering building an
F-4E in this large scale. Is the $30 Revell kit as good as the $160 Tamiya
F-4E? No, of course not. The Tamiya kit has a much better cockpit, a
slightly better selection of ordnance, separate flaperons and auxiliary air
intakes, and an accurate outline. But is the Tamiya kit $130 better than
the Revell kit? No way! If you purchase the Legend resin cockpit for $36,
use some modeling skills to reposition the flaperons and auxiliary air
intake doors, and grind away awhile on the pointy nose, you can get a very
fine looking model for 1/3 the price of the Tamiya offering. Plus you get
the slatted wing and Midas 4 gun muzzle that defines the overwhelming
majority of F-4Es in USAF service during the 1970s and 80s.
| CONSTRUCTION |
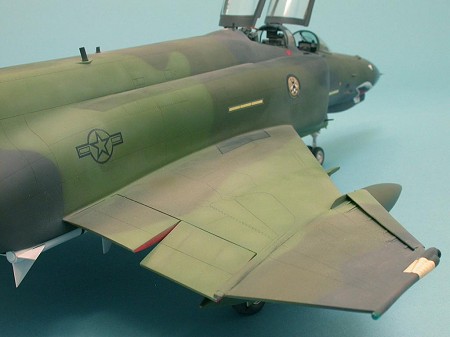
I started the big project by working on some of the kit’s issues first. I cut the flaperons out with an X-Acto knife and used sheet styrene to close in the resultant openings in the wing and one the sides of each flaperon. I did the same for the auxiliary air intakes, but didn't bother to box the openings in – no one ever picks up the model anyway, so why put a bunch of detail that no one will ever see?
I painted the Legend resin cockpit tub FS36231 Dark Gull Gray overall with
black consoles and light gray switches, I glued it into the nose with a
fair amount of fiddling. The fit was okay, but not without the need to
remove the central decking behind the pilot’s seat. The Legend ejection
seats are nicely done, although the harnesses are identical on both the
front and rear seats indicating that the pattern maker only bothered to
make one master. The sidewall detail is very good and fits with
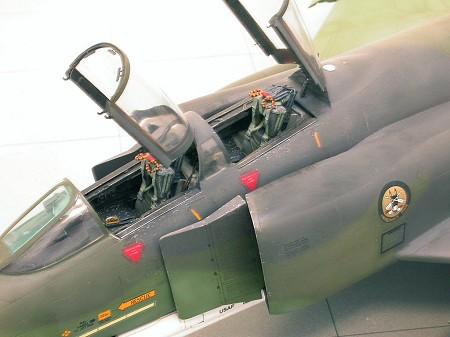 some
amount of persuasion. A weakness with the kit is the lack of cockpit
sills. I made some from thin strips of sheet styrene. It’s not quite as
detailed as the sills on the real jet, but it matches the look in regards
to width.
some
amount of persuasion. A weakness with the kit is the lack of cockpit
sills. I made some from thin strips of sheet styrene. It’s not quite as
detailed as the sills on the real jet, but it matches the look in regards
to width.
One real bone to pick with the Legend set is the quality of the photo-etch pieces provided for the interior of both canopies. The stuff just doesn’t fit at all. The rear canopy gets a piece that contains three rear-view mirrors. My study of photos of F-4Es show that most of the time, the guy in back used an externally mounted mirror in a wedge shaped housing. Unfortunately one isn't provided in the Revell kit, so I went ahead and made one from scrap plastic. Another problem with the Legend photo-etch pieces is that they don’t provide canopy retraction hooks for the front canopy. They give you hooks for the rear canopy, but how could they forget the ones for the front? I put about a dozen hours of work putting the stupid photo-etch inner canopy detail on, tearing it off a couple of times, making new hooks for the front canopy with fine wire, and making a robust hinge for each canopy using cut lengths of paper clip. This was the most frustrating part of the entire project and one that I end up wondering if I should have even bothered with considering the amount of time and frustration involved. If I were to do it over again, I might just dispense with the detail and just add the rearview mirrors.
I sanded the radome to induce a more ogive shape to it. It took a bit of
elbow grease, but the results were worth it, I think. The pitot tube was
fashioned from stainless steel tubing and a straight pin. I've learned
over the years that breaking a plastic nose mounted pitot tube on a jet
model is inevitable, so I might as well go ahead and replace it with
something more resistant to breakage. I still managed to break the darn
thing three times during construction, so even the best laid plans
sometimes come up short. I also replaced the stabilator pressure feed head
on the front of the tail with a piece of hypodermic tubing for the same
reason.
 The fuselage halves came together with little fuss. The nose section is
designed to attach to the fuselage in such a manner as to not cross over
the forward AIM-7 Sparrow wells, a feature I appreciate. The air intakes
were glued on and some minor seams filled and sanded smooth. The air
splitters and variable intake ramps are hollow on their backside, so I cut
appropriately shaped pieces from sheet styrene and plugged them in.
The fuselage halves came together with little fuss. The nose section is
designed to attach to the fuselage in such a manner as to not cross over
the forward AIM-7 Sparrow wells, a feature I appreciate. The air intakes
were glued on and some minor seams filled and sanded smooth. The air
splitters and variable intake ramps are hollow on their backside, so I cut
appropriately shaped pieces from sheet styrene and plugged them in.
As mentioned above, the outer wing tip panels are molded at too great of a
dihedral angle. I glued the panels on a the appropriate 12.5 degrees and
filled the resultant gap, followed with a rescribe of the wing fold line.
I faired in pieces of clear red and green styrene for the navigation
lights, and added a similar red piece for the anti-collision beacon in the
front of the tail fin.
Overall, the fit of the kit was uniformly good, even better than my
experience with the Tamiya F-4C/D kit from few years ago. I still had
seams to fill, but nothing that could be considered unusual or overtly
difficult to deal with. Those panel lines obliterated by the sanding
process were rescribed, and the entire model washed in the sink to remove
all the sanding dust and finger prints picked up during construction before
the model was taken out to the paint shed.
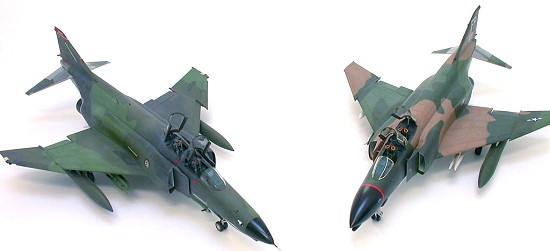
| COLORS & MARKINGS |
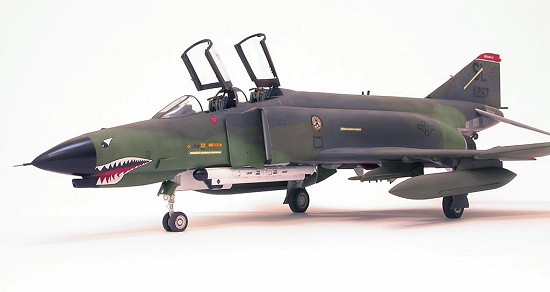
I wanted to paint my model in the Euro I camouflage scheme
because (1) I think it looks cool and (2) you rarely see Phantom models
ever painted that way. I don't know why this is, as Air Force F-4s wore
the scheme for nearly a decade before switching over to the Hill Gray
scheme. I consulted a listing of the T.O. 1-1-4 instructions in Dana
Bell’s USAF Colors & Markings in the 1990s. I lightened Testors
Acryl Medium Green FS34102 with about 10% white and sprayed that on the
model. That was followed up with Polly Scale FS36081 Grimy Black, which
was also lightened considerably with about 20% white. The reason I lighten
these two colors is that they tend to look much too dark on a model right
out of the bottle. Polly Scale TAC Dark Green FS34079 was used for the
third color. While painting, I ran into a problem: I couldn't reconcile
the colors in the T.O. 1-1-4 as they were seen in the various profile
views. What was called out for in the underside view didn't wrap around to
the side profile views or what I could see in numerous color photos. I had
about half the model painted when I finally figured it out: the T.O. 1-1-4
listing is wrong! It looks like Revell used the same reference when they
made their painting instructions as well, because it too is wrong for the
Euro I scheme. What I discovered is that the Medium Green and Dark Green
colors call-outs are switched in the left, right, and top profiles. The
bottom profile is fine. So, when T.O. 1-1-4
 says to paint an area Medium
Green, It should really be Dark Green. I suspect the Air Force sorted this
out, or the guys in the paint barn figured it out on their own.
says to paint an area Medium
Green, It should really be Dark Green. I suspect the Air Force sorted this
out, or the guys in the paint barn figured it out on their own.
I resumed camouflage painting using my usual method of drawing
the pattern in pencil on the model and freehand spraying the appropriate
color to fill in the areas between the lines. I faded the overall paint
scheme by lightening the paint with 25% flat white and overspraying each
color irregularly with a higher concentration of the lightened paint being
applied in the center of each panel. ANG Phantoms generally have an
anti-skid walkway on the fuselage spine and along the top of each air
intake. Sometimes this was left in the dark gray anti-skid paint, and
other times it was oversprayed with the camouflage paint. In the
latter case, the wear from ground crew walking on the aircraft wore some of
the paint off, exposing the anti-skid underneath. This was the case
on my Phantom, so I masked off the walkways and sprayed the area using the
base colors after darkening each with a few drops of flat black. A
little bit of black pastel was rubbed into the walkway area to simulate
even more wear.
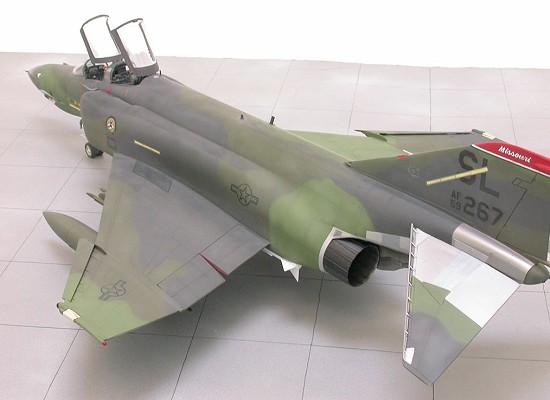
The metallic area in the rear part of the aircraft was painted with a base of Floquil Platinum Mist enamel, followed by accenting individual panels with Testor Metalizer and Alclad II Lacquer in various shades. Tamiya Smoke was used for the prominent exhaust staining seen underneath the stabilators, followed up some dark gray and black chalk pastels.
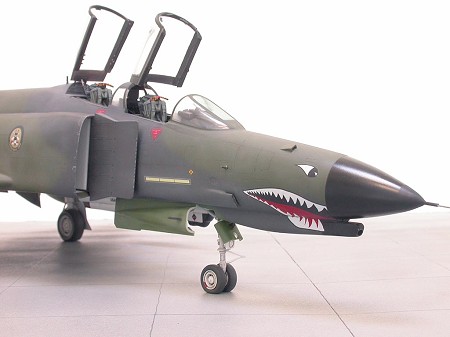
The two Sparrow missiles and the ECM pod were painted flat white and glossed with Future. The interior of the wheel and speed brake wells were also painted flat white. The inside of the inner surfaces of the speed brakes and the auxiliary air intake doors were painted Insignia Red, as were the edges around the flaperons.
I painted the radome with Polly Scale Steam Power Black. I mixed yellow and white to match the color of the fuselage slime lights on the kit decal sheet in order to paint the wingtip lights, which unfortunately are not provided as a decal. Many coats of Future floor polish were applied to the non-metallic areas to provide a base for the decals.
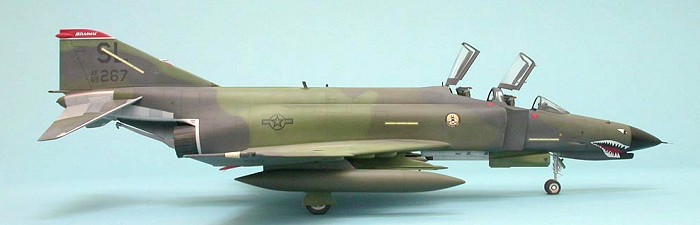
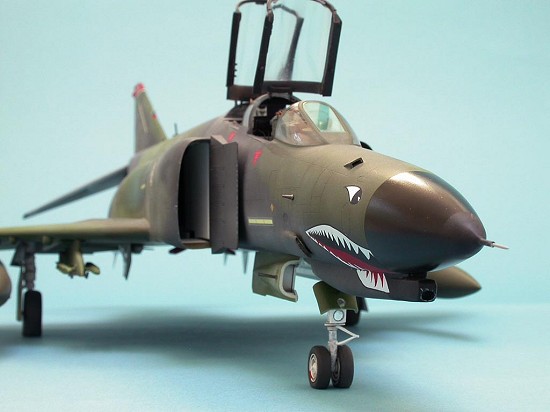
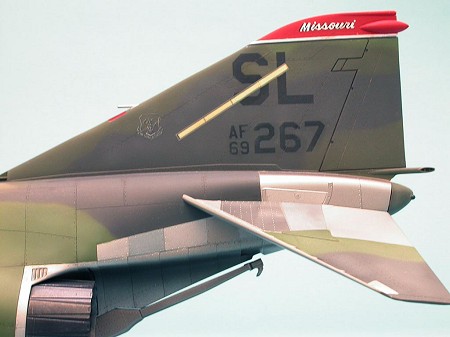
I have two very clear color photographs of F-4E serial number
69-0267 of the Missouri Air National guard and elected to model that
particular aircraft. From the Revell decal sheet, I used the stencils, the
shark mouth, the squadron insignia,
 the slime lights, and the national
insignia. Typical of my experience with Cartograf printed decals, nearly
every single one of the markings silvered. Undeterred, I began a process
of applying full-strength Solvaset many times to the markings to get them
to melt down into the paint. This worked on most of them. For the more
stubborn silvered areas, I masked off the marking and airbrushed in the
appropriate underlying color. Tedious to be sure, but it was necessary to
get a true “painted on” look.
the slime lights, and the national
insignia. Typical of my experience with Cartograf printed decals, nearly
every single one of the markings silvered. Undeterred, I began a process
of applying full-strength Solvaset many times to the markings to get them
to melt down into the paint. This worked on most of them. For the more
stubborn silvered areas, I masked off the marking and airbrushed in the
appropriate underlying color. Tedious to be sure, but it was necessary to
get a true “painted on” look.
The serial number and the big SL tail code were made on my
computer and printed out on clear decal paper with a laser printer. I used
black decal stripes to outline the wingtip slime lights and the wing
walkways. The circular IFF antenna behind the rear canopy was punched out
of a sheet of solid stainless steel colored decal. I applied another coat
of Future over the decals, then a wash of Paynes’ Gray artist’s oil mixed
with Turpenoid was applied to all the panel lines and in the wheel wells.
I sprayed the model with a light coat of Polly Scale Dust to tone down the
starkness of the camouflage.
Weathering was kept to a minimum, as ANG aircraft generally are kept fairly clean. In addition to the engine exhaust and faded paint mentioned above, I used a silver pencil to simulate chipping and scratches in the paint around the cockpit sills and the edges of the air intakes.
| FINAL CONSTRUCTION |
The landing gear and wheels were glued on. I spent a lot of time trying to get the alignment correct, but discovered that the fork on the plastic main landing gear struts are simply not strong enough to hold the wheels straight when the weight of the large model is applied. To remedy this I added a tiny square of .040 sheet styrene and wedged it between the top of the tire and the bottom of the landing strut. This gives two points of contact for the wheel and reduces the load on the fork itself. This illustrates how Tamiya’s metal struts are a superior solution, but at a correspondingly higher price. Unless you know what you are looking for (or are a contest judge with a penlight), it’s really hard to see my little cheat.
The landing gear doors and speed brakes were added next. Revell has some tiny retraction struts on the smaller main gear doors that are next to impossible to attach, so I left them off. Similarly, the nose gear has some struts that attach to the landing light assembly that don't come close to resembling reality. Those were left off as well. On most Phantoms that I have inspected personally, the speed brakes are not fully extended when the aircraft is parked, just cracked open a few inches. I attached the model’s speed brakes accordingly.
 I glued on the auxiliary air intake doors, and used small cut
lengths of paper clip to make pins to strengthen the joint of the flaperons.
I used this same method to attach the inner pylons to the underside of the
wing, as well as to glue on the always-fragile stabilators. You really
can't call yourself a Phantom modeler unless you have knocked a stabilator
off a model at least a dozen times in your life.
I glued on the auxiliary air intake doors, and used small cut
lengths of paper clip to make pins to strengthen the joint of the flaperons.
I used this same method to attach the inner pylons to the underside of the
wing, as well as to glue on the always-fragile stabilators. You really
can't call yourself a Phantom modeler unless you have knocked a stabilator
off a model at least a dozen times in your life.
I glued the two AIM-7F Sparrows in the rear wells, and the
ALQ-119 ECM pod in the left front Sparrow well. Because I didn’t elect to
purchase aftermarket AIM-9J/P Sidewinders which are the appropriate missile
for the timeframe I was modeling, I only mounted the cut-down launch rails
on the inner pylons. The two outer 370-gallon fuel tanks were added and
the model flipped over for the final part of the assembly, attaching the
canopies. This is the part I always hate about jet models. I used
five-minute epoxy to glue the canopies on, utilizing the beefed-up hinge
assemblies I had made earlier. Epoxy makes a much stronger joint than CA
glue because I have painfully learned over the years that open canopies
will take a lot of abuse during the lifetime of a model and break almost as
much as those darn stabilators.
The RHAW domes on the tail and the leading edge of the wingtips
are much too tall. I sanded them down to about a quarter of their original
height before attaching them to the model.
A final coat of Polly Scale Clear flat gave a uniformly flat
finish to the camouflage scheme. With that final bit of effort, I was
done. It took me six months and nearly 120 hours of work to complete the
model, which is what I expect when I work on a big jet in this scale.
| CONCLUSIONS |
 This is good kit. The price is certainly right, even allowing
for some extra expenditure to fix the lacking cockpit detail. It fits
together well and presents the modeler with no insurmountable challenges.
If you are willing to address the model’s weaknesses as listed above, you
can create a very impressive model that compares quite favorably with the
very much more expensive Tamiya kits. For that fact alone, I consider this
kit a “Best Buy” in the modeling world. I am somewhat ambivalent about the
Legend cockpit set, however. I like the seats and the additional detail of
the cockpit tub. I hate the photo-etched parts for the canopies, however.
They don't fit, are incomplete, and aren't all that detailed. If I was to
do it over again, I would probably invest in the Eduard photo-etch interior
set just to avoid messing with Legend’s poorly engineered pieces.
This is good kit. The price is certainly right, even allowing
for some extra expenditure to fix the lacking cockpit detail. It fits
together well and presents the modeler with no insurmountable challenges.
If you are willing to address the model’s weaknesses as listed above, you
can create a very impressive model that compares quite favorably with the
very much more expensive Tamiya kits. For that fact alone, I consider this
kit a “Best Buy” in the modeling world. I am somewhat ambivalent about the
Legend cockpit set, however. I like the seats and the additional detail of
the cockpit tub. I hate the photo-etched parts for the canopies, however.
They don't fit, are incomplete, and aren't all that detailed. If I was to
do it over again, I would probably invest in the Eduard photo-etch interior
set just to avoid messing with Legend’s poorly engineered pieces.
I'm pleased to have a big long-nosed Phantom in my collection
in the sinister-looking Euro I paint scheme. Other than the inordinate
amount of time spent on the canopies, I thoroughly enjoyed building this
kit and recommend it to anyone interested in building a large scale version
of this amazing airplane. The world can't have enough Phantom models.
My sincere thanks go to Ben Brown for his invaluable assistance
with this project.
| REFERENCES |
Lake, Jon: McDonnell F-4 Phantom: Spirit in the Skies
Kinzey, Bert, and Ray Leader: Colors and Markings of the F-4E
Phantom II, Colors and Markings Volume 13
Kinzey, Bert, F-4 Phantom II, Part 2, Detail & Scale Volume 7
Bell, Dana: USAF Colors & Markings in the 1990s
Lee Kolosna
November 2004
If you would like your product reviewed fairly and fairly quickly, please contact the editor or see other details in the Note to Contributors.