| KIT #: | ?5863 |
| PRICE: | $35.00 a few years back |
| DECALS: | Two options |
| REVIEWER: | Hans Gertje |
| NOTES: | Surball Aero Design: MiG Masters - F-8 Crusaders of The Vietnam War decals were used, along with resin Wolfpack MB F5 ejection seat, Master Model F-8E/J pitot tube, Scale Aircraft Conversion F-8 landing gear, and Hasegawa Aircraft Weapons C. |
| HISTORY |
 Known for its MiG
killing prowess, the Vought F-8 Crusader was the principal fighter flown from
the Navy’s smaller Essex-class
aircraft carriers during the early to middle Cold War. It was involved in the
very first moments of the Vietnam War becoming “hot” for the US, strafing and
launching rockets at North Vietnamese patrol boats during the Gulf of Tonkin
Incident. From there, it was heavily engaged as an air superiority fighter,
squaring off mainly with the North Vietnamese MiG-17s and occasionally MiG-21s.
The Crusader would officially claim 18 MiG kills, all between 1966 to 1968, to a
loss of only three of their own to enemy fighters. The Crusader’s sterling air
engagement record would earn it the nickname “MiG Master.”
Known for its MiG
killing prowess, the Vought F-8 Crusader was the principal fighter flown from
the Navy’s smaller Essex-class
aircraft carriers during the early to middle Cold War. It was involved in the
very first moments of the Vietnam War becoming “hot” for the US, strafing and
launching rockets at North Vietnamese patrol boats during the Gulf of Tonkin
Incident. From there, it was heavily engaged as an air superiority fighter,
squaring off mainly with the North Vietnamese MiG-17s and occasionally MiG-21s.
The Crusader would officially claim 18 MiG kills, all between 1966 to 1968, to a
loss of only three of their own to enemy fighters. The Crusader’s sterling air
engagement record would earn it the nickname “MiG Master.”
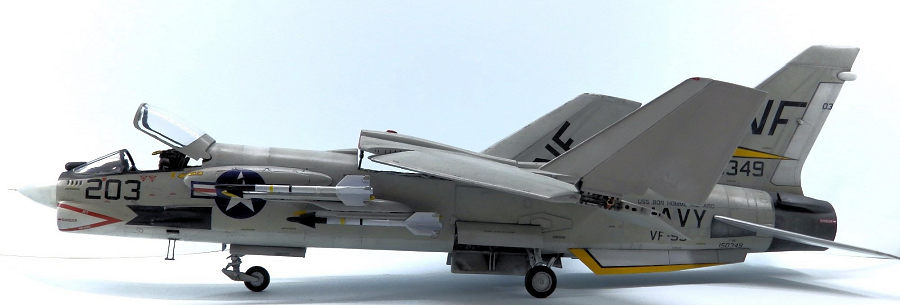
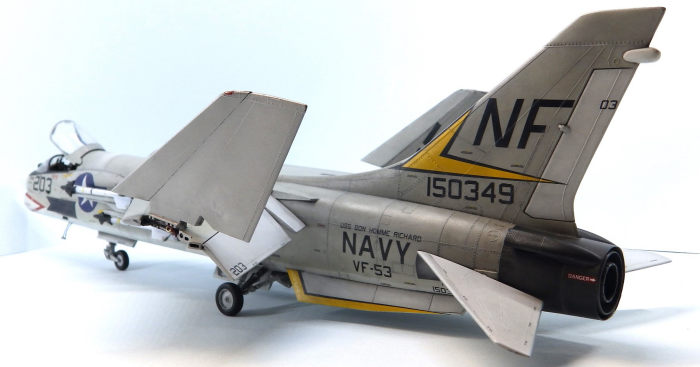
This jet is one of those MiG killers. Launched from the USS Bon Homme Richard on July 29, 1968, Lt Cdr Guy Cane’s flight of four F-8s from the VF-53 “Iron Angels” engaged two MiG-17s. Cane maneuvered his jet (callsign “Firefighter 203”) to launch Sidewinder missiles and shot down one of the MiGs. After 186 combat missions, this was Cane’s first MiG encounter and kill. This was also the last time a MiG-17 was officially shot down by a Crusader.
| THE KIT |
T his is the 1/48 Monogram
F-8E, first tooled in 1988, and I am building the most recent Revell reboxing
from 2011. It was a gift from my wife to get me back into modeling. Aside from
my modeling experience as a youngster, I knew little about the hobby at the time
I picked this out, so didn’t know that the more modern Hasegawa tooling existed.
Nonetheless, many modelers have made great results out of this old kit with some
extra work. The kit sprues are molded in grey plastic with a tree for clear
parts. There is warpage on the tail of one of the fuselage halves, and there’s
flash here and there. There is also a decal sheet with options for a Navy or
Marines jet. The overall kit assembly is pretty basic, as there’s little more to
the interior than the cockpit and superficial engine parts.
his is the 1/48 Monogram
F-8E, first tooled in 1988, and I am building the most recent Revell reboxing
from 2011. It was a gift from my wife to get me back into modeling. Aside from
my modeling experience as a youngster, I knew little about the hobby at the time
I picked this out, so didn’t know that the more modern Hasegawa tooling existed.
Nonetheless, many modelers have made great results out of this old kit with some
extra work. The kit sprues are molded in grey plastic with a tree for clear
parts. There is warpage on the tail of one of the fuselage halves, and there’s
flash here and there. There is also a decal sheet with options for a Navy or
Marines jet. The overall kit assembly is pretty basic, as there’s little more to
the interior than the cockpit and superficial engine parts.
While working on practice kits prior to the build, I took the time to research and find some aftermarket items. I found a Scale Aircraft Conversions white metal landing gear correction set at New Brookland Railroad & Hobby in Columbia, SC. Also, I decided to use Furball’s MiG Killers decals, in particular Guy Cane’s jet since it doesn’t have a rudder decal that would have to be reshaped as it was made for the Hasegawa kit. Other aftermarket included a Wolfpack MB Mk.5 resin ejection seat, a Master Model metal pitot tube, Hasegawa weapons kit AIM-9D Sidewinders, and E-Z masks fitted to the Monogram canopy. Paints for this Crusader are Gunze Aqueous and Tamiya acrylics.
| CONSTRUCTION |
Since I have many ambitious future projects with conversion kits, I decided to get some meaningful experience in modifying and scratchbuilding. The Monogram F-8 doesn’t give an option to raise the variable incidence wing. This is a very unique feature of the Crusader which is often seen on takeoff and landing, so I decided that this would be a central focus of this build. Along with starting the cockpit, I cut the control surfaces away from the wing parts. If the wing is to be raised, the droops, flaps, and ailerons all must deflect downward. Cutting these apart with an exacto knife resulted in some unwanted scratches on the plastic, so I bought a high quality razor saw for future builds. For the cockpit, I scratchbuilt some launch rails for the ejection seat using Evergreen H-shaped plastic rod, and added some wiring and plastic for extra details, such as the oxygen tank compartment behind the seat. I also used the kit decal for the instrument panel, first gloss coating the panel. I then applied the decal, sprayed dull coat, and dabbed the gauges and radar scope with tiny drops of gloss to give a glass effect. Some other details included extra knobs, levers, and switches made from scrap plastic.
The fuselage fit wasn’t great, particularly around the rear cockpit area, so it took some time to seal every segment down with Tamiya extra thin. Test fitting showed that the SAC main gear couldn’t be inserted after the halves were together, so I inserted the main landing gear in between the fuselage halves without gluing the gear secure (to do later). Since I didn’t quite like how I predicted the instrument panel would fit, I deviated from the instructions and decided I would glue it in later. I did glue the inside part of the engine, but left out the nozzle for later, since I would want to clean up seams and paint the inside first. There is also a component for the air intake which has difficult fit prior to gluing the halves (and is also NOT mentioned in the instructions—beware!), so I inserted it through the nosegear well to attach it after the halves were glued.
 Then it was on to creating
the underwing bay. I took inspiration from modelers such as Wayne Hui
(https://modelingmadness.com/review/viet/huif8.htm) for scratchbuilding this.
Steve’s review also pointed me in the direction of a 1992 issue of Fine Scale
Modeler, with instructions by Donn Wells. I sure didn’t follow these
instructions to a T—I found it difficult to curve the sheets of plastic to get
them to fit correctly when the fuselage halves were apart, so I built it up
after fuselage assembly, starting with plastic strips cut at 90 degrees and then
inserting a curved sheet on top. I also assembled the forward bulkhead. Little
things like BluTak underneath were helpful in holding these things in place so
they could be glued. Following this I added styrene strips to make the “ribs”
over the intake duct and sidewalls. I added various plastic rods and wires and
covered one of the rods with foil from a beer bottle. These details were based
on reference photos taken by Tom Weinel, a former Crusader pilot who sadly
passed away a few years ago. He provided many photos on ARC Forums, and they can
also be found in Squadron’s Crusader Walk Around book.
Then it was on to creating
the underwing bay. I took inspiration from modelers such as Wayne Hui
(https://modelingmadness.com/review/viet/huif8.htm) for scratchbuilding this.
Steve’s review also pointed me in the direction of a 1992 issue of Fine Scale
Modeler, with instructions by Donn Wells. I sure didn’t follow these
instructions to a T—I found it difficult to curve the sheets of plastic to get
them to fit correctly when the fuselage halves were apart, so I built it up
after fuselage assembly, starting with plastic strips cut at 90 degrees and then
inserting a curved sheet on top. I also assembled the forward bulkhead. Little
things like BluTak underneath were helpful in holding these things in place so
they could be glued. Following this I added styrene strips to make the “ribs”
over the intake duct and sidewalls. I added various plastic rods and wires and
covered one of the rods with foil from a beer bottle. These details were based
on reference photos taken by Tom Weinel, a former Crusader pilot who sadly
passed away a few years ago. He provided many photos on ARC Forums, and they can
also be found in Squadron’s Crusader Walk Around book.
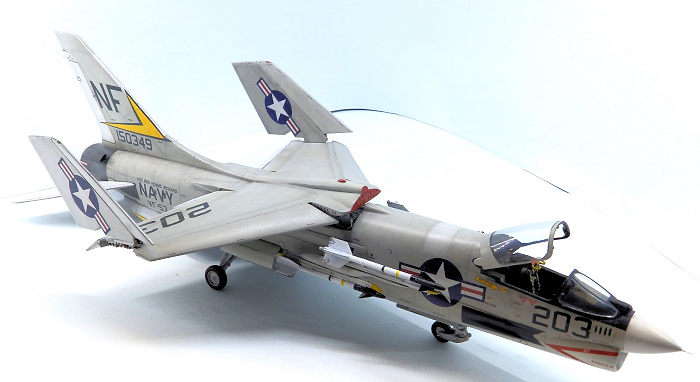
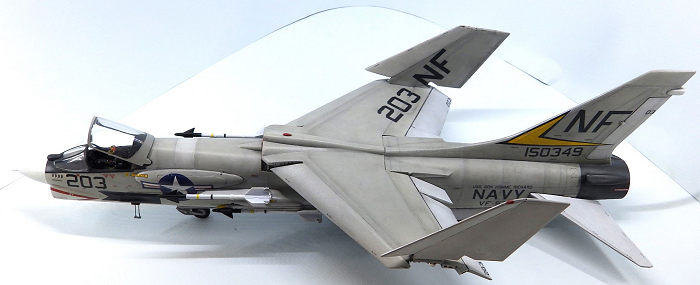
Next, I had to glue the wing together. In order to show the wing’s features when raised, I used styrene sheet to shape the wing roots where the droops separate. I also shaped and trimmed a thin styrene sheet to fit on the forward bulkhead of the raised wing. These were blended with putty and gel super glue, then sanded flush. Then I etched in some surface detail on these features. The control surfaces that had been cut away from the upper and lower wing halves were glued together and filled/sanded free of seams. Then began the long process of attaching the droops, ailerons, and flaps, which meant a great deal of test fitting and sanding them down at a certain angle. When raised, the droops deflect downward at a maximum angle of 25 degrees, the ailerons 45, and the flaps 20. The forward tip of the droops also extends slightly underneath the main body of the wing section when raised. The droops in particular took a great deal of time to sand down until I was satisfied with the gluing angle, and even then substantial gaps remained that would be filled later. For the flaps and ailerons, I sanded the joint side down to a slight bullnose to show the curvature of the forward edge. I carefully glued these all to the wing one piece at a time, gently adjusting them until I was satisfied with the deflection angles.
 Now for work on the
fuselage. This being an old Monogram kit, there are seams galore to fill and
sand all along the joints, particularly the nose, as it joins with the two
fuselage halves and the upper part of the intake trunk. From some Tom Weinel
notes, I learned that the nose is a little short, so I added a 20 thou spacer to
slightly lengthen it. Quite a lot of filling and sanding went into getting the
seams right, especially difficult was the intake, tailpipe, and seam just aft of
the nosegear bay. In the main gear bays, the bulkheads are featureless, so I
added details according to reference photos using wires and scrap plastic. After
gluing secure the main gear that I inserted before fuselage join, I noticed that
there were various pipes and hoses on the kit plastic that simply “go nowhere,”
so I extended them with wires and rods to fit to the bulkhead of the main gear.
For the nosegear, I also added some wires and features, and raised the gear with
a couple shims of plastic to give the jet a “nose up” look.
Now for work on the
fuselage. This being an old Monogram kit, there are seams galore to fill and
sand all along the joints, particularly the nose, as it joins with the two
fuselage halves and the upper part of the intake trunk. From some Tom Weinel
notes, I learned that the nose is a little short, so I added a 20 thou spacer to
slightly lengthen it. Quite a lot of filling and sanding went into getting the
seams right, especially difficult was the intake, tailpipe, and seam just aft of
the nosegear bay. In the main gear bays, the bulkheads are featureless, so I
added details according to reference photos using wires and scrap plastic. After
gluing secure the main gear that I inserted before fuselage join, I noticed that
there were various pipes and hoses on the kit plastic that simply “go nowhere,”
so I extended them with wires and rods to fit to the bulkhead of the main gear.
For the nosegear, I also added some wires and features, and raised the gear with
a couple shims of plastic to give the jet a “nose up” look.
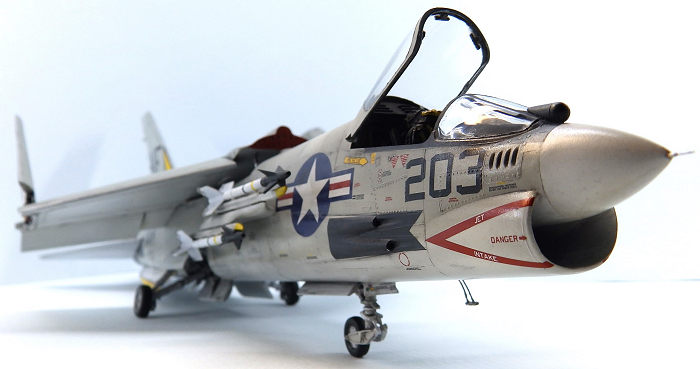
Prior to priming and painting in earnest, I wanted to finish some cockpit details and attach the windscreen. This meant installing the instrument panel, which I found difficult to center properly if glued together with the fuselage halves. I also wanted to improve the gunsight so I cut the inaccurate existing mount and replaced it with thinner pieces of scrap plastic. The clear part for the gunsight glass was a thick slab, so I replaced it with a much thinner and more realistic square of clear acetate. After installing the instrument panel, I covered the gaps with putty. I also recreated the canvas cover in front of the gunsight with some squares of tissue paper wetted with water, adhered with white glue, and painted it olive drab. With the cockpit fully painted, I attached the windscreen after polishing it with Novus compound and dipping. The kit also has no foot pedals, so I cut pieces from the kit ejection seat and some scrap and painted them flat aluminum. I sprayed black primer over the canopy after masking it with a set of vinyl E-Z masks and covering off the rest of the cockpit with tape and blutak. One thing I noticed on the port cockpit rim was that it was very low above the panel line which would be painted a black strip, so I decided that I would have to build this up with some plastic shims. This is also where I find super glue gel is very useful, as layers of it can be build up on steps, and easily sanded smooth after.
Having fixed this particular problem, I moved on to adding other features to the fuselage. These included adding the afterburner cooling scoops. These are much too large on the Monogram kit but only realized this after hollowing out the holes and gluing them onto the tailpipe, so they stay. I also attached the in-flight refueling probe bay (displayed closed) and attached the upper and lower gear doors. The lower gear doors are a single assembly plate that didn’t fit well with the white metal gear, so a lot of grinding down with a file was needed before I got a satisfying enough fit.
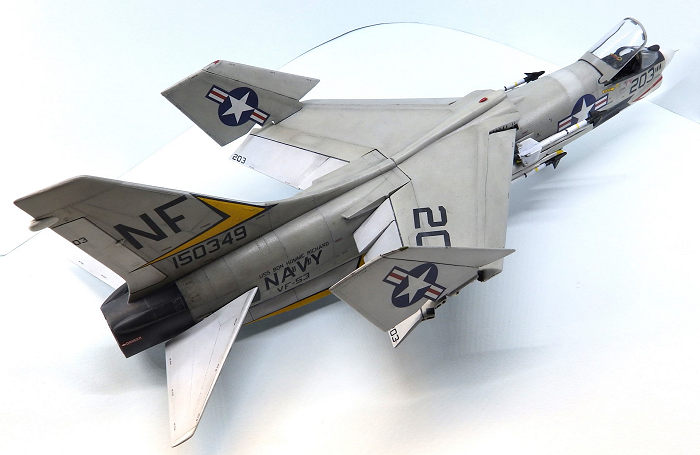 The ventral strakes also
presented a problem for the particular plane I intended to build, as VF-53 jets
had a yellow design which on the Furball sheet is a decal shaped to fit the
Hasegawa kit. Monogram’s strakes are shaped differently enough that it would be
very difficult to fit them without taking a risk to trim the decals. Ironically,
I chose this scheme in part because it reduced the chance of fit problems with
the Furball decals, but it so happens that I have multiple Hasegawa F-8 kits in
my stash, including one that I could eventually build into an RF-8A, which has
no ventral strakes. I pirated the Hasegawa strakes, cut off the locator pins,
and glued them into the groove on the fuselage at a 45 degree angle.
The ventral strakes also
presented a problem for the particular plane I intended to build, as VF-53 jets
had a yellow design which on the Furball sheet is a decal shaped to fit the
Hasegawa kit. Monogram’s strakes are shaped differently enough that it would be
very difficult to fit them without taking a risk to trim the decals. Ironically,
I chose this scheme in part because it reduced the chance of fit problems with
the Furball decals, but it so happens that I have multiple Hasegawa F-8 kits in
my stash, including one that I could eventually build into an RF-8A, which has
no ventral strakes. I pirated the Hasegawa strakes, cut off the locator pins,
and glued them into the groove on the fuselage at a 45 degree angle.
I finished the fuselage by spraying Mr. Surfacer to hunt down seams and imperfections. I didn’t have much stomach for the idea of rescribing panel lines, so instead I gently cut into the areas of lost detail with a fresh #11 hobby—mostly with surprisingly great results. I also restored lost rivets with tiny bumps of super glue.
Back to the wings. I wanted to display the model with the wingtips raised in the stored position, which is a great feature of the Monogram kit, except there’s almost no detail on the open joint area. I scratchbuilt a variety of features while referring to pictures from my Squadron Walk Around book for the F-8. This included wiring, locking “teeth,” a shim with some holes drilled, and some plastic rod to make a hydraulic shaft and wing lock. I also shaved off the inner sides of the flaps and underside fuselage section so that the wing would fit in the raised position. Last, I glued down a quartet of 32 gauge copper wire along the underside of the wing that fits over the fuselage, just to add some extra detail.
| COLORS & MARKINGS |
For painting, I decided to try a subtle pre-shade with Gunze Aqueous Dark Gull Grey. I started with GA Insignia White on the undersides, then masked a soft line on the sides of the fuselage with blutak in order to spray GA Light Gull Grey, and also masked off the rudder and flaps/ailerons as they should be painted white. I also cut a triangular mask from the size and shape of the Crusader’s intake warning decals so that there would be a clear demarcation of white and grey once the decal was on.
After paint was complete on the fuselage, I masked off the canopy area and tailpipe so they could be painted with Tamiya flat black. Behind the cockpit, this particular plane had a replacement panel that was apparently a lighter shade of grey, so I sprayed a couple coats of white over the LGG. The ECM blister on the tail above the rudder was masked off to paint white. There are black panels that were painted over the gunports on VF-53 jets on this 1968 deployment, so I masked to paint them flat black. The underwing bay on the actual aircraft was either Interior Green or later painted over with white, so I added a drop of black to GA Zinc Chromate, painted the bay, and then sprayed a few layers of Tamiya White over. The effect left hints of green under the white paint.
 The bulkhead of the raised
wing was painted GA Red. The area on the fuselage where the horizontal
stabilizer moves is also a bare metal color similar to the engine area of the
tailpipe, so I painted it black and I dry brushed this and the tailpipe with
Model Master Chrome Silver to get a dull metallic effect. I handpainted some
details in the underwing bay, landing gear bays, and wing joints. Then the whole
jet got a coat of GA gloss and it was on to the wonderful Furball decals.
The bulkhead of the raised
wing was painted GA Red. The area on the fuselage where the horizontal
stabilizer moves is also a bare metal color similar to the engine area of the
tailpipe, so I painted it black and I dry brushed this and the tailpipe with
Model Master Chrome Silver to get a dull metallic effect. I handpainted some
details in the underwing bay, landing gear bays, and wing joints. Then the whole
jet got a coat of GA gloss and it was on to the wonderful Furball decals.
The Cartograph-printed Furball decals were an absolute pleasure to work with—even the large, complicated yellow livery on the tail and strakes went down without problems. Speaking of the strakes, I’m very glad I decided to use the Hasegawa parts, as they fit almost perfectly. Some of the decals needed an extra hit of Micro Sol in places in order to get them to fully snug down into the surface. The decals were sprayed with gloss and it was on to weathering. I made a wash with Windsor & Newton lamp black and burnt sienna oil paints. After removing the excess and another gloss coat, I tried two separate dot filters, one with black and brown oil paint, then another with white. Finally I smudged these same oil paints along the panel lines on the upper surfaces to give them just a little more definition, and I sealed it all with GA flat clear to get an overall semi-gloss appearance.
| FINAL CONSTRUCTION |
I built and painted AIM-9D missiles from the Hasegawa Weapons Set C, and used the kit provided launch rails, which were painted white with yellow tips. I scratchbuilt boarding steps, painted and assembled the canopy, and added some final pieces like the arrestor hook and front nosegear door. I also scratchbuilt a hydraulic jack which raised the wing. The wing with raised tips was glued on top. Once everything was together, I painted little details like wing lights. Overall very pleased with the final result, this being my first “serious” build.
| CONCLUSIONS |
It’s a dated kit surpassed by the newer Hasegawa release in terms of accuracy and quality, but the Monogram F-8 still builds into a convincing replica of this Navy fighter. You don’t need to put all the extra time and effort into raising the wing like I did—it’s fairly easy to add some extra details and corrections like the landing gear. Like all old Monogram kits, it needs some putty and patience, but if you really like the Crusader like me, it’s a worthy option. Also, I highly recommend the Furball MiG Masters decalset, it has a ton of schemes to choose from—in addition to every jet that shot down a MiG, it includes several notable jets such as those flown by Dick Schaffert and Jim Stockdale.
This was very fun and memorable, and I learned a great deal from really taking the time (6+ months!) to build it how I envisioned.
Special thanks to modelers Drew Tarter, Wayne Hui, Tom Weinel, and friends on Scalemates who watched and gave advice on the build. Extra special thanks to my wife for this great kit!
| REFERENCES |
F-8 Crusader Units of the Vietnam War (Osprey Combat Aircraft 7). Peter Merskey (1998).
F-8 Crusader vs. MiG-17: Vietnam 1965-72 (Duel). Peter Merskey (2014).
F-8 Crusader – Walk Around No. 38. Squadron/Signal. Ed Barthalmes (2005).
F-8 & RF-8 Crusader in Detail & Scale. Bert Kinzey & Rock Roszack (2019).
FineScale Modeler, Volume 10 Issue 5, (July 1992).
5 March 2024
Copyright ModelingMadness.com. All rights reserved. No reproduction in part or in whole without express permission.
If you would like your product reviewed fairly and fairly quickly, please contact the editor or see other details in the Note to Contributors.