Eduard 1/48 Albatros D. II
| KIT #: | 8081 |
| PRICE: | $29.95 in 2001 |
| DECALS: | Four options |
| REVIEWER: | Rob Hart |
| NOTES: | Kit is currently OOP but gets reissued from time to time. |
| HISTORY |
 By early
1916 the German Fokker monoplane fighters were being outclassed by the British
DH 2 and French Nie 11 biplane fighters. The Germans responded by introducing
new biplane designs in the Spring of 1916. The Albatros company introduced two
very similar designs, the D.I and D.II. Both designs used the same engine,
synchronized twin machine gun armament, empennage, and fuselage. The wings of
the D.I and D.II were similar, but the D.II's upper wing was mounted lower with
“N” type cabane struts. This gave the pilots a better upward and forward view.
The streamlined plywood covered fuselage was strong and the liquid cooled
Mercedes engine gave the aircraft good speed and climbing ability.
By early
1916 the German Fokker monoplane fighters were being outclassed by the British
DH 2 and French Nie 11 biplane fighters. The Germans responded by introducing
new biplane designs in the Spring of 1916. The Albatros company introduced two
very similar designs, the D.I and D.II. Both designs used the same engine,
synchronized twin machine gun armament, empennage, and fuselage. The wings of
the D.I and D.II were similar, but the D.II's upper wing was mounted lower with
“N” type cabane struts. This gave the pilots a better upward and forward view.
The streamlined plywood covered fuselage was strong and the liquid cooled
Mercedes engine gave the aircraft good speed and climbing ability.
Albatros D.Iis entered service in late 1916 just in time to re-equip the newly organized German fighter units. The new aircraft and new organization enabled the Germans to achieve air superiority over the allied air forces in the Spring of 1917. 275 Albatros D.IIs were built and a few were still in service at the time of the armistice.
| THE KIT |
The kit has 62 plastic parts, 30 photo-etched parts, and a sheet of vinyl masks. Surprisingly, the plastic parts include a pilot figure. Two upper wings are provided, one with the radiator molded iintegrally with the wing and one without for the aircraft that used side mounted radiators The photo-etched parts include, control horns, machine gun jackets, machine gun cocking handles, gun sights, seat belts,shoulder harnesses, access hatch covers, throttle handle, magneto, and mesh grill faces for the side radiators. The mask set includes masks for the wheel hubs, some of the markings, and for masking off the natural metal vents and fairings on aircraft with varnished wood finished fuselages. Oddly, no representation of any of the various windshields that were fitted to Albatros D.IIs is provided.
| CONSTRUCTION |
I used parts from the following aftermarket sets: black dog A48001 Albatros D.I and D.II detail set, GasPatch Models Spandau 08 Early, Quinta Studios QL 48005 1/48 Axial laminated Propeller decals, Eduard 49 030 1/48 Seatbelts German WWI, Eduard 49 194 1/48 WWI Instruments, and Eduard 48 409 1/48 Mirrors
 I started
construction of the model by running a scriber through all of the engraved panel
lines. This didn't take long as the subject's surface detail is mostly wood and
fabric and what few panel lines exist are confined to the fuselage. The assembly
process, as laid out in the instructions, starts with the construction of the
cockpit. To that end, I began painting the parts that would go in the cockpit. I
sprayed all of the parts requiring a wood grain finish (bulkheads, cockpit
floor, rudder bar, and instrument panel) with a mix of 9 x Tamiya's acrylic
white XF2 and 1 x Tamiya's acrylic dark yellow XF60, foilowed by a streaky wash
of burnt umber oil paint, and sealed with a 70/30 mix of Tamiya's acrylic clear
yellow and clear orange.
I started
construction of the model by running a scriber through all of the engraved panel
lines. This didn't take long as the subject's surface detail is mostly wood and
fabric and what few panel lines exist are confined to the fuselage. The assembly
process, as laid out in the instructions, starts with the construction of the
cockpit. To that end, I began painting the parts that would go in the cockpit. I
sprayed all of the parts requiring a wood grain finish (bulkheads, cockpit
floor, rudder bar, and instrument panel) with a mix of 9 x Tamiya's acrylic
white XF2 and 1 x Tamiya's acrylic dark yellow XF60, foilowed by a streaky wash
of burnt umber oil paint, and sealed with a 70/30 mix of Tamiya's acrylic clear
yellow and clear orange.
I painted most of the metal parts in the cockpit with a 50/50 mix of Tamiya acrylic XF22 and XF49 to represent the light gray green color used by the Germans. The seat and cushion from the black dog set was given a coat of Tamiya acrylic XF85 Rubber Black and the ammunition container was given a couple of coats of Alclad II Aluminum. With all of the parts in the cockpit painted, assembly began.
I recommend closely following the instructions during construction. The cockpit has a lot of parts that have to go into a very small space. The instructions include a couple of useful side view drawings that show the correct angles and alignment of the parts as they are placed on the fuselage halves. I filed off the faces of the kit instruments and replaced them with the pre-colored tachometer and altimeter gauges that came in the Eduard set. I also used the pre-painted (inked?) seat belts and shoulder harnesses from the Eduard set. The kit includes photo-etched seat belts, but I had the Eduard set to hand and it spared me having to hand paint the kit parts. I replaced the gun trigger levers on the kit's spade grip with some unidentified photo-etched psrts from my spare's box. The only other addition that I made to the cockpit was a pair of control wires running from the rudder bar under the floor and through a couple of holes that I drilled in the rear bulkhead.
The engine and machine guns are assembled next. The engine block and cylinders are molded integrally in left and right halves. The halves were joined and after the seams were sanded smooth, the block was painted aluminum and the cylinders were painted black. I painted the rocker arm assembly aluminum and painted the carburetor and induction pipes a burnt bronze color with brass highlights. I drilled out the ends of the magnetos and ran .0075” black insulated wires to holes drilled in each side of the cylinders to represent ignition wires. After closing the fuselage halves none of the wires can be seen. After the engine was assembled I gave it a wash of thinned paynes gray oil paint and attached it to the mounting frame. I then glued the entire engine sub-assembly in the nose of the right fuselage half.
 Eduard
provides plastic parts with photo-etched embellishments for the twin machine
guns. I had a pair of very nice 3D printed GasPatch guns on hand and substituted
them for the kit parts. The GasPatch guns required some slight trimming to line
up with the kit ammunition feed chutes, but fit well otherwise and look really
good. The instructions advise attaching the guns to their mounts at this point,
but I decided to hold off on this until after the model was painted.
Eduard
provides plastic parts with photo-etched embellishments for the twin machine
guns. I had a pair of very nice 3D printed GasPatch guns on hand and substituted
them for the kit parts. The GasPatch guns required some slight trimming to line
up with the kit ammunition feed chutes, but fit well otherwise and look really
good. The instructions advise attaching the guns to their mounts at this point,
but I decided to hold off on this until after the model was painted.
With the engine and cockpit assembled and installed, the fuselage halves were joined. After the glue dried, the seams were smoothed, and any panel lines that spanned seams were rescribed, the lower wing, tail skid fairing, fin/rudder, and horizontal stabilizer were attached to the fuselage. Any seams created were filled with superglue and sanded smooth. The instructions advise attaching the tail skid, the empty cartridge collection chute, and a photo-etched fairing between the guns in this step, but again, I held off until after the model was painted. Since I was going to use the separate control surfaces that came in the black dog set, I removed the kit's ailerons and elevators. To simulate the aileron and elevator hinges, I filed out “C” shaped indentations on the leading edges of the elevators and the ailerons where the hinges are located. Then I added small pieces of .030” by .030” strip styrene to the trailing edges of the upper wing and the horIzontal stabilizer where the ailerons and elevator were removed and at the locations of the hinges. I decided not to use the black dog fin and rudder as they did not fit very well and the rudder did not have much contact area on the fin.
| COLORS & MARKINGS |
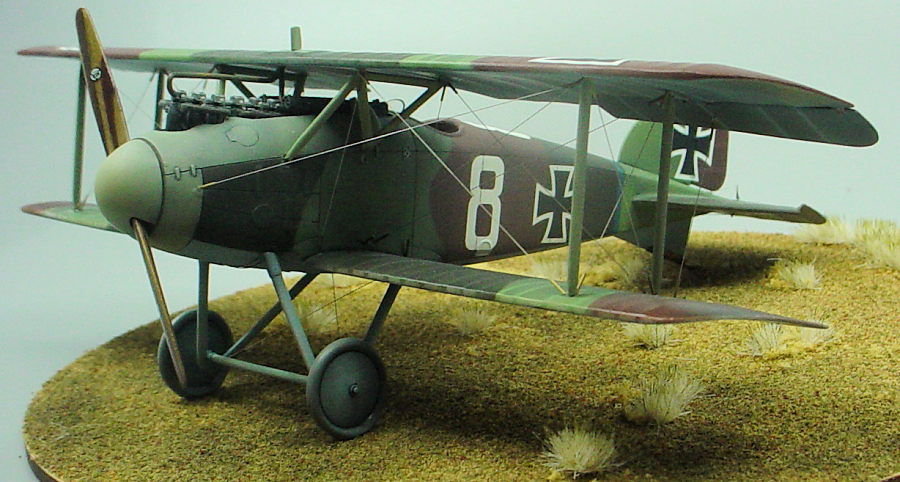
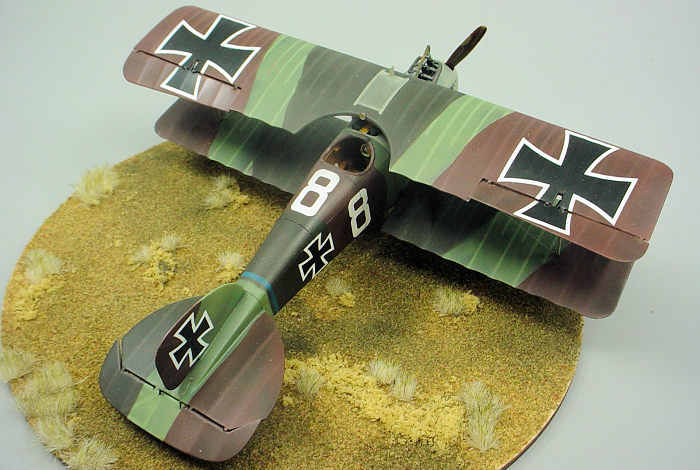
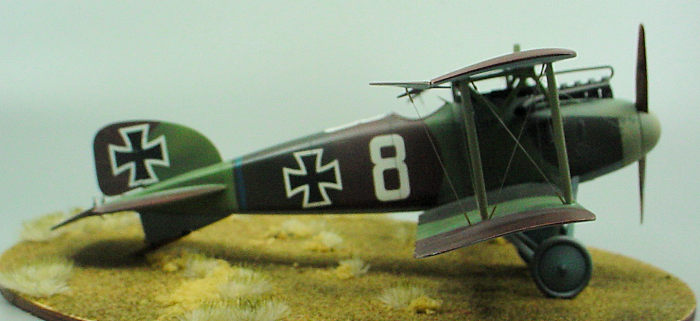
Eduard provides four decal options. Three of the options are for machines with natural wood finished fuselages and camouflaged wings. The fourth option is for an overall camouflage painted aircraft that was brought down intact by the British on March 4 , 1917. This machine is very well documented and is the option that I chose for the model. Eduard's painting instructions specify dark green and brown upper surfaces with light blue unders urfaces while other references show three color upper surfaces with either light green or light gray being the third color. I decided to go with the dark green, brown, and light green upper surfaces and light blue under surfaces. I used The following Tamiya Acrylic paints and mixes:
Dark green: XF61
 Brown: XF10
x 8 + XF2 x 2
Brown: XF10
x 8 + XF2 x 2
Light green: XF71
Light Blue: XF2 x 10 + XF18 x 1
I used the same light gray green on the metal engine covers and nose surround that I had painted the metal fittings in the cockpit with. Prior to applying the camouflage, I masked off the exposed engine with strips of Tamiya masking tape and pieces of damp tissue paper and I stuck a short cylinder of foam rubber into the cockpit opening to keep over spray out of the interior of the fuselage. Photos of the real aircraft show no visible feathering between the colors so I masked the outlines of each camouflage color with thin ribbons of rolled out Blu-Tack and filled in the interior of the outlines with paper masks cut from old magazine pages. I masked off the coaming around the cockpit opening with strips of kabuki tape from a Maketar Canopy Survival kit and aprayed it dark brown followed by dry brushing with tan enamel to simulate a leather finish. With the camouflage applied, I over sprayed all of the exterior surfaces with a couple of coats of Tamiya Acrylic X22 Clear Gloss.
I approached using the 22 year old kit decals with some trepidation, but aside from one of the under wing crosses tearing when I tried to move it into position, all of the problems that I had with the decals were self induced. I applied the two upper wing crosses, waited about an hour, and then hit them with a brush load of Microsol. When I checked them about 24 hours later they were wrinkled. I slit the wrinkles with a scalpel and applied more Microsol. I looked at them again on the following day and saw no improvement, I sanded down the wrinkles and touched up the crosses with a black Micron 005 marker. I skipped the Microsol step on the next group of decals and they laid down perfectly. Lesson learned: don't use decal solvent on these decals. After the decals dried, I wiped off the adhesive revenue, and applied a paynes gray oil paint pin wash in the panel lines. I let the wash dry for 24 hours and sprayed the exterior surfaces with a coat of Tamiya acrylic XF86 flat clear. The subject aircraft used an Axial laminated wood propeller. I usually simulate laminated wood props with colored pencils, but I decided to try some Quinta Studios decals. I wasn't impressed. The decals didn't fit, wouldn't lay down, and I ended up having to touch them up with a colored pencil.
| FINAL BITS |
The
pins on the kit's strut ends were very short so I drilled them out and inserted
short lengths of .012” music wire. I glued the cabane struts to the fuselage and
after letting the glue cure overnight, I attached the upper wing. After I was
satisfied with the wings to fuselage alignment, I attached the interplane
struts. I failed t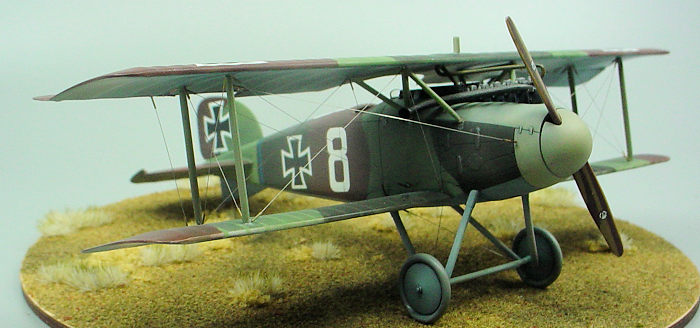 o
notice that there was insufficient forward stagger of the wings until too late
to correct it. If I build this kit again, I'll move the cabane strut locations
on the lower surface of the upper wing forward by about 1 mm. Another correction
that I will make is to thin down the interplane struts. They are about twice as
thick as they should be. I cut a windscreen from clear packaging material
(acetate?) to match some scale drawings in one my references, formed it around
the handle of a JLC saw, and held in steam from a boiling teapot until it took
on the curvature that I wanted. I sanded off the the molded on access hatch
covers and the landing gear retaining strap on the underside of the forward
fuselage and replaced them with the kit supplied photo-etched parts. I attached
the landing gear and wound a roughly two inch length of EZ Line around the axle
and the lower end of the landing gear struts to simulate the bungee cord
suspension. I glued the photo-etched control horns to the elevator and rudder
and then attached the elevator and ailerons to the stabilizer and upper wing
respectively. I added rigging and control lines from .004” stainless steel music
wire with simulated turnbuckles from 3 mm lengths of .04 mm brass tubing. I
attached the windshield, wheels, propeller, and the exhaust pipe from the black
dog set. Finally, I attached a rear view mirror from the Eduard set to the
trailing edge of the upper wing cutout.
o
notice that there was insufficient forward stagger of the wings until too late
to correct it. If I build this kit again, I'll move the cabane strut locations
on the lower surface of the upper wing forward by about 1 mm. Another correction
that I will make is to thin down the interplane struts. They are about twice as
thick as they should be. I cut a windscreen from clear packaging material
(acetate?) to match some scale drawings in one my references, formed it around
the handle of a JLC saw, and held in steam from a boiling teapot until it took
on the curvature that I wanted. I sanded off the the molded on access hatch
covers and the landing gear retaining strap on the underside of the forward
fuselage and replaced them with the kit supplied photo-etched parts. I attached
the landing gear and wound a roughly two inch length of EZ Line around the axle
and the lower end of the landing gear struts to simulate the bungee cord
suspension. I glued the photo-etched control horns to the elevator and rudder
and then attached the elevator and ailerons to the stabilizer and upper wing
respectively. I added rigging and control lines from .004” stainless steel music
wire with simulated turnbuckles from 3 mm lengths of .04 mm brass tubing. I
attached the windshield, wheels, propeller, and the exhaust pipe from the black
dog set. Finally, I attached a rear view mirror from the Eduard set to the
trailing edge of the upper wing cutout.
| CONCLUSIONS |
The Eduard kit, given its age, still builds into a reasonable representation of the subject. A good thing as its still the only Albatros D.II in 1/48. I was kind of disappointed by the upper wing's lack of forward stagger, but that could have been easily corrected had I caught it in time. Due to the kit's good fit, general accuracy, and high level of detail, I recommend it to anyone who has an interest in WWI aircraft.
.
19 February 2024 Copyright ModelingMadness.com. All rights
reserved. No reproduction in part or in whole without express permission from
the editor. If you would like your product reviewed fairly and fairly quickly, please contact the editor or see other details in the
Note to
Contributors. Back to the Main Page
Back to the Review
Index Page
Back to the Previews Index Page