Airfix 1/72 B-25C/D Mitchell
| KIT #: | A06015 |
| PRICE: | $36.00 shipped |
| DECALS: | Two options |
| REVIEWER: | Scott Van Aken |
| NOTES: | 2018 tooling. |
| HISTORY |
 The North American B-25 Mitchell is an American twin-engine, medium
bomber manufactured by North American Aviation(NAA).
The North American B-25 Mitchell is an American twin-engine, medium
bomber manufactured by North American Aviation(NAA).
The design was named in honor of Major General William "Billy" Mitchell, a pioneer of U.S. military aviation. Used by many Allied air forces, the B-25 served in every theater of World War II and after the war ended many remained in service, operating across four decades. Produced in numerous variants, nearly 10,000 Mitchells rolled from NAA factories. These included a few limited models, such as the United States Marine Corps' PBJ-1 patrol bomber and the United States Army Air Forces' F-10 reconnaissance aircraft and AT-24 trainers.
Thanks to the longevity of the later B-25J in both the trainer and general transport role, a goodly number are still flying and can be seen at air shows over the world.
| THE KIT |
With the release of their fine B-25J series of kits, many of us were hoping that Hasegawa would do the earlier version as well. However, this did not happen and we who like to model the C/D variant had to wait until now for something to replace our Italeri kits.
The wait was well worth it as Airfix has made a nice kit for us. It is a series 6 which means it is a bit more pricey than their older B-25H/J (which is still in the catalogue). That means it comes in a fairly large box so don't expect first class shipping.
The molding is right up there with their other newer kits and this one comes with a lot of options. Let me start by stating that this boxing is for the later B-25C/D with the ejector exhaust. Airfix did not provide a parts location guide in the instructions, but searching the sprues turned up all the parts needed to do an early variant as well as other bits.
The cockpit is nicely done and relies on a decal for the instrument panel. There is no harness detail on the seats and they got the short back co-pilot's seat correct, something other kits have missed. There is nice sidewall detailing and one builds up the interior by adding the various bulkheads to it. The very back one contains the wing spars.
Next a
lot of paper is taken up with the building up the bomb bay and adding the bombs.
If you don't want to model yours with the doors open, there is a piece included
to do a doors closed option. The aft bay bulkhead contains the second wing
 spar.
Note that when you close the fuselage halves, you'll need to have installed 25
grams. It will be tricky to find enough room for all that weight, but it can be
done.
spar.
Note that when you close the fuselage halves, you'll need to have installed 25
grams. It will be tricky to find enough room for all that weight, but it can be
done.
Instructions show the upper wings attached to the spars first and then the lower wings. This should help get a good upper wing/fuselage fit. On the fuselage side are two clear inserts for the windows in that area. You are also told to glue the main gear to the lower wing at this time, temporarily attaching the engine nacelle halves while the cement dries.
The engine is nicely detailed and since this is the ejector exhaust boxing, you have a goodly number of little exhaust triangles to attach. Once the cowling is done, you attach it along with an insert to the two nacelle halves and then to the wing. If you wish to do an early C/D, those cowling bits are on the sprues.
The kit provides separate flaps for the up and lowered position. You also have separate rudders and elevators. Wheels and landing gear are nicely molded. There is an optional spoked nose gear wheel, but that is not called out in the instruction. Upper and lower turret can be built raised or lowered. On the sprues is a blanking plate for the lower turret as often that was removed to save weight. Both the forward and aft boarding ladders can be posed lowered or up. Two canopies are provided, one with the additional frames on the forward quarter windows. All the other clear bits have well defined frames and can be installed from the outside after you have painted the model. What is not included is the SWPA gun packs and gun noses. However, you can get the early gun packs from Quickboost and I would be surprised if they did not appear in a dedicated boxing.
Instructions are very well done with Humbrol paint numbers provided during the build. Markings are for two interesting planes. One is the box art plane in the infrequently photographed sea search scheme of OD and white operating out of Tampa, FL with the 23rd Antisubmarine Squadron. The other is in a faded desert scheme with the 12th Bomb Group on a War Bond drive in 1943. For this option, the insignia are faded. Decals are quite nicely done and my experience with Airfix kit decals is quite positive.
| CONSTRUCTION |
A few years back, I robbed this kit of its 500lb bombs for another project and while looking around for another project to start, keyed in on this for the next subject. Throwing caution to the wind, I started off by constructing the cockpit section. The parts fit quite well and the somewhat soft plastic made removing the sprue attachment stubs a breeze. While doing this I also assembled the wheels. With most of the interior done, I started figuring out how to install the required 25 grams of weight. I wasn't sure if I wanted to leave this as a glass nose or do a SWPA B-25 gunship. Eventually I managed to cram the weight in place, hoping I wasn't shooting myself in the foot with some of the placement, which could interfere with the installation of the nose gear. To alleviate those fears, I did some dry fitting and found that there was (barely) room.
 With the interior built up, I then went to paint it. From
some reading, I discovered that the B-25 cockpit area was a darker than the
usual US interior green. Some recommended FS 34092, so I used that, but it
looked too green. Others recommended RAAF Foliage Green, but I didn't have any
on hand. This meant ordering it as the dearth of hobby shops around here made
that the best option. Truth is that foiliage green is very close to FS 34092,
but once I got the paint, I repainted the interior bits.
With the interior built up, I then went to paint it. From
some reading, I discovered that the B-25 cockpit area was a darker than the
usual US interior green. Some recommended FS 34092, so I used that, but it
looked too green. Others recommended RAAF Foliage Green, but I didn't have any
on hand. This meant ordering it as the dearth of hobby shops around here made
that the best option. Truth is that foiliage green is very close to FS 34092,
but once I got the paint, I repainted the interior bits.
I then closed the fuselage halves, trapping the interior and the bulkhead/wing spar pieces. Note that even if you aren't going to have the bomb bay open, you need to install the upper bay piece. With all that done, I did the usual filler and sanding. The closed bomb bay piece was then installed. Fit is fair.
Next, the tail section was built up and then installed on the fuselage. Filler is needed at the forward juncture. I found it easy to keep the control surfaces free so they could move if one wanted. Next, the wings were assembled after opening the required holes. This included installing the landing lights. These were then attached to the fuselage. Fit is good. Due to the small opening in the nacelles for the main gear, these need to be installed at this time using a nacelle half as a brace while the cement dries.
Meanwhile, I built up the engines and cowling. You are
provided each individual stack for the back row of exhaust. Thankfully, Airfix
provides a couple of spares in case you lose one or two to the carpet monster. I
built up the nacelles first then attached them to the wing and this resulted in
some larger than I'd liked gaps when it came time to glue them to the wings. I'd
recommend attaching the nacelle halves around the gear though this will make
cleaning up the nacelle seams mo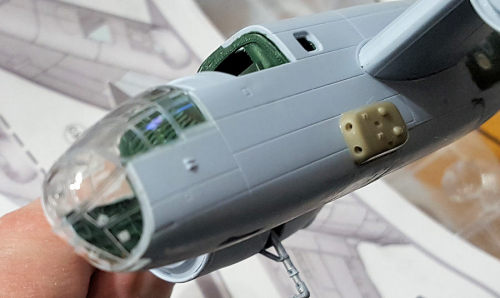 re difficult. I installed the engine assemblies
into the cowling. In hindsight, it might have been better to glue the engines to
the nacelles first then attach the cowling. Anyway, before installing the
engines I painted the forward cowling yellow to match the decal scheme I chose
for this one.
re difficult. I installed the engine assemblies
into the cowling. In hindsight, it might have been better to glue the engines to
the nacelles first then attach the cowling. Anyway, before installing the
engines I painted the forward cowling yellow to match the decal scheme I chose
for this one.
This kit was going to be a SWPA strafer. This meant some add on parts were needed, specifically the side gun packs. Quickboost makes a pair for the Hasegawa kit, though they fit the Airfix Mitchell without any issues. I also had to drill holes in the forward transparencies for the gun barrels. Had I thought about it, I'd have filled the nose with weight and left off all the bombardier's bits. The nose transparencies fit quite well. You can see the pack installation and the nose gun holes in the accompanying image.
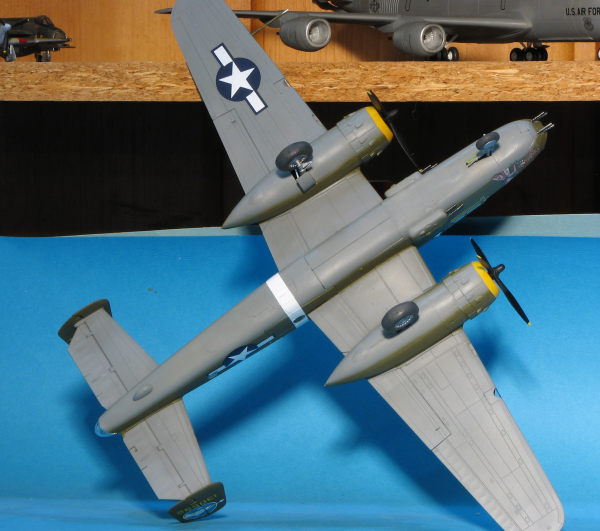
Next, I painted the inside of the side transparencies and glued them in place. I also installed the flaps. Airfix provides the flap down option, which is nice, however, all the period photos I looked at (and it was a LOT) did not show any parked B-25 with lowered flaps. The only Mitchells shown on the ground with lowered flaps were those that had crashed so I installed the 'flaps up' pieces.
I then installed most of the rest of the clear bits save the turret, upper astrodome, and tail transparency, which all have no framework to mask. The rest were masked off using an Eduard mask set. The engines and cowlings were then glued in place as were all the underside access hatches. Airfix offers both open and closed access hatches and I chose the closed ones. These are not the greatest fit. Same goes for the lower turret blanking plate. With all this complete, I went to the paint shop.
| COLORS & MARKINGS |
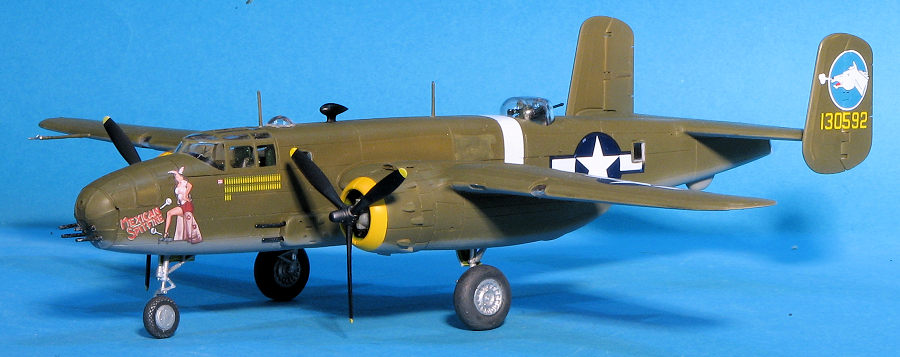
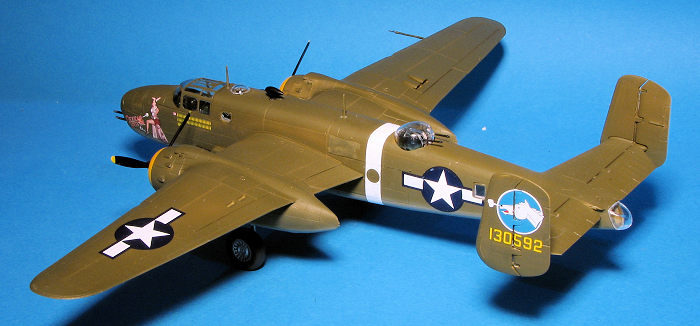
I decided to model 'Mexican Spitfire', a B-25 of the that is provided on Lifelike sheet 72 - 040. This is in the standard OD over Neutral Grey. I started by masking the forward engine cowling and then sprayed some neutral grey that I'd already had mixed from a previous project. I am not sure how much the neutral grey fades, but this is not as dark as fresh NG. Once that had cured, several areas were masked off and I sprayed on the OD using a bottle of Testors enamel that I had in the stash. Again, this is a lighter shade than fresh OD.
 I did find a few areas of concern once I put the kit
under a bright light so went back and touched those up. I then installed the
nose gear and the main gear doors. The nose gear was attached and the airframe
given a gloss clear coat in preparation for decals.
I did find a few areas of concern once I put the kit
under a bright light so went back and touched those up. I then installed the
nose gear and the main gear doors. The nose gear was attached and the airframe
given a gloss clear coat in preparation for decals.
The decals from the Lifelike sheet went on without any real fuss. Most easily succumbed to Microsol, though some required a bit of Mr Mark Softer. With the decals in place a bit of Tamiya flat was sprayed on to seal things in. After this, the masking was removed. I apparently forgot to mask one of the side windows and scratched up the area trying to pick off a non-existent mask. I also discovered that I couldn't remove the circular side masks as they didn't match up with the openings in the white decal stripe.
There were quite a few final bits. First, the main gear doors were glued on along with the small retraction piston. Then the wheels were attached. These are a positive fit. I chose the nose wheel cover option as Mexican Spitfire had that feature. Then I glued on the radio and DF antennas. Building the rear turret was a bit of a challenge as I had to cut off a small section of the rear of the guns to get it to fit. Getting into its mounting post was also not easy. The rear clear bit was attached using clear cement. Then the gun barrels for the nose and side packs. Super glue was used for these. Final items were the pitot and the props. I didn't do exhaust stains as I was running short of time, so I'll attend to those later.
| CONCLUSIONS |
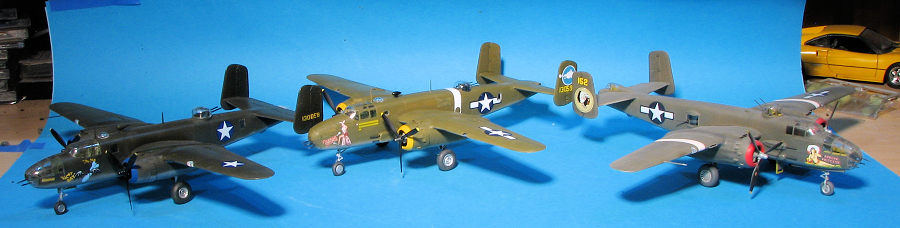
This is the fourth 1/72 B-25 that I've built having done the old Monogram snap kit, a Hasegawa J, an Italeri C and this one. This one was the most detailed for the group. It is fairly fussy thanks to all the inserts, but nothing a modeler cannot overcome. In my opinion, the Hasegawa kit is still the best of the group, however, they only do the later H/J models. For a C/D, this one would be my choice. Completion of this kit also gave me one of each squadron of the 345th BG.
| REFERENCES |
https://en.wikipedia.org/wiki/North_American_B-25_Mitchell
2 February 2024 Copyright
Modelingmadness.com. All rights reserved. No reproduction in part or in whole
without express permission from the editor. If you would like your product reviewed fairly and fairly quickly, please
contact
the editor or see other details in the
Note to
Contributors.
Back to the Main Page
Back to the Review
Index Page
Back to the Previews Index Page