Airfix 1/48 Vampire FB.5/9
| KIT #: | A06108 |
| PRICE: | $46.00 delivered |
| DECALS: | Three options |
| REVIEWER: | Scott Van Aken |
| NOTES: | 2023 release |
| HISTORY |
The de Havilland Vampire is a British jet fighter which was developed and manufactured by the de Havilland Aircraft Company. It was the second jet fighter to be operated by the RAF, after the Gloster Meteor, and the first to be powered by a single jet engine.
 Development of the Vampire as an experimental aircraft began in 1941
during the Second World War, to exploit the revolutionary innovation of jet
propulsion. From the company's design studies, it was decided to use a
single-engine, twin-boom aircraft, powered by the Halford H.1 turbojet (later
produced as the Goblin). Aside from its propulsion system and twin-boom
configuration, it was a relatively conventional aircraft. In May 1944 it was
decided to produce the aircraft as an interceptor for the Royal Air Force (RAF).
In 1946 the Vampire entered operational service with the RAF, only months after
the war had ended.
Development of the Vampire as an experimental aircraft began in 1941
during the Second World War, to exploit the revolutionary innovation of jet
propulsion. From the company's design studies, it was decided to use a
single-engine, twin-boom aircraft, powered by the Halford H.1 turbojet (later
produced as the Goblin). Aside from its propulsion system and twin-boom
configuration, it was a relatively conventional aircraft. In May 1944 it was
decided to produce the aircraft as an interceptor for the Royal Air Force (RAF).
In 1946 the Vampire entered operational service with the RAF, only months after
the war had ended.
The Vampire quickly proved to be effective and was adopted as a replacement of wartime piston-engined fighter aircraft. During its early service it accomplished several aviation firsts and achieved various records, such as being the first jet aircraft to cross the Atlantic Ocean. The Vampire remained in front-line RAF service until 1953 when its transfer began to secondary roles such as ground attack and pilot training, for which specialist variants were produced. The RAF retired the Vampire in 1966 when its final role of advanced trainer was filled by the Folland Gnat. The Royal Navy had also adapted the type as the Sea Vampire, a navalised variant suitable for operations from aircraft carriers. It was the service's first jet fighter.
The type was a huge export success with over 1,000 FB.5/6 aircraft being built overseas.
| THE KIT |
Last year, Airfix delighted many fans with the release of the Vampire F.3. This was a variant that wasn't as widely disseminated as later Vampire marques. It was a smart move on the part of Airfix as people who really wanted a 1/48 Vampire were able to get their fix. However, it was the later FB.5/9 version that was more widely used and that most of us who wanted a 1/48 Vampire were awaiting.
Now it is probably not too surprising that this kit shares the majority of sprues with the F.3 boxing. Basically the only major differences were the clipped wing tips of the FB.5/9 and the extened intake section for the FB.9 to fit the air conditioning package (such as it was). So let me provide a few highlights of this kit that might interest you.
The kit provides full intake trunking, though removing the join line will
take some considerable effort. The engine compressor section includes the
forward wall of the main landing gear. The rest of the gear well is built up of
separate items. THe exhaust is the same with an uppe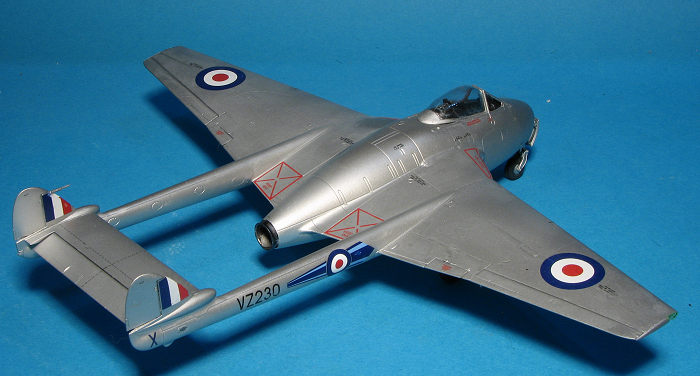 r and lower section that has
a prominent seam. The final compressor stage includes the backwall of the flap/speedbrake
section. A note on this. I looked at a LOT of period photos of Vampires on the
ground. None had extended flaps. Some did have the speedbrake deployed so you
might want to keep that in mind.
r and lower section that has
a prominent seam. The final compressor stage includes the backwall of the flap/speedbrake
section. A note on this. I looked at a LOT of period photos of Vampires on the
ground. None had extended flaps. Some did have the speedbrake deployed so you
might want to keep that in mind.
A nicely detailed cockpit is provided and though you are expected to install 17 grams of noseweight to keep it from tail-sitting, finding space for what is a fair amount of weight will be difficult. Airfix also has you build and attach the booms to the lower wing prior to attaching the upper wing/fuselage section. As mentioned, there are separate right intake pieces depending on if you are doing the FB.5 or FB.9. Separate ailerons, flaps, rudders, and elevator is provided. For the flaps, there are separate pieces for raised and lowered flaps.
All of the landing gear are well done and quite sturdy looking. You do have the option of open or closed canopy as well. Airfix provides a seat with a harness molded in and one without if you want to use the pilot figure. Another neat feature is that for a wheels up model, the main gear wells are glued from the inside for a positive fit. Oddly, I did not see any step that showed how to do the nose gear closed. The other option is for the underwing fuel tanks.
Airfix instructions are very nice showing the previous assembly in color in the current assembly step. Markings are for three planes. Two are FB.9s with one in high speed silver from 213 squadron with large black areas on the nose and tail. The other is the camouflaged box art plane from 502 Squadron. The lone FB.5 is a high speed silver French plane from EC 5. The decal sheet is nicely done and provides the usual stencils.
| CONSTRUCTION |
I generally follow the instructions on kits which I have never built before. So it was with this one. Early on I decided not to use the drop tanks, which on a Vampire are unlovely. This one starts with building up the intake and the forward spar/compressor/front wheel well piece. I prepainted all of these using Tamiya silver lacquer, which went on smooth and dried quickly. At this time, I identified other bits that needed this color and painted those.
Next batch of steps are completing the main gear
wells. The outer piece was a real bitch to get into place as I'd waited for the
preceding steps to dry before installation. Recommend doing all these pieces at
the same time. Next, the aft spar/exhaust was assembled. Prior to gluing I
painted it all using Citadel tinny tin. I found it a bit of a trial to get the
two spa r pieces to fit where they should as they do need to be held in place
until dry or they will 'drift' out of position.
r pieces to fit where they should as they do need to be held in place
until dry or they will 'drift' out of position.
Cockpit is next. This is all painted matte black. Two seats are supplied, one with and one without belts, the latter designed for the pilot figure. Nose gear well is next, followed by installing the cockpit. Fitting the cockpit is a real chore as the tolerances are quite tight. Eventually I got it in place, but it was a struggle.
Tail booms next. These are then fit into the lower fuselage section and slot into holes in the rear spar. Again, very close tolerances. Those bits that fit in the upper fuselage were next. This included the main instrument panel of which two are supplied. One is for decals and the other has raised detail. Before closing the fuselage/wing halves, I packed the area aft of the cockpit with lead. The fit of the upper/lower fuselage is only fair. It is rather poor in the fuselage sections. I then put more weight in the nose after discovering that I didn't use enough behind the cockpit. Instructions state 17 grams in the nose. Good luck getting all that in there. The nose cap was then attached. Again, fit wasn't very good. This was followed by the intakes of choice. This is where you have to decide between modeling and FB.5 or FB.9. Fit is fair, but needed filler. There were also some gaps where the tail booms fit. Perhaps you get by now that while not a putty monster, I had to do a lot of filling and sanding.
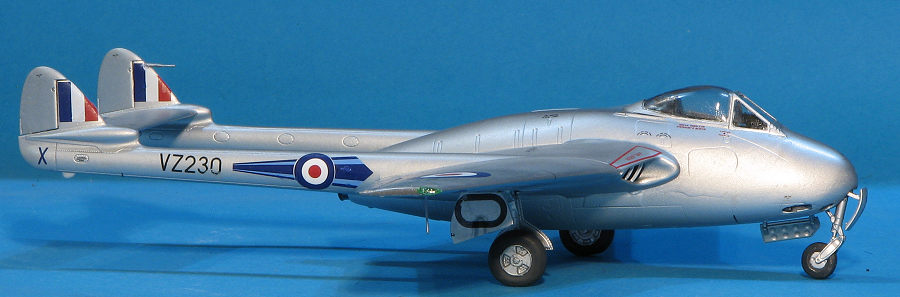
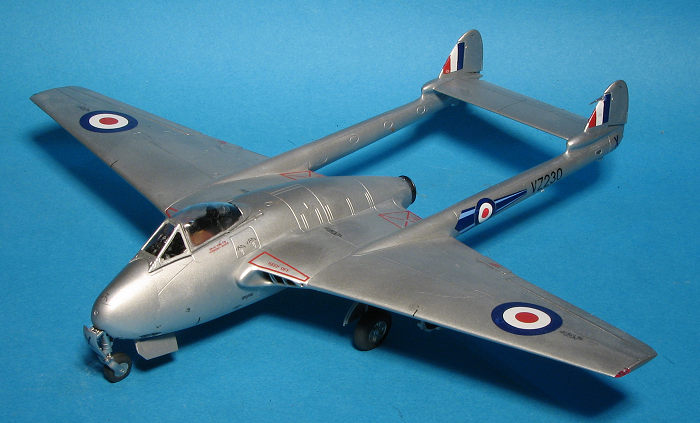
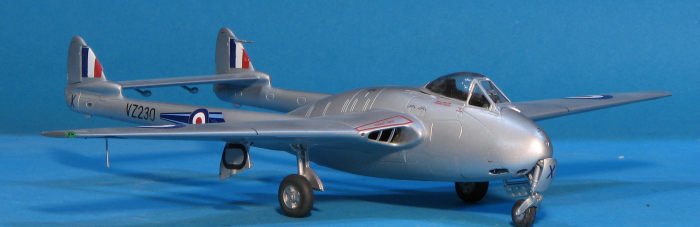
With all that finally completed, I started attaching control surfaces. At the back, I posed the rudders and elevator slightly deflected as I saw in a lot of photos of the plane on the ground. I almost never saw the flaps lowered on the ground so used the 'up' option. I know a lot of people will model their Vampire with flaps lowered, even though it wasn't really prototypical. It is like lowered flaps on Spitfires, though a pilot would be fined if they left them lowered after touchdown. A nice touch is that the 'raised' pieces have little pegs on which they rest to ensure a good fit. As for the speedbrakes, it was not at all unusual to see these deployed on the ground so I modeled them in this position.
With those attached, I added the ailerons and the wing tip pieces. I then moved to the landing gear. Since I was choosing an overall high speed silver scheme, I felt it was best to attach all the gear and doors so I could paint them at the same time. I found the nose gear door quite difficult to install properly. I also discovered that the nose gear was crooked. This was due to the uneven gear well caused by the difficulty I had installing the cockpit subassembly. Main gear went on without trauma. For the outer doors, I'd suggest attaching the retraction mechanism prior to attaching the door. It is just a lot easier to do.
| COLORS & MARKINGS |
 Then started the somewhat tedious job of attaching all the small decals. I
used kit decals for everything except the unique markings. For those I used
Xtradecal 48-220 and chose the 73 Squadron option. Note that these decals do
not like strong setting solutions. I used Mr Mark Softer on a few of them
with results that were not good. Stick with MicroSol or something equally
weak.
Then started the somewhat tedious job of attaching all the small decals. I
used kit decals for everything except the unique markings. For those I used
Xtradecal 48-220 and chose the 73 Squadron option. Note that these decals do
not like strong setting solutions. I used Mr Mark Softer on a few of them
with results that were not good. Stick with MicroSol or something equally
weak. | CONCLUSIONS |
 I had expected this to be a trouble-free build. It was
not. While it wasn't as difficult as the Classic Airframes kit, it was more of a
hassle than the Trumpeter version. Much of the issue had to do with the very
tight fit of the cockpit which not only caused the nose gear to be off center,
but caused issues with closing the fuselage halves. The fit of the tail booms
were not exactly perfect. Now, this is not a deal-breaker and I'm sure that if I
built another, I'd be able to ameliorate these issues. The kit does look very
good when it is done and is well worth picking up if you are a fan of the type.
Now, I'm looking forward to a nice T.11.
I had expected this to be a trouble-free build. It was
not. While it wasn't as difficult as the Classic Airframes kit, it was more of a
hassle than the Trumpeter version. Much of the issue had to do with the very
tight fit of the cockpit which not only caused the nose gear to be off center,
but caused issues with closing the fuselage halves. The fit of the tail booms
were not exactly perfect. Now, this is not a deal-breaker and I'm sure that if I
built another, I'd be able to ameliorate these issues. The kit does look very
good when it is done and is well worth picking up if you are a fan of the type.
Now, I'm looking forward to a nice T.11.
| REFERENCES |
https://en.wikipedia.org/wiki/De_Havilland_Vampire
1 December 2023 Copyright ModelingMadness.com. All rights reserved. No
reproduction in part or in whole without express permission from the editor. If you would like your product reviewed fairly and
fairly quickly, please
contact
the editor or see other details in the
Note to
Contributors.