ESCI 1/72 A-7E Corsair II
| KIT #: | 9064 |
| PRICE: | $11.00 delivered (used) |
| DECALS: | Two options |
| REVIEWER: | Scott Van Aken |
| NOTES: |
| HISTORY |
The LTV A-7 Corsair II is an American carrier-capable subsonic light attack aircraft manufactured by Ling-Temco-Vought(LTV) to replace the Douglas A-4 Skyhawk. Its airframe design was a somewhat smaller version of the supersonic Vought F-8 Crusader. The Corsair II initially entered service with the United States Navy (USN) during the Vietnam War. It was later adopted by the United States Air Force (USAF), including the Air National Guard, to replace the Douglas A-1 Skyraider and North American F-100 Super Sabre. The aircraft was also exported to Greece in the 1970s, and to Portugal in the late 1980s.
The Navy was sufficiently impressed with the increased power offered by
the A-7D Spey engine used by the Air Force, and decided to use this engine for
its own version of the Corsair II. The designation A-7E was assig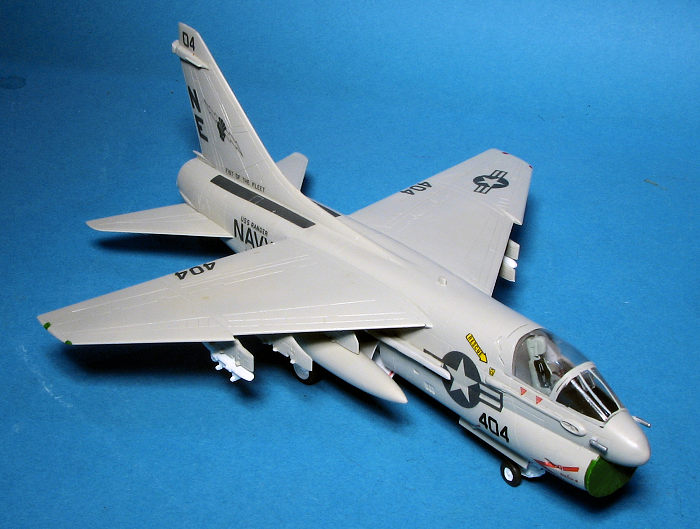 ned, and this
version was to succeed the A-7B in production. However, there were delays in the
deliveries of the TF41-A-2 engine specified for the A-7E, so the first 67
aircraft of the order were delivered with the TF30-P-5 engine. These aircraft
had all of the other improvements planned for the A-7E, including the improved
avionics and the M61 rotary cannon, and were re-designated A-7C after delivery.
ned, and this
version was to succeed the A-7B in production. However, there were delays in the
deliveries of the TF41-A-2 engine specified for the A-7E, so the first 67
aircraft of the order were delivered with the TF30-P-5 engine. These aircraft
had all of the other improvements planned for the A-7E, including the improved
avionics and the M61 rotary cannon, and were re-designated A-7C after delivery.
The first Spey-powered A-7E flew for the first time on 9 March 1969. The A-7E differed from the USAF A-7D in retaining the probe-and-drogue midair refueling system of the earlier A-7A/B. It entered service in Southeast Asia in May 1970 with VA-146 and VA-147 deployed aboard USS America. The A-7E participated in numerous close-air support missions over both North and South Vietnam, the A-7E's state-of-the-art bombing and navigation system being particularly reliable and accurate. Most air wings operating Douglas A-4 Skyhawks and early A-7s were re-equipped with A-7Es. The A-7E participated in the mining of Haiphong harbor in 1972, and played a vital role in Operations Linebacker I and Linebacker II that led up to the formal end of US involvement in the Vietnam War on 24 January 1973.
On 15 May 1975, A-7E aircraft operating from USS Coral Sea, in conjunction with A-7D aircraft assigned to the 3d TFS at Korat RTAFB, provided air cover in what is considered the last battle of the Vietnam War, the recovery of SS Mayagüez after it was hijacked by Khmer Rouge gunboats. By the time the Mayaguez incident was over, three USAF Sikorsky CH-53 Sea Stallion helicopters had been shot down, two airmen, 11 Marines and two Navy Corpsmen had been killed in action and a further three Marines were missing in action. The type performed in combat in Grenada and against the Lybians on a couple of occasions with its last combat missions coming during Desert Storm after which the type was retired from fleet service.
| THE KIT |
Molded in a white plastic, this one has nicely engraved panel lines that would look good on any modern molding. There are no ejector pin marks on the inside of gear doors or on wheels or gear legs. Why ESCI could pull this off 30 years ago and some better known companies couldn't is beyond me. The cockpit tub is adequate with a bang seat, control stick, and instrument panel. One uses decals for instruments. A decal for the seat harness is also provided. I like having these included as they are better than nothing and not everyone wants to either make a harness or buy an aftermarket one.
Wings are a full upper surface with an insert for the lower inside. This
insert has the two inner pylon areas already drilled out. The outer pylon is a
butt join and all pylons are single piece moldings. To model folded wings, the
builder will have to do some surgery. To my knowledge, the only 1/72 A-7 that
can be built with folded wings is the Matchbox kit. For things under wings you
have a pair of drop tanks, a TER and MER with lots of Mk 80 bombs to attach to
them. You can also mount either Shrike or Maverick missiles, both of which are
appropriate for the E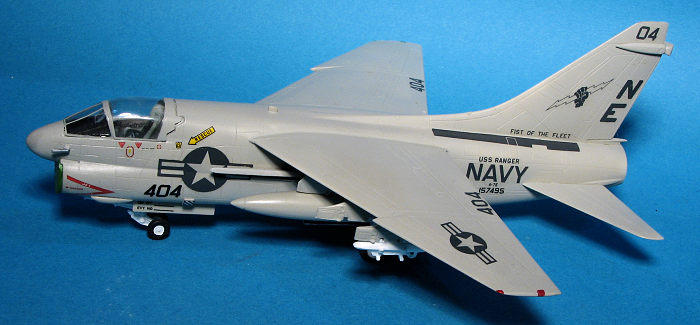 model A-7. I should mention that there are fuselage
mounted Sidewinders, but these were frequently not installed though the pylons
generally were.
model A-7. I should mention that there are fuselage
mounted Sidewinders, but these were frequently not installed though the pylons
generally were.
Landing gear is well done and the wheels included are the slotted variety which, I believe, are appropriate for the A-7E. ESCI apparently did the right thing and included a sprue that is specific for the Navy version. In it are all the different bits including fin and underside antennas, the aforementioned wheels and a nose gear leg with the catapult bar to name most of the bits. Finally, the clear bits include a separate windscreen and canopy so you can model this open. Frankly, without an aftermarket cockpit, it would be best to keep it closed as the cockpit is rather Spartan. It could also use a decent bang seat and to my knowledge, no one makes one, though the A-4 seat is close.
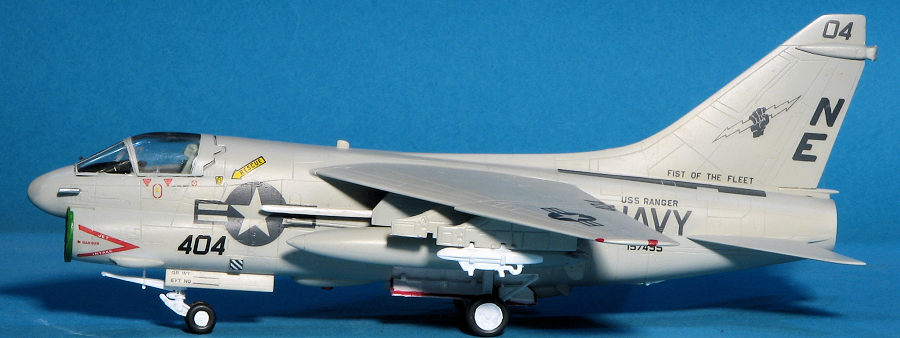
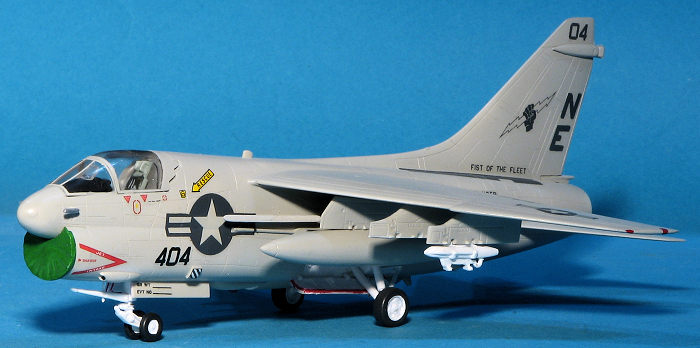
Instructions are well done providing FS 595 color references. The decals have markings for two planes. Both are listed as being in overall light gull grey (FS x6440) so painting will be a breeze. One is the box art scheme from VA-81, with many of the markings in white. The other is a VA-105 aircraft with most markings in black and the large, single color insignia. I'm not sure how viable these decals are after all these years, but they will need to be used for the instrument panels if nothing else.
| CONSTRUCTION |
I started with subassemblies. First were the wing tanks. These have mounting pins that are too long so one is better off either sanding them down to near nothing or removing them entirely. Next, I went for the wings and the underside inserts. These inserts have holes drilled in them for the two inside pylons. The A-7 was rarely seen without all three of them. The inserts are also a bit smaller than the opening into which they fit so many of us will need to apply filler around the edges of the pieces to smooth things out. So that is what I did, despite the fact that few will ever see the underside of the wings.
The interior was next. This is nothing fancy, though I was concerned about the
old decals. First the instrument panel and rear bulkhead were glued onto the
tub. Then it was painted dark gull grey FS36321, a shade I also painted the
small inner fuselage section of the cockpit. Instructions would have you paint
it a lighter shade, but in all my years in the navy, dark gull grey was the
standard shade for cockpits. When dry, the decals were applied. One thing about
AMT printed decals is that they are fairly thick and have a very large clear
carrier. This 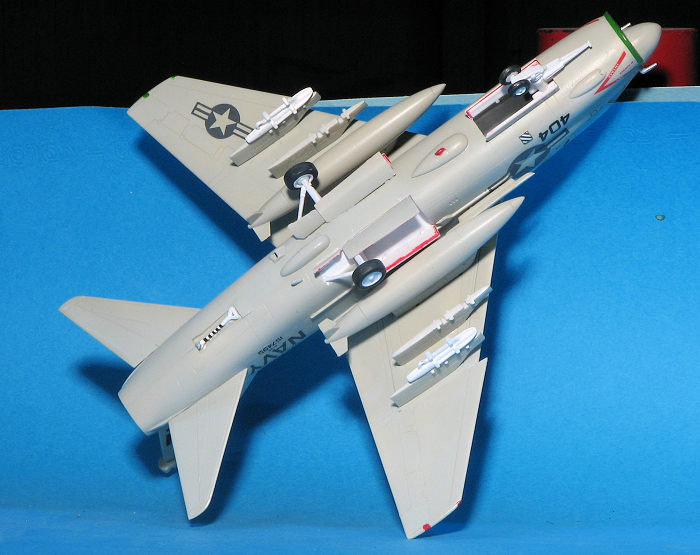 necessitates trimming the decals. Once that was done, they were
applied with no trauma at all.
necessitates trimming the decals. Once that was done, they were
applied with no trauma at all.
Meanwhile I painted the exhaust with Citadel's tinny tin acrylic and the inside of the fuselage around the exhaust with yellow zinc chromate from the Testors line of enamels. The interior and exhaust were then glued into one half and the required 10 grams of nose weight installed, followed by attaching the other fuselage half. I assembled the intake halves and glued those in place. There was then much slathering of filler to deal with the gaps and steps. Once all that was smoothed out over the course of several days, I decided to attach all the fuselage mounted bits and pieces. There are many as this same fuselage is used for the A-7D. Probably the most fragile parts are the external cable runs typical of the E. Parts placement wasn't helped by the somewhat vague placement instructions, but eventually, all the pieces were solidly attached.
It was then that the wings were glued in place. I also painted and installed the seat. As much as I wish someone did a proper resin seat for this plane in this scale, apparently that is not the case so one is left with the shape included in the kit. The gunsight was attached as were the windscreen and canopy, which I had already masked. The canopy does not fit the openings in the back very well and some will probably want to use filler for the gaps. I then glued on the horizontal stabilizers and after painting the gear wells white, filled them with Silly Putty prior to painting.
| COLORS & MARKINGS |
 Since the cockpit decals worked so well, I thought I'd give one of the kit
options a try. This one was an overall light gull grey scheme that was used
early in the 'low-viz' era on the A-7. The kit supplies two so if one gave me
issues, I'd have a second to fall back on. For this I used Testors FS 16440
enamel, thinned with their thinner. Not sure if it is still available or not,
but there are other brands who make this color.
Since the cockpit decals worked so well, I thought I'd give one of the kit
options a try. This one was an overall light gull grey scheme that was used
early in the 'low-viz' era on the A-7. The kit supplies two so if one gave me
issues, I'd have a second to fall back on. For this I used Testors FS 16440
enamel, thinned with their thinner. Not sure if it is still available or not,
but there are other brands who make this color.
As usual, once the airframe was painted, I removed the putty and worked on installing the landing gear. With the gear in place, it was time for decals. I tried a not-used decal and it split apart. So I coated everything else with Microscale decal film. This pretty well took care of any issues. I did need to use setting solution to keep the decals from curling, though in all honesty, this only started to happen to a few of them.
| CONSTRUCTION CONTINUES |
Once the decals were all in place, I started attaching the wheels followed by the gear doors. Typical of kits of the era, there were no positive attachment points so it took a while.
Then it was on to the pylons. For some inexplicable reason, the inner pylons,
which hold the fuel tanks, have no tab on them to fit into the slot on the top
of the tanks. So I took some bronze wire and drilled holes in the pylons. Th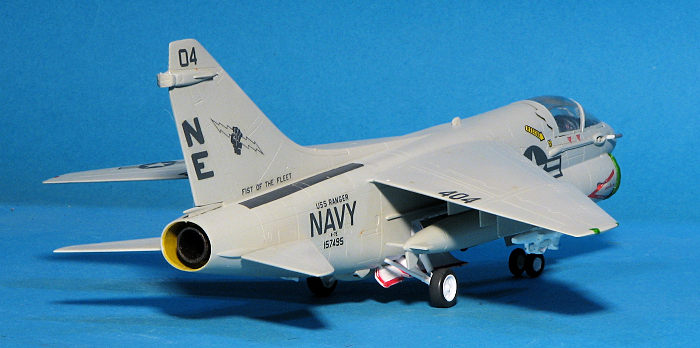 en,
after gluing in the wire, I made marks with it on the tank and drilled holes
there. The two were then glued together with super glue. It was then glued to
the underside of the wing. The holes already provided are about twice the
diameter of the pins on the pylon so you have wiggle room. The Sidewinder rails
were then glued in place after the missile mounting lug was sanded away. This
was followed by the the rest of the wing pylons. The outer pylon has no positive
indication of just where it should be so you need to make a guess. On the real
deal it is just inboard of the wing fold so perhaps that might help when you get
to building yours.
en,
after gluing in the wire, I made marks with it on the tank and drilled holes
there. The two were then glued together with super glue. It was then glued to
the underside of the wing. The holes already provided are about twice the
diameter of the pins on the pylon so you have wiggle room. The Sidewinder rails
were then glued in place after the missile mounting lug was sanded away. This
was followed by the the rest of the wing pylons. The outer pylon has no positive
indication of just where it should be so you need to make a guess. On the real
deal it is just inboard of the wing fold so perhaps that might help when you get
to building yours.
I did have a spare intake cover from the Italeri boxing so I painted that green and glued it in place. This cover is not going to be found in the AMT or ESCI boxings. On the outer pylons I attached a TER, though did not attach any bombs to it. It was not unusual to see empty racks on the plane. The last thing I added were the oversize nose pitot tubes. These were glued in place using Cementine clear cement that I usually use on canopies and other clear parts. This glue sets up fairly quickly and if (probably when) the pitot gets knocked off, it won't take the underlying paint with it. A semi-matte clear was sprayed on the kit and the masks removed. Finally, the tailhook was painted and installed.
| CONCLUSIONS |
As you have gathered from reading this, the kit isn't perfect. However, it does have the shape down fairly well and it can be found fairly inexpensively. It is a good way to build up your A-7 collection.
| REFERENCES |
https://en.wikipedia.org/wiki/LTV_A-7_Corsair_II
5 January 2024
Copyright ModelingMadness.com. All rights reserved. No reproduction in part or in whole without express written permission from the editor.
If you would like your product reviewed fairly and fairly quickly, please contact the editor or see other details in the Note to Contributors.
Back to the Main Page Back to the Review Index Page Back to the Previews Index Page