Minicraft 1/144 C-54 Skymaster "Candy Bomber"*
| KIT #: | 14520 |
| PRICE: | $22.00 MSRP |
| DECALS: | Two options |
| REVIEWER: | Scott Van Aken |
| NOTES: |
| BACKGROUND |
Please visit the preview for more info on the aircraft and a look at what comes in the box.
| CONSTRUCTION |
With no interior, construction would
be made a bit easier. However, I first started with the wings. The upper
sections were  glued to the
lower and pressed together to allow the melted plastic to ooze out. I then
sanded off all the seams and from what I can see, I got everything. Won't
know for sure as I used the white plastic that came with the DC-4 kit and
white is a real pain when it comes to looking for seams and holes. I'll
find out when I apply the first coat of paint.
glued to the
lower and pressed together to allow the melted plastic to ooze out. I then
sanded off all the seams and from what I can see, I got everything. Won't
know for sure as I used the white plastic that came with the DC-4 kit and
white is a real pain when it comes to looking for seams and holes. I'll
find out when I apply the first coat of paint.
I then assembled the fuselage halves
after putting what I hoped was 3/4 oz of weight in the forward section. The
clear cockpit section was also installed. The instructions said it would be
a tight fit, but it wasn't. I then added filler to all the seams. In this
way, I could tell if any additional filler was needed. It was, especially
around the cockpit section. I glued the wing in place and applied filler to
the joins there as well. This was later sanded off and a second
application was 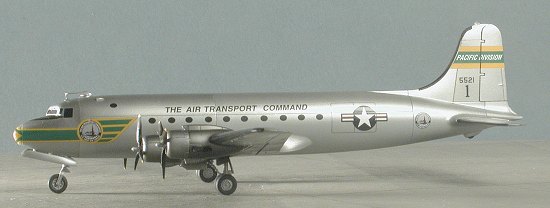 needed in a few spots. The tail planes were then glued in.
These fit quite tightly with no need for filler. With a somewhat complete
airframe, I gave it a few test flights, buzzing curious felines, who
quickly fled for safer grounds.
needed in a few spots. The tail planes were then glued in.
These fit quite tightly with no need for filler. With a somewhat complete
airframe, I gave it a few test flights, buzzing curious felines, who
quickly fled for safer grounds.
I next turned my attention to the engines and landing gear. The engines were painted black and once dry, dry-brushed with aluminum. Then the landing gear was cleaned up and glued in place. I should mention at this time that I broke both of the main gear legs removing them from the sprues. WARNING!! Regarding the nose gear, the instructions have the two struts glued in the wrong holes. The main leg should be in the aft hole. With the aircraft basically being aluminum, I can do this as the wheel wells were not primered on these big transports. The engine cowlings were tacked into place so they could be painted along with the airframe and I glued in the exhaust after drilling them out.
| COLORS & MARKINGS |
Knowing that there would be a
ton of little scratches, I primered the kit with a nice gloss enamel. In
this case I just grabbed what was already mixed up, which in this case was
some ModelMaster FS 16473 ADC Grey. It is a gloss and did help to hide
 most
of the scratches. I then started going through a number of Alclad II
aluminum shades. It is fortunate that Alclad II can be masked within an
hour or two of application or painting would have been a very long and
drawn out affair. Among the colors I used were Aluminum, Dark Aluminum,
Duralumin, White Aluminum, Steel, and to make some horrendous exhaust
stains, I used Jet Exhaust.
most
of the scratches. I then started going through a number of Alclad II
aluminum shades. It is fortunate that Alclad II can be masked within an
hour or two of application or painting would have been a very long and
drawn out affair. Among the colors I used were Aluminum, Dark Aluminum,
Duralumin, White Aluminum, Steel, and to make some horrendous exhaust
stains, I used Jet Exhaust.
The end result isn't bad, and best of all, it is not something that needs to be gloss coated so that I can go ahead and apply the decals right over it with no problem. What I started with were the de-icer boot decals. I figures that if I hosed those up, I would still be able to paint them on without having to worry about trashing any already-applied decals.
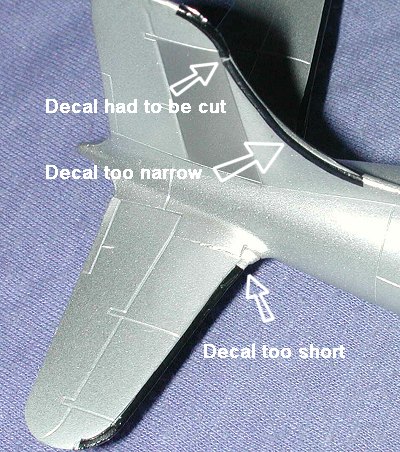 Well, here is the scoop on the de-icer
boot decals. The inner ones are a bit too narrow in that they don't go from
panel line on the top to panel line on the bottom. The middle one is too
long and so are the outer ones. The ones for the tail planes are too short
and too wide. Finally the one for the fin has the wrong upper curve; it is
too sharp. It can be taken care of by cutting the decal at the curve and
then applying it. This decal is also too narrow and so you'll end up having
to paint where they join. Bottom line is that if you are not too picky, the
decals will save you a lot of painting. If you want the de-icer boots to be
perfect, then you'll have to paint them in place. I'll also recommend
completely filling in the cockpit windows and smoothing those out as the
decal provided is not a complete match.
Well, here is the scoop on the de-icer
boot decals. The inner ones are a bit too narrow in that they don't go from
panel line on the top to panel line on the bottom. The middle one is too
long and so are the outer ones. The ones for the tail planes are too short
and too wide. Finally the one for the fin has the wrong upper curve; it is
too sharp. It can be taken care of by cutting the decal at the curve and
then applying it. This decal is also too narrow and so you'll end up having
to paint where they join. Bottom line is that if you are not too picky, the
decals will save you a lot of painting. If you want the de-icer boots to be
perfect, then you'll have to paint them in place. I'll also recommend
completely filling in the cockpit windows and smoothing those out as the
decal provided is not a complete match.
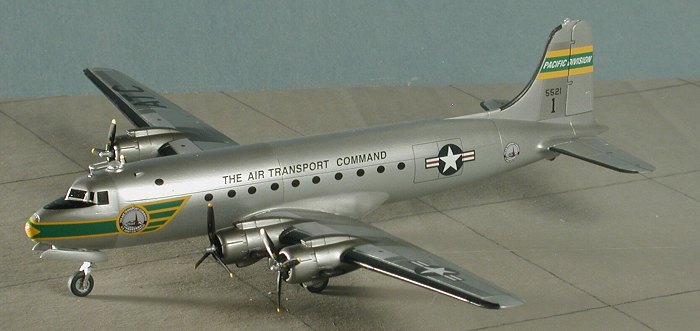
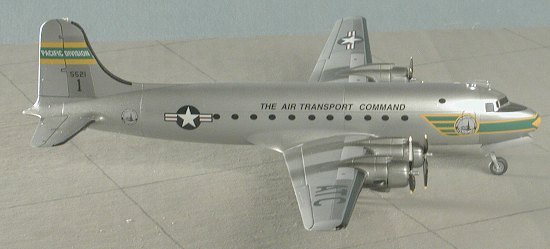
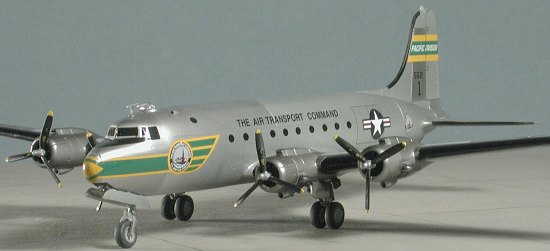
I then put on the wing walk decals and these seemed to fit just fine with no problems. Choosing the final scheme was a difficult one. The more colorful of the two as shown on the box art has a nose decal that I was worried wouldn't fit well. Tossing caution to the wind, I put on one side, which incorporates everything from the nose to the insignia in one very long decal. Though not completely unexpected, when I installed the decal on the other side, they did not meet all the way at the nose, being a bit on the short side. I have to say that I first installed the decal with the forward door marking on it as that door is engraved into the fuselage. My suggestion to you would be to fill in that door prior to applying these decals then you can force the nose sections to join and eliminate the need to paint this section with touch-up paint. Fortunately, it looks as if the colors are straight from those small square Testors paint bottles. We'll see how they match when things conclude. The rest of the decals went on without a hitch.
| FINAL CONSTRUCTION |
There is actually quite a bit to do
before things conclude. One is to paint the wheels. I sprayed the hubs when
I did the other various metallics so I grabbed the Floquil Weathered Black
and started to paint the tires after the mold seam had been sanded. Other
than on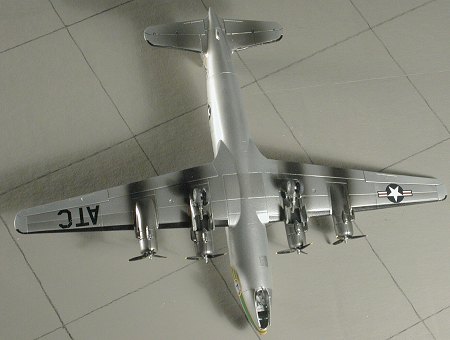 e half of the nose
wheel, there is no wheel 'rim' to help with painting. I do with that all
manufacturers would supply one as it makes doing a nice looking wheel/tire
assembly so much easier. I really hate those that offer no guidance at all
(like this one).
e half of the nose
wheel, there is no wheel 'rim' to help with painting. I do with that all
manufacturers would supply one as it makes doing a nice looking wheel/tire
assembly so much easier. I really hate those that offer no guidance at all
(like this one).
I then glued on the wheels. The nose strut really has to be stretched out to fit in the wheel and it stayed rather 'splayed' once the wheel was in. Main wheels fit well, but rather loosely so it might not be a bad idea to use super glue. Next, I tried to fill the seam inside the navigator's dome atop the fuselage. I used regular white glue for this and the result isn't bad. I painted it black when I did the touch-up on the de-icer boots. Next were the gear doors. The large forward ones fit well, but the aft ones seem to curve the wrong direction when referenced to their attachment tabs. I put them in so that the curve was inward and the tabs fit, well, oddly. Using small bits of superglue, I attached the fin tip light and the navigators dome. I also glued on the ILS antenna over the cockpit roof. This seems a bit large. I should also mention that the lower ADF 'football' that is so prominent on the C-54 was not supplied in the kit.
I glued in the very nicely detailed engine faces to the inside of the engine nacelles. You'll have to fiddle with them a bit to get them properly centered. Once dry, the nacelles were glued on. I then glued the props in place. The kit offers yellow tip decals for these, but I used a touch of paint instead. The prop data decals fit quite well and were not any problem at all. A bit of touch up painting and I was done.
| CONCLUSIONS |
 Overall, this is a really neat kit. It builds with minimal
fuss and if you take your time with it, it will return a very nice model.
The ScaleMaster decals are superb and for once they were not off register!
It would be nice were they actually the same size as the areas on the kit
they are supposed to fit as I noted in the decaling section above, but it
isn't anything that can't be either touched up or, with pre-planning,
worked around. It really turned out well and I think you'll be quite
pleased with the results you get.
Overall, this is a really neat kit. It builds with minimal
fuss and if you take your time with it, it will return a very nice model.
The ScaleMaster decals are superb and for once they were not off register!
It would be nice were they actually the same size as the areas on the kit
they are supposed to fit as I noted in the decaling section above, but it
isn't anything that can't be either touched up or, with pre-planning,
worked around. It really turned out well and I think you'll be quite
pleased with the results you get.
September 2004
#1330 in a series
Copyright ModelingMadness.com. All rights reserved.
Postscript: As often happens, after the kit was built, I got an e-mail from a knowledgeable reader who states that the green in the decals should have been done in a blue. You may want to consider this when choosing which scheme you are going to do.
You can thank me for purchasing this kit for your review enjoyment!
If you would like your product reviewed fairly and fairly quickly, please contact the editor or see other details in the Note to Contributors.