|
KIT: |
mauve 1/48 P-40N Warhawk |
|
KIT # |
81 |
|
PRICE: |
$27.00 |
|
DECALS: |
One aircraft |
|
REVIEW & |
|
|
NOTES: |
True Details resin
cockpit |
|
HISTORY |
 The China-Burma-India (CBI) theatre in WWII is known mostly by
the exploits of daring young aircrews made famous by flying the
"Hump", over the Himalayan mountain range, to resupply Chinese forces.
However, allied forces were active in offensive operations in the area along the
India-Burma border, starting a major campaign to retake Burma from the Japanese
in October 1943. The P-40 Warhawk was a principal combatant in this theatre,
providing mainly ground attack operations for the advancing allied troops
against the Japanese 15th, 28th, and 33rd
Armies, and the 5th Air Division.
The China-Burma-India (CBI) theatre in WWII is known mostly by
the exploits of daring young aircrews made famous by flying the
"Hump", over the Himalayan mountain range, to resupply Chinese forces.
However, allied forces were active in offensive operations in the area along the
India-Burma border, starting a major campaign to retake Burma from the Japanese
in October 1943. The P-40 Warhawk was a principal combatant in this theatre,
providing mainly ground attack operations for the advancing allied troops
against the Japanese 15th, 28th, and 33rd
Armies, and the 5th Air Division.
Starting in northern Burma in late 1943 around the Myitkyina area and in March 1944 in the Imphal area, allied forces marched towards Mandalay freeing it in early 1945, and eventually retaking Rangoon in May 1945.
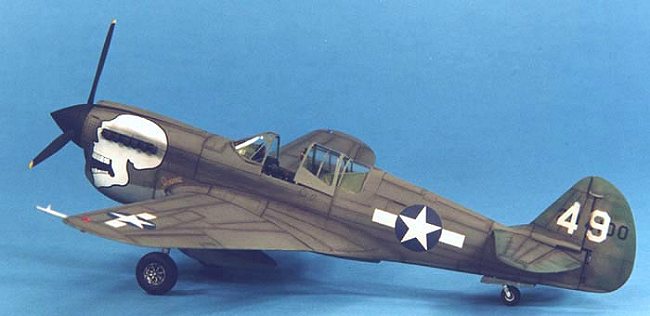
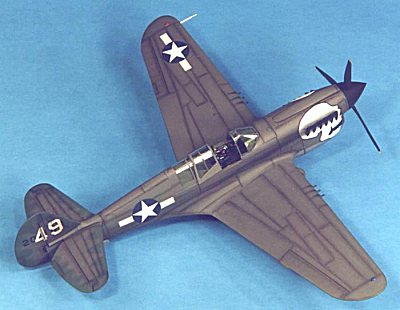
The aircraft modeled is a P-40N-5-CU of the 89th Fighter Squadron, 80th Fighter Group stationed in India in 1943.
|
THE KIT |
 The kit is fairly simple, consisting of 53 pieces molded in a
shiny, dark olive plastic that attracts sanding dust like a magnet and 6 pieces
of clear plastic. Panel lines are engraved and nicely done, however cockpit
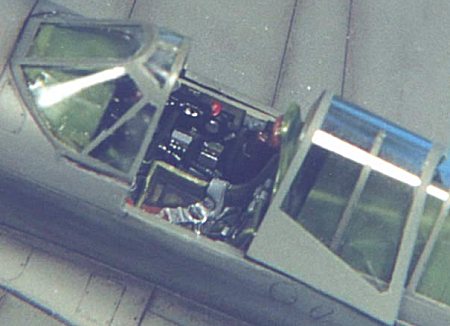
detail is very sparse so the True Details Cockpit set was used. This cockpit set
is very detailed, and adds a great deal to the kit. It also fits magnificently
inside with no modifications; a lesson I wish all aftermarket suppliers would
follow. The kit decals are well printed, colorful, and an interesting subject
with a crazy parrot on steroids motif, however they cannot be used since they
seem to be printed on a thick, Mylar-like material that refuses to conform to
the model surface. Scott warned me about these, but I still tried because I
liked the parrot; don’t waste your time with them. I substituted Aeromaster’s
Allied P-40N’s Pt. 2 sheet (48-150) and they are typical Aeromaster, simply
beautiful. The kit instruction sheet is solely in Japanese; however, the
expanded assembly drawings need no explaining text. I suspect that color
information is also provided, but since it’s in Japanese it’s difficult to
decipher. This really didn’t matter since I used the True Details interior
painting instructions with the Aeromaster exterior instructions.
The kit is fairly simple, consisting of 53 pieces molded in a
shiny, dark olive plastic that attracts sanding dust like a magnet and 6 pieces
of clear plastic. Panel lines are engraved and nicely done, however cockpit
detail is very sparse so the True Details Cockpit set was used. This cockpit set
is very detailed, and adds a great deal to the kit. It also fits magnificently
inside with no modifications; a lesson I wish all aftermarket suppliers would
follow. The kit decals are well printed, colorful, and an interesting subject
with a crazy parrot on steroids motif, however they cannot be used since they
seem to be printed on a thick, Mylar-like material that refuses to conform to
the model surface. Scott warned me about these, but I still tried because I
liked the parrot; don’t waste your time with them. I substituted Aeromaster’s
Allied P-40N’s Pt. 2 sheet (48-150) and they are typical Aeromaster, simply
beautiful. The kit instruction sheet is solely in Japanese; however, the
expanded assembly drawings need no explaining text. I suspect that color
information is also provided, but since it’s in Japanese it’s difficult to
decipher. This really didn’t matter since I used the True Details interior
painting instructions with the Aeromaster exterior instructions.
|
CONSTRUCTION |
 After washing the parts in mild dishwater soap and letting
them dry, I then pre-painted all the parts as indicated in the
instructions. For the interior I used Aeromaster acrylic Interior Green.
Starting with the interior, I built up the True Details kit as per the
instructions. The interior builds up very nicely with no significant problems.
After washing the parts in mild dishwater soap and letting
them dry, I then pre-painted all the parts as indicated in the
instructions. For the interior I used Aeromaster acrylic Interior Green.
Starting with the interior, I built up the True Details kit as per the
instructions. The interior builds up very nicely with no significant problems.
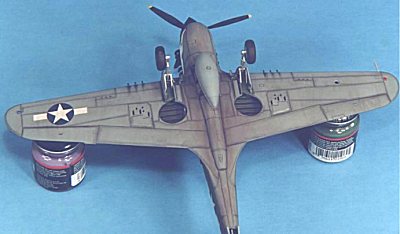
After closing up the fuselage with liquid cement, the cockpit tub slid right up into the fuselage perfectly and was secured with superglue. I wish all detail sets fit as well as this one! Assembly of the main wings was completed and there were a few minor gaps that needed to be filled around the wheel well nacelles. Dry fitting of the wing to the fuselage indicated a major gap on the starboard wing root, this side was shimmed with 15 thou strips to close the gap. Significant amounts of putty were also used to smooth out the join. Fortunately, assembly of the horizontal stabilizers did not require any putty. The fuselage was stuffed with tissue and then it was off to the paint shop.
|
PAINT & DECALS |
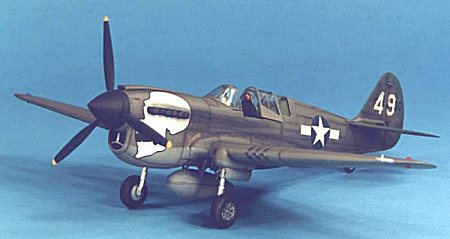 The paint scheme for this aircraft was very simple, olive drab over neutral
gray. Since this is a rather dull scheme and many Curtiss aircraft had a medium
green trim applied to the leading edges of the tail surfaces, I opted for this
scheme even though the Aeromaster instructions do not indicate that this
aircraft was painted that way. I used Testor’s Model Master Neutral Gray for
the undersides, Olive Drab ANA 613 mixed with about 20% ANA 616 Sand to provide
for a faded OD, and French Khaki was used for the tail surface trim. After
curing overnight, I shot a light topcoat of Future to prepare the flat surface
for decaling.
The paint scheme for this aircraft was very simple, olive drab over neutral
gray. Since this is a rather dull scheme and many Curtiss aircraft had a medium
green trim applied to the leading edges of the tail surfaces, I opted for this
scheme even though the Aeromaster instructions do not indicate that this
aircraft was painted that way. I used Testor’s Model Master Neutral Gray for
the undersides, Olive Drab ANA 613 mixed with about 20% ANA 616 Sand to provide
for a faded OD, and French Khaki was used for the tail surface trim. After
curing overnight, I shot a light topcoat of Future to prepare the flat surface
for decaling.
As mentioned earlier, the kit decals were terrible so Aeromaster decals were substituted. These went on flawlessly and MicroSol setting solution was used to melt the decals into the panel lines and detail surfaces. After drying overnight, I wiped the decals off with a Polly S Plastic Prep to remove any residue and after drying I shot a light coat of Future thinned with rubbing alcohol (50:50 mix) over the decals to seal them.
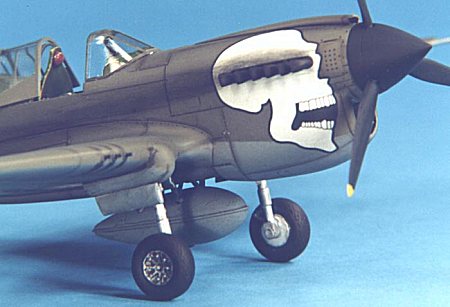
 For weathering, I chose to accentuate the engraved panel lines and surface
detail with a light burnt umber oil wash.
For weathering, I chose to accentuate the engraved panel lines and surface
detail with a light burnt umber oil wash.
I then sealed everything with a light coat of PS Flat Finish to provide a surface for pastel application. I then used a pastel pencil to highlight the panel detail on the wings/tail surfaces and randomly applied some ground up pastels with a soft brush to simulate dirt staining on the lower surfaces. Lastly, I applied a fading pattern of light brown pastel pencil to the interior of the topside panels to simulate the intense fading effects of sun and salt spray.
For final assembly I installed all the landing gear components, propeller, drop tank, fuselage pieces, and cockpit details. A final coat of PS Flat Finish was shot and the clear plastic pieces were lastly installed.
|
CONCLUSIONS |
This is an excellent model of an important WW II aircraft. It would be an extremely easy build suitable for first time modelers if not for the wing fit problems. A little careful work with that portion of the kit and you will be rewarded with an excellent model.
|
REFERENCES |
Presidio Press, The War In The Pacific, $18.95
Avery Publishing, West Point Military History Series: The Second World War (sold as set)
For those seeking another point of view, here is a very short review of this kit.
If you would like your product reviewed fairly and quickly by a site that has over 900 visits a day, please contact me or see other details in the Note to Contributors.