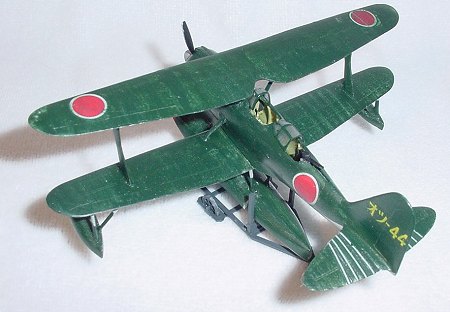
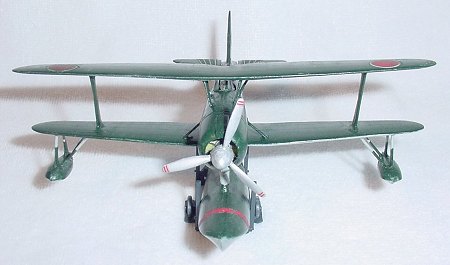
X-otic72 1/72 F1M2 'Pete'
|
KIT # |
AU 1003 |
|
PRICE: |
$9.95 at Aviation USK Nebraska |
|
DECALS: |
Two aircraft |
|
REVIEWER: |
|
|
NOTES: |
Short Run kit. |
|
HISTORY |
 The prototype F1M first flew in June 1936. After resolving some initial
design problems including an upgrade to the powerplant (875 hp Mitsubishi
Zuisei 13, 14 cylinder air cooled radial piston engine), the F1M2 model
entered naval service in 1941. Given the Allied code name 'Pete', the F1M2
was used in the fighter as well as observation, gunnery spotting,
antisubmarine, and convoy escort roles. It was among the combatants at the
Battle of Midway, having been part of the air search component from the heavy
cruiser Tone during 4-6 June 1942. It flew in Japanese operations in the
Philippines, New Guinea, the Solomons, from Attu in the Aleutians, and other
areas.
The prototype F1M first flew in June 1936. After resolving some initial
design problems including an upgrade to the powerplant (875 hp Mitsubishi
Zuisei 13, 14 cylinder air cooled radial piston engine), the F1M2 model
entered naval service in 1941. Given the Allied code name 'Pete', the F1M2
was used in the fighter as well as observation, gunnery spotting,
antisubmarine, and convoy escort roles. It was among the combatants at the
Battle of Midway, having been part of the air search component from the heavy
cruiser Tone during 4-6 June 1942. It flew in Japanese operations in the
Philippines, New Guinea, the Solomons, from Attu in the Aleutians, and other
areas.
|
THE KIT |
|
CONSTRUCTION |
 Step One: Reread the boxtop: "Skill Level 3: For Experienced Modelers."
Understand that this is not a Tamigawa or even an older Monogram kit. The
quality of this kit is below the quality of an older KP or no-name Russian
import in this builder's opinion.
Step One: Reread the boxtop: "Skill Level 3: For Experienced Modelers."
Understand that this is not a Tamigawa or even an older Monogram kit. The
quality of this kit is below the quality of an older KP or no-name Russian
import in this builder's opinion.
1.) Fuselage - The assembly of the cockpit consists of 10 pieces of modest detailed parts. The instrument panels have little detail, so you can use your references and imagination to detail it as much as you like. There is no detail molding on the fuselage interior sides. A one piece firewall with molded on engine is featured in the nose of the aircraft. There is no mounting post either in the engine crankcase or a shaft on the base of the propeller. The modeler may either glue the propeller directly onto the engine or drill a simple hole and mount a metal or styrene shaft to the propeller.
 Being a child of the days of operating parts on the old Monogram kits, I at
least demand the basics of a rotating propeller. With a hand powered pin
drill, I drilled a hole in the center of the crankcase and matched it up with
the back of the propeller mechanism. Cutting a section from a .20 cent piece
of copper rod available at your favorite craft store, I glued it to the back
of the prop. Insert the rod through the crankcase and you've got a spinning
prop.
Being a child of the days of operating parts on the old Monogram kits, I at
least demand the basics of a rotating propeller. With a hand powered pin
drill, I drilled a hole in the center of the crankcase and matched it up with
the back of the propeller mechanism. Cutting a section from a .20 cent piece
of copper rod available at your favorite craft store, I glued it to the back
of the prop. Insert the rod through the crankcase and you've got a spinning
prop.
 correctly. This also aids the modeler since you only have
a line drawing as a reference to place necessary items like struts and
pylons. There are no reference points on the kit itself for properly locating
the struts, etc.. Once again, we reference to Step One. Try building a
biplane without some reference points for wings and struts and you may wind up
with an interesting result.
correctly. This also aids the modeler since you only have
a line drawing as a reference to place necessary items like struts and
pylons. There are no reference points on the kit itself for properly locating
the struts, etc.. Once again, we reference to Step One. Try building a
biplane without some reference points for wings and struts and you may wind up
with an interesting result.
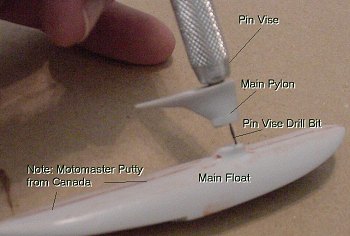
 Since there are no strut locating marks, let alone holes in the wings or pins
on the strut parts, the modeler has the basic reference of the instruction
line drawings and if you're the type of modeler who likes to research subject,
then Koku Fan Number Illustrated #38 has excellent 3 view plans for you to
use. You'll want to add some weight to the front of the aircraft, either
behind the engine in the fuselage or the main float. Otherwise, your Pete
will be a tail sitter.
Since there are no strut locating marks, let alone holes in the wings or pins
on the strut parts, the modeler has the basic reference of the instruction
line drawings and if you're the type of modeler who likes to research subject,
then Koku Fan Number Illustrated #38 has excellent 3 view plans for you to
use. You'll want to add some weight to the front of the aircraft, either
behind the engine in the fuselage or the main float. Otherwise, your Pete
will be a tail sitter.|
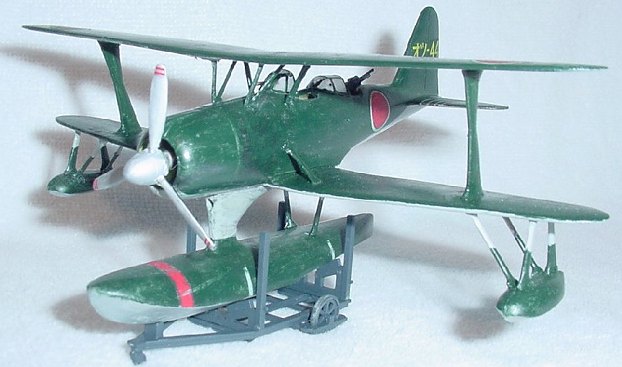
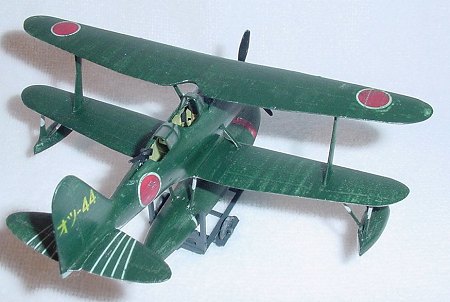
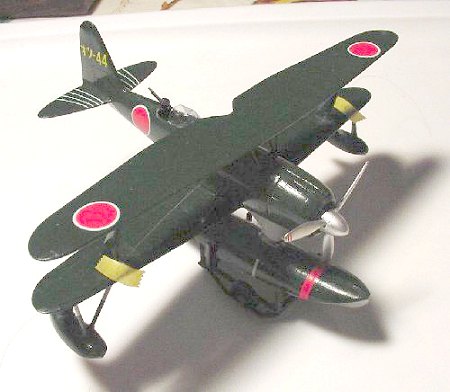
CAMOUFLAGE & MARKINGS |
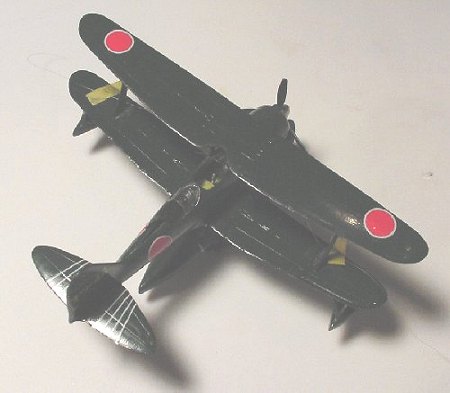 I used my own mix interpretation of Mitsubishi Interior Green using Floquil
Warsaw Pact Gray Green as a base color and tinting from there. Details,
either molded or placed, were picked out with other base colors. For the
propeller blade fronts and spinner, I just finger applied Rub-N-Buff with the
back of the blades black.
I used my own mix interpretation of Mitsubishi Interior Green using Floquil
Warsaw Pact Gray Green as a base color and tinting from there. Details,
either molded or placed, were picked out with other base colors. For the
propeller blade fronts and spinner, I just finger applied Rub-N-Buff with the
back of the blades black.
|
CONCLUSIONS |
 It is a very basic kit. I call to the scratch builder or vacuform builder in
all of us. I can't recommend it as a beginners kit since the lack of assembly
references and mounting pins can leave the casual builder frustrated. For the
super detailer, your got a basic shape of a F1M and you can let your
imagination run from there. The lack of any kind of stand challenges the
modeler to either use a stand from a third party or scratch build their own.
It is a very basic kit. I call to the scratch builder or vacuform builder in
all of us. I can't recommend it as a beginners kit since the lack of assembly
references and mounting pins can leave the casual builder frustrated. For the
super detailer, your got a basic shape of a F1M and you can let your
imagination run from there. The lack of any kind of stand challenges the
modeler to either use a stand from a third party or scratch build their own.
I've built Aviation USK kits from their original release of the Ki-115 since they had taken a lead in producing some of the more obscure kits not available from the large manufacturers. No, they are not the precision-tooled quality of a big manufacturer but they are decent basic kits for you to build up. Since this is definitely not a 'shake-n-bake' kit, approach this kit as a challenge to increase your modeling skills and try out a new technique such as scribing a panel line, using bits of extra plastic to add detail to your model or adding spare parts from your supplies. Xotic72's additional releases of the E8N2 'Dave' and E15K1 'Norm' are additional kits available to round out your Japanese Navy Floatplane collection. Enjoy the hobby!
|
REFERENCES |
If you would like your product reviewed fairly and quickly, please contact the editor or see other details in the Note to Contributors.