|
KIT # |
5969 |
|
PRICE: |
$22.00 |
|
DECALS: |
See Review |
|
REVIEW : |
|
|
NOTES: |
Aftermarket parts: |
|
HISTORY |
The Fw-190D-11 was to have been the next production version of the Langnasen-Dora, after the Dora-9. Seventeen of these aircraft were listed in the Oberkommando der Luftwaffe Generalquartiermeister reports as being delivered in the late winter and early spring of 1945, and at least two of them flew operationally. 820 Dora-11s were to be produced at the Focke-Wulf Sorau factory, commencing in January 1945.
The Dora-11 differed from its predecessor in choice of engine and armament. Power was provided by the Junkers Jumo 213E, which was rated at 2,000 h.p., a considerable advance from the Dora-9's 213A at 1,770 h.p. The 13mm fuselage guns were dropped, while two 30mm MK108 weapons were installed in the outer wings to complement the 20mm MG151s in the inboard positions.
 Of the 17 Dora-11s
delivered, three can be accounted for. One, the best-known, was Rot 4 of
JV44's Platzshutz unit, known as the Papageistaffel for its radio
call sign, Papagei, or "Parrot." Another, "white
chevron," was foundat Muenchen-Reim, and may have served with JV44 after
serving at the Verbandsfuehrerschule General der Jagdflieger (Training
School for Unit Leaders) at Bad Woerishofen; it is not known if it was actually
used operationally. A third, "white <61," was also found after the
war at the Verbandsfuehrerschule General der Jagdflieger.
Of the 17 Dora-11s
delivered, three can be accounted for. One, the best-known, was Rot 4 of
JV44's Platzshutz unit, known as the Papageistaffel for its radio
call sign, Papagei, or "Parrot." Another, "white
chevron," was foundat Muenchen-Reim, and may have served with JV44 after
serving at the Verbandsfuehrerschule General der Jagdflieger (Training
School for Unit Leaders) at Bad Woerishofen; it is not known if it was actually
used operationally. A third, "white <61," was also found after the
war at the Verbandsfuehrerschule General der Jagdflieger.
The primary visual difference between the D-11 and the D-9 is the flat forward weaponless cowl of the D-11, a larger Ta-152 propeller and supercharger intake to deal with the increased power, and a widening of the cowling to take the Jumo 213E engine.
The Papageistaffel and the Galland Zircus:
After his dismissal as General der Jagdflieger by Hermann Goering at the end of December, 1944, Adolf Galland was slated to become Staffelkapitaen of 4.JG54 - at the time fighting overwhelming odds in the Courland Peninsula - as his punishment. For a Generalleutnant to be a staffelkapitaen would have been as great a dismissal as Goering could achieve; had Galland refused, it would have been dereliction of duty in the face of the enemy, and Goering would have been within his rights to stand his greatest critic against a wall and have him shot. Fortunately for Galland, Hitler knew none of this when he suggested to the Reichsmarschall that the obstreperous Galland be given command of a Jagdstaffel of Me-262s to demonstrate what he said the airplane was capable of against the Allied air forces. Thus was born Jagdverband 44, literally "Fighting Band," with the 44 being some inner joke of Galland's regarding both his original command, 3.J/88, and his criticism of Goering. The unit was also known as Galland's Zirkus (circus).
Much has been written about Galland's unit, which was embroiled in controversy during its entire two month existence. By early April, 1945, Galland had nearly 50 Me-262s, which had come to him from the factory, and from other units as they fell apart. During the first week in April, Galland moved the unit to Munchen-Reim airport, where it would be near the main Messerschmitt factory responsible for final assembly of Me-262s, thus assuring him a supply of aircraft. The move also put JV44 squarely in the bulls-eye of the 9th Air Force, which was supporting the 7th Army in its drive to clear the German Army out of Bavaria. Once the jets were spotted, the field was under constant surveillance by P-47s and P-51s of the 9th AF fighter-bomber units, as well as the Tempests of the RAF's 2nd Tactical Air Force.
 Other jet units had been
protected by conventional fighter units nearby, whose Bf-109s and Fw-190D-9s
could provide protection to the Me-262s when they were at their most vulnerable:
during takeoff and landing. JV44 needed their own Platzshutzstaffell
(Airfield Protection Squadron), and formed it in mid-April. The unit has come to
be known as the Papageistaffel, but this was not used at the time,
although the flight call sign Papagei (Parrot), may have been. Nicknamed
the Wurgerstaffel, the three Fw-190D-9s and one Fw-190D-11 (there may
have been others, these are known for certain photographically) were commanded
by Leutnant Heinz Sachsenberg. That Sachsenberg had a sense of humor is
demonstrated in the slogans on the four airplanes: his airplane, Fw-190D-9 Rot
Ein, carried the slogan "Verkaaft's mei Gwand 'I foahr in Himmel"
("Sell my clothes, I'm going to heaven!"); Fw-190D-9 Rot Drei
carried "Im Auftrage der Reichsbahn,"("By Order of the
State Railway," a reference to the manner by which a shot-down German pilot
could return to his unit via the railroad); Fw-190D-11, Rot Vier - whose
pilot is unknown - carried "Der nachste Herr, dieselbe Dame!"
("The next man, the same woman!"), while Oberlautnant Klaus
Faber's Rot Dreizehn carried "Rein muss er und wenn wir beide
weinen!" ("In he goes and then we both cry!") The
double-entendre can still bring a smile to one - whether you understand
idiomatic German or not - sixty-odd years later.
Other jet units had been
protected by conventional fighter units nearby, whose Bf-109s and Fw-190D-9s
could provide protection to the Me-262s when they were at their most vulnerable:
during takeoff and landing. JV44 needed their own Platzshutzstaffell
(Airfield Protection Squadron), and formed it in mid-April. The unit has come to
be known as the Papageistaffel, but this was not used at the time,
although the flight call sign Papagei (Parrot), may have been. Nicknamed
the Wurgerstaffel, the three Fw-190D-9s and one Fw-190D-11 (there may
have been others, these are known for certain photographically) were commanded
by Leutnant Heinz Sachsenberg. That Sachsenberg had a sense of humor is
demonstrated in the slogans on the four airplanes: his airplane, Fw-190D-9 Rot
Ein, carried the slogan "Verkaaft's mei Gwand 'I foahr in Himmel"
("Sell my clothes, I'm going to heaven!"); Fw-190D-9 Rot Drei
carried "Im Auftrage der Reichsbahn,"("By Order of the
State Railway," a reference to the manner by which a shot-down German pilot
could return to his unit via the railroad); Fw-190D-11, Rot Vier - whose
pilot is unknown - carried "Der nachste Herr, dieselbe Dame!"
("The next man, the same woman!"), while Oberlautnant Klaus
Faber's Rot Dreizehn carried "Rein muss er und wenn wir beide
weinen!" ("In he goes and then we both cry!") The
double-entendre can still bring a smile to one - whether you understand
idiomatic German or not - sixty-odd years later.
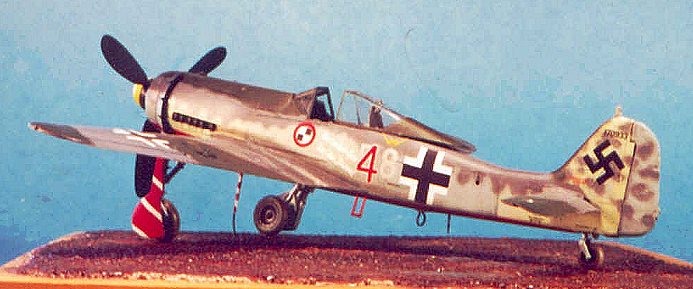
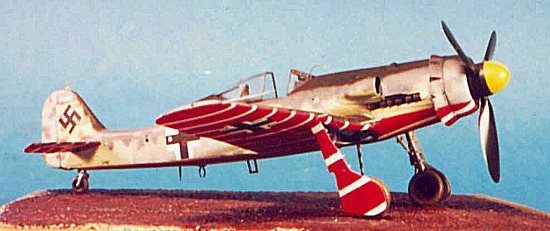
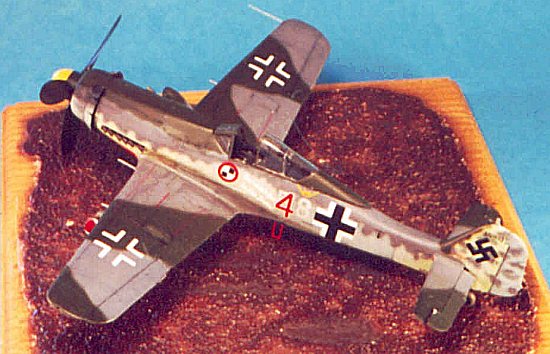
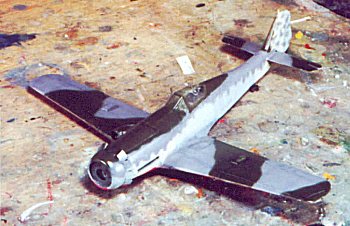
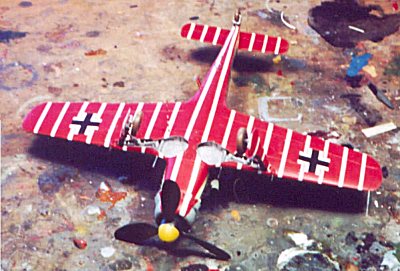
So far as is known, in the two weeks of combat left for JV44, the Papageistaffel did not score any victories over Allied aircraft. The unit has become of primary interest to modelers since the discovery of the first photographs of Rot 13 in the late 1980s showed the wild markings of the flight: the underside painted completely in Rot23 red, with white stripes, the intention being to convince the light flak gunners defending the field that these airplanes were friendly at a glance, as they flew through the flak in pursuit of any attacking Thunderbolt or Mustang.
|
THE KIT |
 Tri-Master was the first
company to produce a 1/48 Langnasen-Dora, with the model first appearing
in the late 1980s. Like the Ta-152 and the other Focke-Wulf models, it was
expensive. Dragon Models picked up the molds when Trimaster went out of business
in the early 1990s, and the model has been variously available until about 4
years ago. It is currently distributed by Italerei as a Fw-190D-9. Most
recently, ProModeler acquired a license on the molds, and released the kit as a
Fw-190D-11, with markings for the Papageistaffel Rot 4, and for Weiss
"<61."
Tri-Master was the first
company to produce a 1/48 Langnasen-Dora, with the model first appearing
in the late 1980s. Like the Ta-152 and the other Focke-Wulf models, it was
expensive. Dragon Models picked up the molds when Trimaster went out of business
in the early 1990s, and the model has been variously available until about 4
years ago. It is currently distributed by Italerei as a Fw-190D-9. Most
recently, ProModeler acquired a license on the molds, and released the kit as a
Fw-190D-11, with markings for the Papageistaffel Rot 4, and for Weiss
"<61."
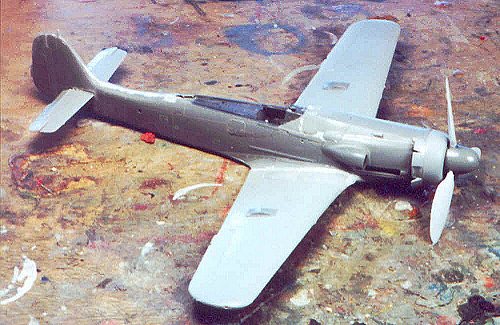
Unfortunately for ProModeler, there is more to a Fw-190D-11 than merely a bigger supercharger intake, Ta-152 prop and "flat top" gun bay cover and upper forward fuselage piece. The Jumo 213E that powered the D-11 is slightly different in overall size, which requires that the cowling has some extra bumps and fairings. The difference is subtle, and many might miss it, but once you have seen it, it is as obvious as a zit on the end of your nose. It doesn't help that the spinner for the Ta-152 prop was not taken from the original Ta-152 kit, and is misshapen, or that the Ta-152 intake also didn't come from the original kit - it's not misshapen, but there's more work than there should be in getting it right.
Fortunately for modelers everywhere who really want to do this airplane, Bob Stephenson, "The Wurger Mechanic," has created a conversion kit to create the Fw-190D-11 that is simply stunning in its overall quality. The set includes a resin spinner and prop blades that are exquisite, and an entire resin fuselage - hollow and in halves, and the upper "flat top" gun bay cover and forward fuselage, as well as the correct outboard cannon fairings both upper and lower. This fuselage has the proper cowling shape changes for the Jumo 213E engine. The quality of the resin casting is so good that, when I first opened the box, it took a minute to realize I wasn't looking at high quality injection-molded Tamiya plastic parts.
 This conversion is made
for the Tamiya Dora-9 kit, and if you use that, you can assemble it as if these
were Tamiya parts, i.e., you won't need any putty, and will only use Mr.
Surfacer to close in the seams on the fuselage centerline. However, most of you
who are going to want to do a D-11 will want to do so because you spent your $20
the ProModeler (DML) kit. Sooooo - can the parts work here? Yes. The two kits
have overall shape and dimensional accuracy, and you can easily fit the DML wing
assembly to this fuselage. The only thing you'll want to do is either cut off a
bit of the lower DML/PM fuselage right aft of the joint between lower wing and
fuselage, to fill the narrow gap caused by the fact the DML part is a bit
shorter, or you can use a piece of 10-mil sheet styrene, glue it in position and
shape to fit. However you do it, if you have the hand-eye coordination to
navigate your keyboard to this article at Modeling Madness, you will be able to
do the necessary work in about one minute. Past that, all else fits, though I
found I needed to run some Mr. Surfacer along the join of the "flat
top" forward fuselage
This conversion is made
for the Tamiya Dora-9 kit, and if you use that, you can assemble it as if these
were Tamiya parts, i.e., you won't need any putty, and will only use Mr.
Surfacer to close in the seams on the fuselage centerline. However, most of you
who are going to want to do a D-11 will want to do so because you spent your $20
the ProModeler (DML) kit. Sooooo - can the parts work here? Yes. The two kits
have overall shape and dimensional accuracy, and you can easily fit the DML wing
assembly to this fuselage. The only thing you'll want to do is either cut off a
bit of the lower DML/PM fuselage right aft of the joint between lower wing and
fuselage, to fill the narrow gap caused by the fact the DML part is a bit
shorter, or you can use a piece of 10-mil sheet styrene, glue it in position and
shape to fit. However you do it, if you have the hand-eye coordination to
navigate your keyboard to this article at Modeling Madness, you will be able to
do the necessary work in about one minute. Past that, all else fits, though I
found I needed to run some Mr. Surfacer along the join of the "flat
top" forward fuselage 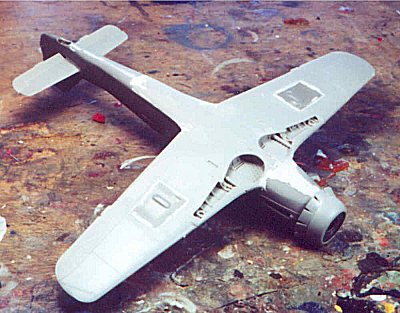 parts
to the fuselage - this may have been my own fault rather than any problem with
the design and production of the parts. You use the radiator cowling and cooling
flaps, which fit fine. Bob told me that the DML radiator sits back a bit further
than the Tamiya does, so the spinner might sit in too far, but I made sure to
push the radiator all the way forward in the cowling (trimming just a bit to get
it as far forward as I could) and all came out looking fine.
parts
to the fuselage - this may have been my own fault rather than any problem with
the design and production of the parts. You use the radiator cowling and cooling
flaps, which fit fine. Bob told me that the DML radiator sits back a bit further
than the Tamiya does, so the spinner might sit in too far, but I made sure to
push the radiator all the way forward in the cowling (trimming just a bit to get
it as far forward as I could) and all came out looking fine.
One other problem with the ProModeler iteration of the D-11 is that the ejector ports for the outboard 30mm MK108s are wrong - they used the lower wing for the DML Fw-190D-8 kit, and those ports aren't right. Fortunately Bob comes to your rescue with parts that are right. Simply cut out the offending area along panel lines, and insert these parts, and all is well. The kit provides the upper wing cannon fairings, but the resin parts are just a bit better overall. The replacement prop was assembled easily - the blades are thin and perfectly formed.
|
CONSTRUCTION |
Past all that, I assembled the kit per instructions, with the difference being I used a True Details resin cockpit. This is designed for the DML kit, and has to be trimmed a bit to fit the Tamiya kit, but there is no insuperable problem here, merely a bit of sanding, test-fitting, sanding, etc. I did have to trim the horizontal stabilizer, cutting off about 1/32" of the stabilizer section, so the part would fit to the Tamiya version of the stabilizer fairing. Again, no real problem here beyond measuring what needed to be removed and doing so.
One failing to note is that both the DML/ProModeler and Tamiya kits fail to provide the open wheel well and visible engine that was so much a part of the in-line Focke-Wulf's look. At the time I started building this, I had no engine available, so I left the wheel wells closed up. The result doesn't look bad, and is really only noticeable if you're displaying the model upside-down. However, the day after (naturally) I assembled this model, I was contacted by Bruce Radebaugh, who wanted me to review his Jumo 213 resin engine plug for the Dora kits, which I ended up using on a later kit of this series. If I were doing this model over again, I would use that plug along with the Eagle-Editions book and decals to get a really accurate model.
|
PAINT & DECALS |
 The painting instructions
in the ProModeler kit are not quite right. At this point, a modeler who has
Jerry Crandall's book, "Doras of the Galland Circus" (published by
Eagle Editions) with the great Tom Tullis color profiles, will have no trouble
as they'll merely follow that guide. I didn't have that, so I used the photos
Sam Garcia took of his Rot 4 that were published in Aircraft In
Miniature #1, which were done from the book, and followed those in general.
The painting instructions
in the ProModeler kit are not quite right. At this point, a modeler who has
Jerry Crandall's book, "Doras of the Galland Circus" (published by
Eagle Editions) with the great Tom Tullis color profiles, will have no trouble
as they'll merely follow that guide. I didn't have that, so I used the photos
Sam Garcia took of his Rot 4 that were published in Aircraft In
Miniature #1, which were done from the book, and followed those in general.
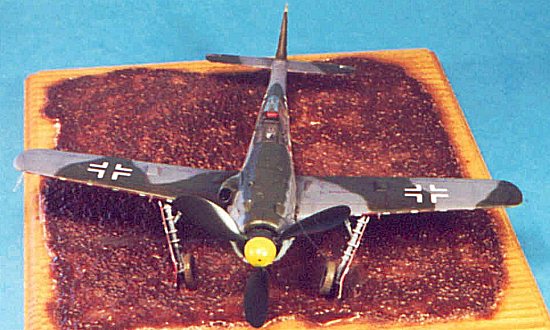
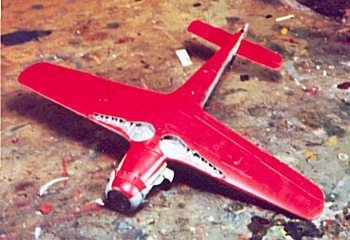
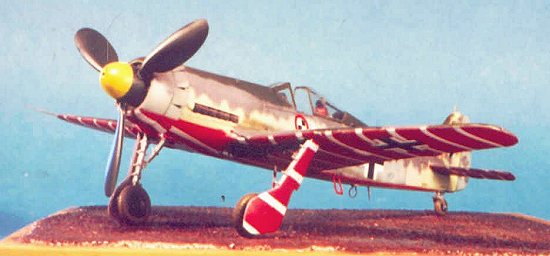
First, I painted the underside with Gunze-Sanyo Rot 23 Red, after painting the wheel wells with SnJ aluminum. When this was dry, I masked it off and painted the rest of the model. Just for color variation (and there is no one who can prove me wrong on this), I painted the cowling RLM84, the main fuselage RLM76, the rear fuselage extension and tail RLM76, with the elevators and the rudder RLM84. I painted the upper camouflage in RLM75 and RLM83, as Sam had done. The prop and spinner was RLM70 black-green with a yellow tip on the spinner. All this was done with Gunze-Sanyo paints, and when I was finished I gave the entire model two coats of Future.
 While the kit markings for
Rot 4 look OK, I was really wishing I had gotten hold of the Eagle
Editions decal sheet for these airplanes, since the quality is far beyond what
the kit offers. I really wanted the Eagle-Editions sheet when I tried
using the kit's white stripe decals for the undersurface and discovered after
only laying down three of them that the decals were both too wide and too short
to fit. I immediately removed these decals and dried off the model, being very
thankful I had started with these, since now I had to mask off the model and
paint the stripes.
While the kit markings for
Rot 4 look OK, I was really wishing I had gotten hold of the Eagle
Editions decal sheet for these airplanes, since the quality is far beyond what
the kit offers. I really wanted the Eagle-Editions sheet when I tried
using the kit's white stripe decals for the undersurface and discovered after
only laying down three of them that the decals were both too wide and too short
to fit. I immediately removed these decals and dried off the model, being very
thankful I had started with these, since now I had to mask off the model and
paint the stripes.
Fortunately, this isn't hard. The stripes are approximately 3/32" wide, and the distance between is about 3/8". I cut some drafting tape into 3/8" wide strips, masked off the model, and then shot the white stripes. The paint came out a bit thicker than had I painted them first and then masked off for the red, but the result looks OK. If you're going to use the ProModeler sheet, realize to begin with the white stripes are useless, shoot the underside white, mask off those stripes, shoot the red, mask all off, and you will have no trouble. Even better, use the Eagle Editions decals, which are the right size both in width and length.
 Once I had the underside
right, the rest of the decals went on just fine, settling in under several
applications of Micro-Sol. Once they were dry, I washed the model, and when dry
applied a coat of Future over everything.
Once I had the underside
right, the rest of the decals went on just fine, settling in under several
applications of Micro-Sol. Once they were dry, I washed the model, and when dry
applied a coat of Future over everything.
Final Assembly and Finish:
I decided it was unlikely this airplane had seen enough operational service to be really dinged up, so I limited the weathering to a minor ding or two on the wing root where the pilot would have climbed into the cockpit, and to applying exhaust stain and gunfire residue with Tamiya Smoke. I muddied up the tires before assembling them to the landing gear and then assembling the landing gear in position.
I shot the model with two coats of "Flat Future," and when that was dry I unmasked the canopy and windscreen, and attached the canopy in the open position.
|
CONCLUSIONS |
Bob Stephenson's conversion set for the Fw-190D-11 is beautiful, and fits the proModeler kit with no problem, despite its being created for the Tamiya model. The final result with this set makes a model that is far better than you'll get assembling the ProModeler kit out of the box - since it will ultimately be wrong, wrong,wrong no matter the skill you put into doing it as well as you can. Bob's set is well worth the money, and a real bargain for the quality you get. I would also highly recommend Bruce Radebaugh's engine plug, and the Eagle-Editions decal sheet and book.
The model is one of the most colorful on my Luftwaffe shelves, a one-of-a-kind airplane that I really enjoy looking at.

To get the items you want to do this model right:
Contact Bob Stephenson at: rstephen@hom.net
Contact Bruce Radebaugh at: bradebau@netzero.net ( http://partsrparts.homestead.com/partslist.html )
Contact Eagle Editions at: www.eagle-editions.com
Just as an additional bit of information, your editor built a D-11 a few years ago using Robert Stephenson's earlier conversion set that did not include the full fuselage (which would have made construction MUCH easier), and the Tamiya kit. If you would like to walk down memory lane and see that review, go here.
If you would like your product reviewed fairly and fairly quickly, please contact the editor or see other details in the Note to Contributors.
Back to Reviews Page 2015