| KIT #: | 80258 |
| PRICE: | $9.99. MSRP |
| DECALS: | Two Options |
| REVIEWER: | Joel Hamm |
| NOTES: |
For another opinion visit this link |
| HISTORY |
What this world needs is a good 49 cent plastic model; the kind kids
could buy by cashing in a few deposit soda bottles.
Oh, I know. Kids don’t scrounge for money any more.
At age 4 they draw a double digit in dollars allowance; and on their 16th
birthday get handed the keys to a Beemer SUV.
Things were different when we were kids.
We were poor. Really poor.
[CHORUS: How poor were you?]
We were so poor that I got clubbed feet from my mother darning the same pair of
socks so many times. We were so
poor that we were the best dressed kids on the block a full half century before
Ralph Lauren turned tattered
clothes into the height of fashion.
Our clothes were patched hand-me-downs and we were ashamed to go to
school with mis-matched knees and elbows.
How were we to know that fifty years later movie stars would strut about
with their tucheses poking out of frayed gashes, and that you would have to be a
movie star to afford jeans that came that way off the designer’s rack.
We were poor, but we were never unkempt, un-kept, un-cared for, or unfed;
the last evidenced by a life-long ectomorphism.
Toys , however, were a low priority, and we were on
our own to feed an early interest in styrene.
Deposit pop bottles were the answer.
Small ones were worth 2 cents. A full nickel
for the quart size, but these could rarely be found tossed off into the
gutter.
 We
would cash them in at
Binder’s candy story. Mr. Binder always had a few Hawk or Comet 29 centers
tucked up on a high shelf with school supplies and some hardware bits and
pieces. He never charged us the extra penny tax, and if we were short a bottle
he’d generally let that slide too. Revell was
out of our league. They cost
98 cents and you had to go way up on
We
would cash them in at
Binder’s candy story. Mr. Binder always had a few Hawk or Comet 29 centers
tucked up on a high shelf with school supplies and some hardware bits and
pieces. He never charged us the extra penny tax, and if we were short a bottle
he’d generally let that slide too. Revell was
out of our league. They cost
98 cents and you had to go way up on
Bazooka
Bubble Gum wrappers were another route to wealth.
You could collect and cash those in for prizes. If I correctly recall,
250 would get you a matched Mustang and Zero, also by Comet.
We never splurged on such trifles, because we were going for the Big
Time. My brother had decided that
we would get the 80 power microscope, which required a whopping 475 wrappers.
We spent more than a year with our eyes scouring the sidewalk, collected
325 wrappers, and despaired of ever reaching the magic number.
Then came
one of those chance encounters that forever changes lives.
We learned that the Lichtman Brothers, Alan and Harold, were also saving
Bazooka wrappers for an almost-as-expensive basketball, but
had lost all hope. We struck a deal, trading for their 150 wrappers a
pile of Superman comic books and Mad Magazines.
The
microscope was a tiny thing, less than 6 inches tall.
But hunched over it we peered into an unimagined world inhabited by
paramecium, amoebas, and the fearfully multi-headed hydra. Our samples were
drawn from a drainage ditch bucolically named Spring Creek.
We kept them in cotton-stoppered test tubes in a closet and apparently
never noticed the mounting stench.
Mom came in one day to investigate,
uncorked the tubes, and nearly infected the entire housing project with unknown
and un-curable plagues. These days
such a stunt would land a pair Leeuwenhoek
wannabees in a Gitmo cell, branded as bio-terrorists.
But how
did this episode change our lives?
It got Big Brudder started on the road to a career as a surgeon. Of course, had
we held on to that stack of comic books they would have been worth enough to pay
for his med school tuition. Me? I just couldn’t hack all that studying.
And the thought of being around sick people all the time.
Ooh – just so icky!
The
tables were eventually turned. Here
am I ten years retired and living the good life, while he still struggles with
the pittance he gets from Medicaid and Medical patients. Having a brother in the
surgical field is quite an asset.
He gets me scalpel blades (I’m out
of #11’s Bro), hypodermic needles for applying liquid cement, and exceptionally
fine stainless suture wire which makes superlative 1/72 scale rigging.
Of course, for the really juicy modeling stuff, he should have become a
dentist.
There’s a
more important advantage. When national healthcare is eventually rammed through
and access to a doctor becomes a
gift of government, I’ll have someone to minister to my more egregious ills;
that is, if those nasty old ciggies he’s forever sucking upon don’t do him in.
But how
did I lapse into all this reminiscence? I was talking about history. Oh – you
want history of the airplane. The Saber Jet?
I’m not going to get into that.
There’s already oodles right here on Modeling Madness.
Then there’s GOOGLE. And all
those “In Action” books. What could
humble moi possibly add? But
I did want to return to the topic of affordable model airplanes.
 A few years
back the Chinese Hobby Boss brand
took on the task of molding entry-level models.
They have an extensive repertoire in 1/72 scale of the most popular, if
jaded, WWII- to-current-day fighters, priced one penny below $10; more than a
kid can earn by cashing in
deposit bottles, which generally can no longer be found because plastic has
taken over, but about what he could make by bringing a few bags of aluminum cans
to the recycler.
A few years
back the Chinese Hobby Boss brand
took on the task of molding entry-level models.
They have an extensive repertoire in 1/72 scale of the most popular, if
jaded, WWII- to-current-day fighters, priced one penny below $10; more than a
kid can earn by cashing in
deposit bottles, which generally can no longer be found because plastic has
taken over, but about what he could make by bringing a few bags of aluminum cans
to the recycler.
Their
next-step-up-the-ladder series is a
collection of helicopters and
larger planes that go for $20 - $30.
Once a kid is hooked he can move up to 1/48 scale and into the “Dad, can
I have an advance on my allowance?” range. Keeping pace with the current trend
in import pricing, their 1/32 creations take the devotee ever higher into the
“Honey, can we get a second mortgage on the homestead?” range.
Assuming
that they were just toys and on par with Snap-Tites and early Matchboxes; and
because they offered no to-me
exciting subjects, I had turned up
my nose at these bottom-liners.
A brood of grand-nephews sprouting into model airplane age gave me cause
to take a second look when the need came over me also for instant-gratification
respite from the toils and tribulations of Merlin and Mach 2.
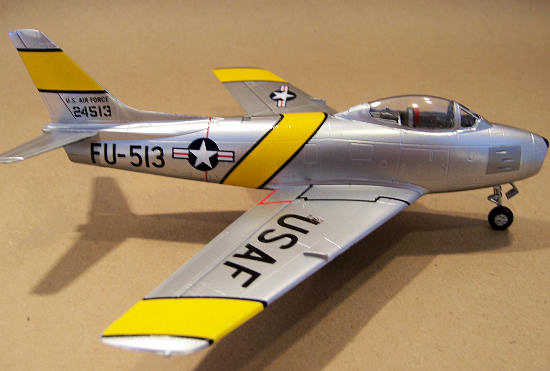
I chose
the Saber having of late become
infatuated with its svelte lines.
It has to be one of the prettiest airplanes ever conceived, and differs
from so many classics in retaining
that sex appeal through operational maturity; even unto
its barrel-chested FJ-4 embodiment.
Unlike
most subjects, which are of the “One or at most two then through” variety, the
F-86 fell into the exclusive category of “Let’s see what each manufacturer has
to offer.” One of the very few attractions of entering into a seventh decade of
existence is the freedom to indulge such excesses.
Hasegawa
put one out in its very first batch of export moldings.
It long ago disappeared from the store shelves and my example similarly
disappeared from the
Like Tutenkhamen’s tomb, the Saber seemed to carry with it a curse, jinxing each construct with a major bung-up. Hobby Boss’s “Easy Assembly Authentic Kit” dangled the tantalizing prospect of the elusive “flawless buid”. But my, how I do ramble on in my advancing age. Let us move on finally to a discussion of…
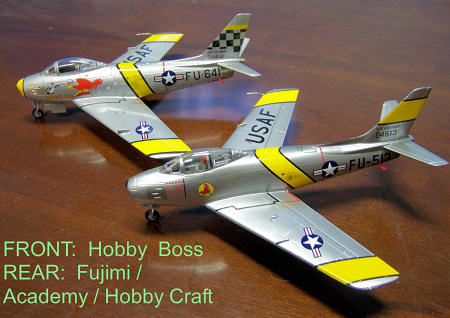
| THE KIT |
Which was
a surprise. The few parts, custom cradled in their
vacu-formed holder, are engineered for quick and easy assembly, but are
not at all toy-like. The level and
rendering of detail is at least equal to the Fujimi /Academy
kit. The only exception is the main gear wheels, a tad over-inflated and
the prominent brake-hubs of which are disapppointingly fuzzed.
Accuracy
may or may not be an issue. With
Saber Jets there is a question of which wing went with which sub-variant. Wings
could be wide or narrow chord. Long span or sh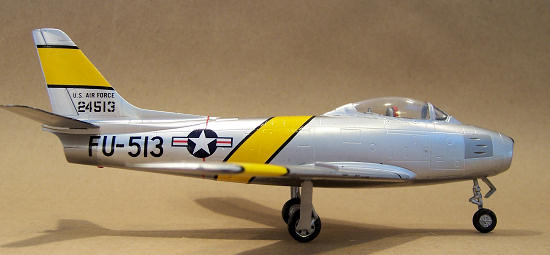 ort.
Slatted, slotted, or slutted. Flapped or flopped. Anal compulsivists can
determine if the mold makers got this one perfectly correct; but it looks fine
to me.
ort.
Slatted, slotted, or slutted. Flapped or flopped. Anal compulsivists can
determine if the mold makers got this one perfectly correct; but it looks fine
to me.
The
one-piece transparency is thick but clear. Everything goes together with
gigantic tabs and keyed slots, but glue is still necessary. The plastic is a bit
finicky; hard, brittle, with thin areas such as tips and trailing edges easily
shattered when dropped from bench-height.
Excess solvent will also
cause sinks and holes to open.
These foibles were revealed
in the boogering-up of a prior attempt at the same kit; but at $9.99 the elusive
“flawless build” can be pursued without undue guilt.
The
instruction diagram is clear enough, whether the parts tags are read in English
or the Mandarin provided. A painting and marking guide is full color but leaves
unanswered some questions. (More
anon). Decals, sealed in their own bag, appear thick and reminiscent of the
ancient Airfix armor plates, but turned out to be exceptionally workable.
More, too, to follow on that.
In a feat
of incomprehensible injection molding magic, the fuselage is formed
in nearly a single shot, eliminating
dorsal seam scraping and sanding. The residual strip of belly is integral
with the one-piece wings; and conjoined
with the lower half of intake trunking.
Despite the resultant thickness of most parts, they are totally free of
shrink dimples and other abominations.
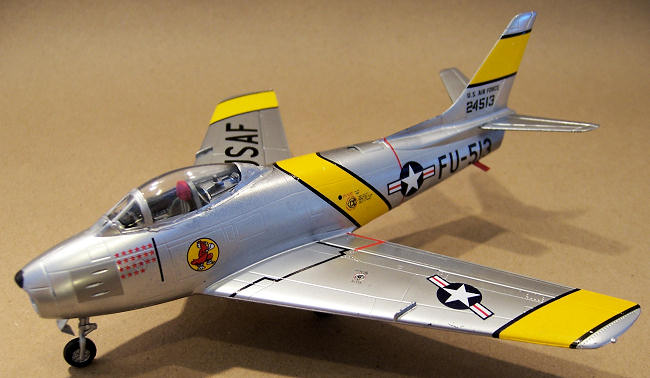
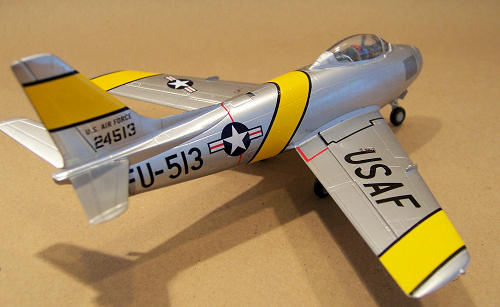
To celebrate the Saber’s sexiness, I chose to assemble it with gear doors and air brakes shuttered tight, and bereft of under-wing tanks. Purists will point out that F-86’s always lugged these around, but let’s pretend that this one has just returned from a Mig tete-a-tete over the Yalu, where encumbrances would have been jettisoned in the opening courtesies.
| CONSTRUCTION |
Starts
with correcting the cockpit opening, which resembles a broad cruciform intended
to capture oversize tabs on the canopy. Razor-sawing away 4 wedges of sidewall
and swiping the cut surface with a sanding stick creates a normal aperture.
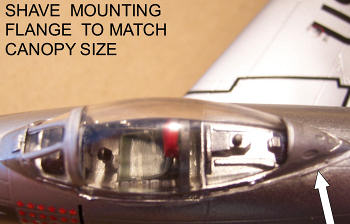
 The need
for another semi-major fix was not evident until cockpit closure.
Either the canopy is slightly small or the mating surface is too large.
When the canopy went on nearly a full millimeter of flat flange extended
on all sides. The fix was
accomplished with careful shaving by a curved scalpel blade, but is most easily
and invisibly done prior to painting.
The need
for another semi-major fix was not evident until cockpit closure.
Either the canopy is slightly small or the mating surface is too large.
When the canopy went on nearly a full millimeter of flat flange extended
on all sides. The fix was
accomplished with careful shaving by a curved scalpel blade, but is most easily
and invisibly done prior to painting.
The
cockpit tub is integral with the upper half of the intake trunk, and mating
these sections is all the furnishing of the front office that needs to be done
at this point, since other details can be inserted from the top.
To avoid
tail sitting, Sabers requite tons of lead weight in the nose and only slightly
less of depleted uranium; though the latter is more difficult to procure and
demanding in its storage and handling. Little room is available at the extreme
forward end of datum, but by smashing flat with a good sized framing hammer, one
or two fishing weights can be curled in around the intake tunnel.
The rest can fit under the cockpit floor. Stuff in as many split shot as
will fit then cram in a few more.
 Before
sealing the fuselage the exhaust piece has to go in; but since I needed to
support the airframe for assembly
and painting I left this out until last. A length of 3/8” dowel fit tightly up
the jet’s wazoo for clamping in a Panavise.
Before
sealing the fuselage the exhaust piece has to go in; but since I needed to
support the airframe for assembly
and painting I left this out until last. A length of 3/8” dowel fit tightly up
the jet’s wazoo for clamping in a Panavise.
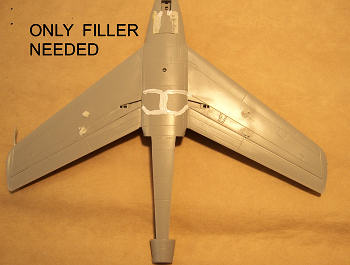
The
fuselage / belly /wing juncture needs just a swipe of 600 grit wet paper to
remove all hints of seam line. The
port side wing root did stand slightly proud of the fuselage flank and once
again a #15 scalpel blade came to the rescue as a scraper. The only filler
needed was to close the mounting holes for the wing tanks. The nose piece is a
glue-free press fit. Ditto the tail planes.
To avoid
breaking and losing the cranked pitot tube I excised and saved it for future re-anasthemosing
in an unused paint vial. The
gremlins, as always, kept one step
ahead by teleporting pitot and vial int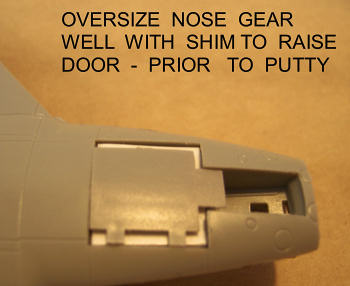 o
a parallel universe. It was easily re-fashioned out of a bent pin, but not until
I had taken the accompanying photographs.
o
a parallel universe. It was easily re-fashioned out of a bent pin, but not until
I had taken the accompanying photographs.
Closing
all the portals offered the first opportunity to exercise ingenuity.
The nose gear well is half again as wide as the door.
I fixed this by inserting a shim of card stock, then adding the door,
mindful of its tendency to dissolve in too much glue. Once dry, Squadron white
stuff was spooned in to the bilateral gaps and sanded smooth.
The gear doors and air brakes are meant to be mounted open, so no lip is provided by which they may be glued closed and flush. To solve this I retrieved from the shop my tube of do-everything J-B Weld epoxy. I let the mixed stuff set for an hour or so until it became firm, rolled several little balls of it and used these to hold the doors in place, pressing gently until everything was flush. BTW, if you do mount the brakes open, snip the lower hinge arms and adjust the actuators so they droop at the proper angle.
| COLORS & MARKINGS |
My intent was to do a base coat of Alclad
Chrome, slightly “panelized” with White Aluminum on the wing center
panels and Dark Aluminum on the gun
doors and engine exhaust.
Most photos depict Sabers in very dull aluminum, though some
do show highly polished warbirds
in this pattern. Not this
particular livery, perhaps; but it’s my model and I’ll paint it to suit me. Or
try to.
Everything ever written by, about, or for Alclad calls for a black enamel
primer under Chrome, polished to a mirror gloss. I sprayed the airframe with
Model Master black, then polished out areas of slight orange-peeling. Since
Chrome cannot withstand masking tape, I sprayed and masked the White Aluminum
panels. Before proceeding I did a
test tape pull up. The tape came up
fine. So did large chunks of Alclad.
Later, with the help of MM Forum posters, I surmised that the aluminum shades
require a lacquer based primer.
I feathered in the boogers, fixed the
Aluminum panels, then sprayed
the Chrome. Where the enamel
surface was virgin,
 the Alclad
laid down an eye-piercing metallic gleam.
Wherever the primer had been polished, however, the lacquer conformed to
the most sub-microscopic imperfections and dried dull.
the Alclad
laid down an eye-piercing metallic gleam.
Wherever the primer had been polished, however, the lacquer conformed to
the most sub-microscopic imperfections and dried dull.
This situation normally called for CFIT – Controlled Flight Into Terrain;
but since I had already discarded one of these kits I resolved to fight the
jinx, and to find some other use for my $10 a-piece bottles of Alclad; such as
getting the fireplace going when the firewood is wet.
Using abrasive toothpaste and Mrs. Wright’s Silver Polish, I scrubbed
away the metalics down to the black gloss;
then whomped the whole with a liberal coat of
Railroad Bright Silver.
The result was smooth, shiny, and convincing. I’d previously found
Floquil to resist marring from tape, but recalling modeling’s Golden Rule
- The Enemy of Good is Better - abandoned the panelized wing thing. There
would be sufficient decals to break
up the monochrome. I did mask and
spray the gun bay doors and exhaust section with Alclad Dark Aluminum.
The decals, as mentioned, looked like they might pose a thickness
problem; but they turned out to be exceptionally well behaved. When first
applied, they look like they will not conform, but as they dry they suck down
into every crook and nanny. They
can be helped along by dousing with either Solvaset or Microset, then rolling
with a Q-tip.
Fuselage
insignia and tail codes are provided pre-cut to fit around the open air brakes.
I had the spare decal sheet from the wrecked kit so avoided the need to re-match
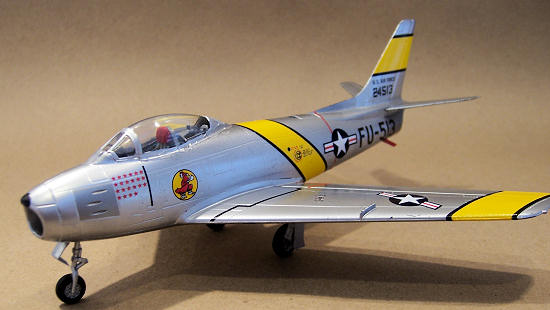
the pieces. The “Fighting Cock” and
some other markings are given in duplicate but are shown on the marking guide as
only on the port side.
The only other fault of the decals is a slight graininess when set. Since they adhered so well, I opted to change from my standard procedure in the past and skip the Future.
| CONSTRUCTION CONTINUES |
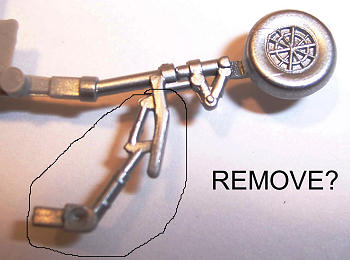 The nosegear strut displays an odd, apocryphal feature copied from
many kits; a hefty and complex diagonal retraction brace.
This cannot be seen on any photo with either the nosegear door open
or closed. It is not evident on
the Saber parked in the Udvar Hazy Annex of the NASM, nor the one guarding
the entrance to the Front Royal VA airport.
If it did exist it would make impossible the closing of the door with
the gear extended. With all
that logical and philosophical support, I felt safe in the decision to snip
it and flip it. Since the
struts are all molded with the oleos for some reason extended, the legs are
all a bit long; but I was too lazy to shorten them.
The nosegear strut displays an odd, apocryphal feature copied from
many kits; a hefty and complex diagonal retraction brace.
This cannot be seen on any photo with either the nosegear door open
or closed. It is not evident on
the Saber parked in the Udvar Hazy Annex of the NASM, nor the one guarding
the entrance to the Front Royal VA airport.
If it did exist it would make impossible the closing of the door with
the gear extended. With all
that logical and philosophical support, I felt safe in the decision to snip
it and flip it. Since the
struts are all molded with the oleos for some reason extended, the legs are
all a bit long; but I was too lazy to shorten them.
The flight deck had yet to be completed. Saber insides
generally were painted
pitch-black, but in the interests of visibility I left the dark grey plastic
un-colored. No details or decals are provided to dress up the blank instrument
panel and consoles, so I added some pieces from a True Details instrument sheet.
The kit seat looks like a crate in which a refrigerator or washing
 machine
might have been delivered, so I replaced it with a
more-convincing-but-far-from-authentic bucket and scratch-built headrest.
I ran out of
machine
might have been delivered, so I replaced it with a
more-convincing-but-far-from-authentic bucket and scratch-built headrest.
I ran out of
The canopy’s humongous mounting tabs had to be removed, and with the
styrene’s brittleness in mind I sawed then sanded them off. A fuel dump pipe had
to be fashioned from a snippet of strut and set just below the left stabilator.
The final step; final that is until post-photography realization that the
pitot tube was still missing, was removal of the rectal dowel and insertion of
the engine exhaust piece; which also required removal of the mounting tabs and
sanding down the circumference.
| CONCLUSIONS |
I do believe this kit has beaten the Saber Jet Jinx.
Despite some assembly difficulties it displays no noticeable (to me)
botch-ups. Hobby Boss has come to
the rescue of model airplaning; providing a line of inexpensive, attractive,
entry-level subjects
that can be as-is built by a young neophyte, or with a bit of experience,
tweaked into a fine display piece.
I’ll have to try some of their others.
 Meanwhile, I’m on the prowl for a Heller F-86; which is OOP but rumored
to be a top-notch rendering. Also
awaiting the release of Airfix’s “new tooling” F-86; rumored
to not be a re-box of the Heller; and an FJ-2/3 promised by one of the
Czech firms. At my age these are
the only types of sexy models I’ll ever handle.
Meanwhile, I’m on the prowl for a Heller F-86; which is OOP but rumored
to be a top-notch rendering. Also
awaiting the release of Airfix’s “new tooling” F-86; rumored
to not be a re-box of the Heller; and an FJ-2/3 promised by one of the
Czech firms. At my age these are
the only types of sexy models I’ll ever handle.
March 2010
If you would like your product reviewed fairly and quickly, please
contact
me or see other details in the
Note to
Contributors.