 capacity
payload vehicle for satellite deployment, and the desire of the Nixon
administration to reduce the costs of space exploration by developing a
spacecraft with reusable components.
capacity
payload vehicle for satellite deployment, and the desire of the Nixon
administration to reduce the costs of space exploration by developing a
spacecraft with reusable components.Revell 1/144 Space Shuttle Launch Complex
| KIT #: | 4910 |
| PRICE: | $ |
| DECALS: | |
| REVIEWER: | Mark Hiott |
| NOTES: |
Part 1: LVM LC39S1 The |
The first of several parts
| HISTORY |
The
Space Shuttle was the first operational orbital spacecraft designed for reuse.
It carried different payloads to low Earth orbit, provided crew rotation for the
International Space Station (ISS), and performed servicing missions. The orbiter
could also recover satellites and other payloads from orbit and return them to
Earth. Each Shuttle was designed for a projected lifespan of 100 launches or ten
years of operational life, although this was later extended. The crucial factor
in the size and shape of the Orbiter was the requirement that it be able to
accommodate the largest planned commercial and military satellites, and have the
cross-range recovery range to meet the requirement for classified USAF missions
for a once-around abort from a launch to a polar orbit. Factors involved in
opting for solid rockets and an expendable fuel tank included the desire of the
Pentagon to obtain a high-capacity
payload vehicle for satellite deployment, and the desire of the Nixon
administration to reduce the costs of space exploration by developing a
spacecraft with reusable components.
Each Space Shuttle is a reusable launch system that is composed of three main
assemblies: the reusable Orbiter Vehicle (OV), the expendable external tank
(ET), and the two reusable solid rocket boosters (SRB). Only the orbiter entered
orbit shortly after the tank and boosters are jettisoned. The vehicle was
launched vertically like a conventional rocket, and the orbiter glided to a
horizontal landing like an airplane, after which it was refurbished for reuse.
The SRBs parachuted to splashdown in the ocean where they were towed back to
shore and refurbished for later Shuttle missions.
At
times, the orbiter itself was referred to as the Space Shuttle. Technically,
this was a slight misnomer, as the actual "Space Transportation System" (
Five
space-worthy orbiters were built: Challenger
(OV-099), Columbia (OV-102),
Discovery (OV-103), Atlantis
(OV-104), and Endeavour (OV-105). A
mock-up, Inspiration (OV-100),
currently stands at the entrance to the Astronaut Hall of Fame. An additional
craft, Enterprise (OV-101), was not
built for orbital space flight, and was used only for testing gliding and
landing. Enterprise was originally
intended to be made fully space-worthy after use for the approach and landing
test (
The system was retired from service in 2011 after 135 missions; on July 8, 2011, with Space Shuttle Atlantis performing that 135th launch - the final launch of the three-decade Shuttle program. The program ended after Atlantis landed at the Kennedy Space Center on July 21, 2011.
| THE KIT |
 I
bought this kit several years ago, partly started. This is the version without
the Shuttle, but I was able to source a Revell 1/144 Shuttle in the meantime.
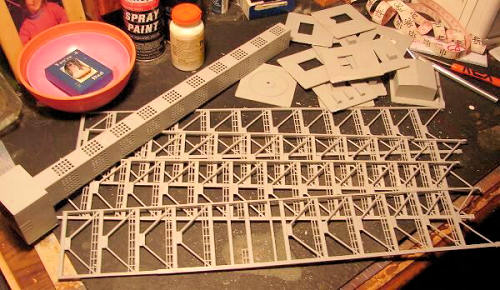
One thing you will notice is that this is a BIG box and it is stuffed with
parts! Molded in gray, the kit consists of hundreds of parts, more if the
shuttle is included. The level of detail is good, but is simplified by
necessity, as the real deal is incredibly complex. The molding is first rate and
even the rails are crisp and show no hint of flash.
I
bought this kit several years ago, partly started. This is the version without
the Shuttle, but I was able to source a Revell 1/144 Shuttle in the meantime.
One thing you will notice is that this is a BIG box and it is stuffed with
parts! Molded in gray, the kit consists of hundreds of parts, more if the
shuttle is included. The level of detail is good, but is simplified by
necessity, as the real deal is incredibly complex. The molding is first rate and
even the rails are crisp and show no hint of flash.
The kit is severely undersized. I believe the
kit was made to fit the existing shuttle kit. It had an undersized
 vel
is 40x40 in real life, 1/144 should be 3.66x3.66 in. They measure out to be 2
30/32x2 30/32, about a 1/2in to small. The model scales out to be about 1/170.
vel
is 40x40 in real life, 1/144 should be 3.66x3.66 in. They measure out to be 2
30/32x2 30/32, about a 1/2in to small. The model scales out to be about 1/170.
The instructions are typical Revell.
They consist of drawings and is 12 pages. Colors are listed on the front page
and there are very few callouts in the steps.
My kit is dated 1986 and, of course,
it's out of production. They come up on the various auction places, but prices
can run as high as $300/$400. There is hope that Revell may someday reissue the
kit.
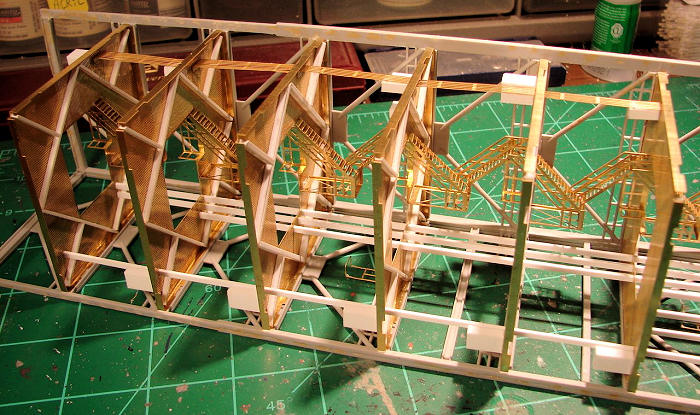
LVM DETAIL SETS: You can check out Scotts' previews for a detailed look at the sets. Believe me, pictures do not do them justice! The brass is absolutely stunning! The details are crisp, sharp and well defined. I did notice that some of the attachments points are a bit big, but nothing that will cause problems. The instructions come on a disc and must be printed out... and you will NEED them! They are detailed and very easy to follow. The instructions contain drawings as well as in progress photos to show just to make modifications to the kit as well as how to assemble the various parts. Each section also includes a parts layout identifying each part.
| CONSTRUCTION |
First I want to mention glue.
You need to use CA to assemble the LC39S1 set. They are mostly flat pieces and I
found that the CA with a brush works best. I tried the tube types but found it
was easier to apply it with a brush. The tube type can still be used on the
smaller parts however.
 Buying
a partly built kit caused me trouble. Since the entire
Buying
a partly built kit caused me trouble. Since the entire
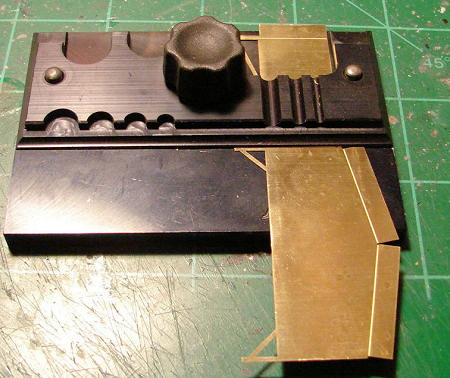
First, you WILL need a p/e bending
tool for this. I don't see any other way to make the bends required on some of
the parts.
A few notes on the instructions... On page 3
you're told you will need Evergreen Pack #141: 1x2mm strip. The package is
actually #144. On page 7 step 3, it tells you to bend PE20x2 and PE21x3, it
should be PE20x3 and PE21x2. The parts layout on page 4 identifies them
correctly. On page 10 PE9 and page 11 PE10 both show an small white outline in
the upper left corner with no label. I assume they are the 6x3x10 Evergreen
called for elsewhere in the instructions. So that's what I installed. (I have
talked to
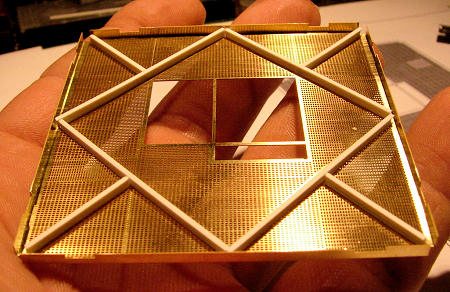
Cut out the platform for levels 280 & 260. After bending the edges, I
felt the platforms looked a bit plain, so I installed framework on the bottom
sides with some spare Plastruct 3/32 U-channel. It will take 2 packs if you want
to do this as well. They should be I-beams, but they are there mostly for effect
and strength. Turn the platforms over and sand off any glue showing on the top.
Next, on page 11, add the plastic details called for. You'll need someway to
measure and cut the Evergreen strips supplied with the kit.
 Mark
the positions for, but leave off, PE21 (or PE20 depending on the level) and the
plastic part that goes with it. You can install those later. Attach platforms
280 and 260 to kit part #1 and kit part #2, but do not glue the kit parts
together yet. Attach the levels so that kit part #2 forms the back side of the
Mark
the positions for, but leave off, PE21 (or PE20 depending on the level) and the
plastic part that goes with it. You can install those later. Attach platforms
280 and 260 to kit part #1 and kit part #2, but do not glue the kit parts
together yet. Attach the levels so that kit part #2 forms the back side of the
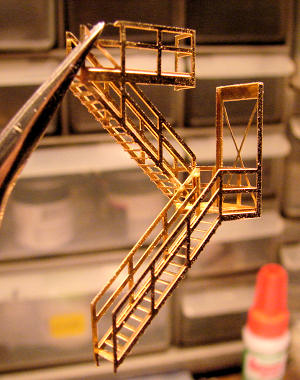
Next, following the instructions, build and install a set of stairs
 between
levels 260 and 280. I only thing I changed was to add Part PE14 to part PE12
before attaching part PE13 to part PE12. I found it a bit easier to fit PE14
this way and it gave me something to help attaching PE13. Attach part PE18 after
the stairs are in place. I must comment that the engineering of the stairs is
some of the best p/e work I have ever seen. They go together with no trouble,
despite being quite complicated, and fit perfectly.
between
levels 260 and 280. I only thing I changed was to add Part PE14 to part PE12
before attaching part PE13 to part PE12. I found it a bit easier to fit PE14
this way and it gave me something to help attaching PE13. Attach part PE18 after
the stairs are in place. I must comment that the engineering of the stairs is
some of the best p/e work I have ever seen. They go together with no trouble,
despite being quite complicated, and fit perfectly.
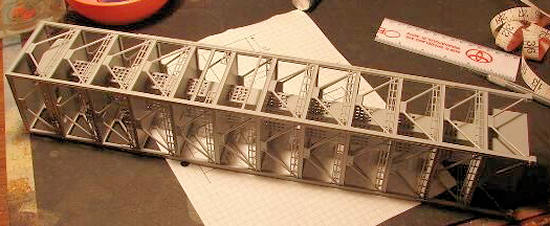
Working your way down from the top,
assemble and install each level and a set of stairs. Complete each level before
going on to the next. Once all the levels are done, go back through the level
diagrams and install parts PE20 and PE21, along with the plastic parts called
for. Make sure to align the parts from top to bottom.
The last step is to install the
cable trays. Be aware that the Evergreen strips are not long enough to do the
longest runs in one piece. End these runs at the bottom of a level, insert
another piece and glue it at the joint.
| COLORS & MARKINGS |
At this point I painted the
I was amazed at how easily
this set was assembled. The fit of the completed parts was outstanding. I was
able to do basic assembly in just over a week. Anyone who has one of these
Shuttle Complex kits will definitely want to get these detail sets.
March 2012
If you would like your product reviewed fairly and fairly quickly, please contact the editor or see other details in the Note to Contributors.