Revell 1/144 Space Shuttle Launch Complex Part 2
| KIT #: | 4910 |
| PRICE: | $ |
| DECALS: | |
| REVIEWER: | Mark Hiott |
| NOTES: |
Part 2: LVM LC39S2/3 The |
For those who missed it, here is Part 1.
| CONSTRUCTION |
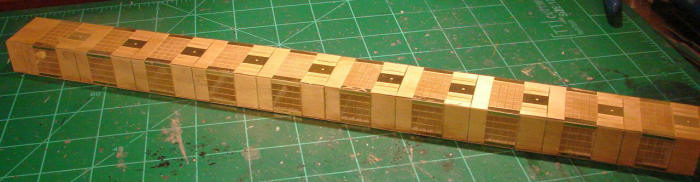
ELEVATOR SHAFT CONSTRUCTION: Assemble the kits elevator shaft as called for in
the instructions. After that's dry, shift to the
 S2 instructions and remove the
molded in grates on the shaft sides as shown. I'm not real sure this needs to be
done, as painting will most likely clog the fine mesh that LVM has cast into the
p/e parts. LVM would have you install the parts in order... i.e. #1, #2, both #5
then both #6 etc. I found it easier to install, and align, one side at a time.
Install PE1 then PE2, then move to the next side and install 1 PE5 and 1 PE6 and
so on. The instructions also suggest you to line up the lower edge of the PE5
with the edge of PE1... don't, align the shaft detail instead. A
S2 instructions and remove the
molded in grates on the shaft sides as shown. I'm not real sure this needs to be
done, as painting will most likely clog the fine mesh that LVM has cast into the
p/e parts. LVM would have you install the parts in order... i.e. #1, #2, both #5
then both #6 etc. I found it easier to install, and align, one side at a time.
Install PE1 then PE2, then move to the next side and install 1 PE5 and 1 PE6 and
so on. The instructions also suggest you to line up the lower edge of the PE5
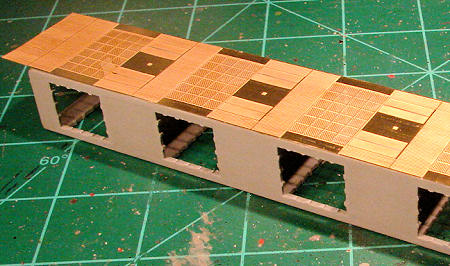
with the edge of PE1... don't, align the shaft detail instead. A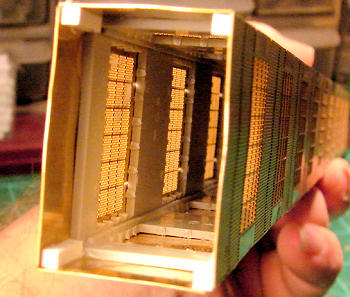 ny misalignment
will be easier to fix at the lower edge then along the sides. LVM provides a
nice layout diagram of the parts on the shaft that's easy to follow. As you
finish each side, install the plastic corner braces at the top and bottom, LVM
provides square plast
ny misalignment
will be easier to fix at the lower edge then along the sides. LVM provides a
nice layout diagram of the parts on the shaft that's easy to follow. As you
finish each side, install the plastic corner braces at the top and bottom, LVM
provides square plast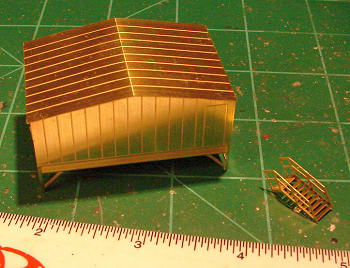 ic for this. Care must be taken when doing this if you are
to get all the sides aligned properly. It all went together ok, but I still
ended up with a small gap at one top corner. Hopefully the Machine House will
hide it.
ic for this. Care must be taken when doing this if you are
to get all the sides aligned properly. It all went together ok, but I still
ended up with a small gap at one top corner. Hopefully the Machine House will
hide it.
The
other part of the S2 set is the machine house. I had a bit of trouble here, as
the house contains some very fine parts. I thought the p/e attachment points
were a tad big, and I had a hard time getting a clean edge. Bend the center of
parts #7 and #8, then bend the edge. I didn't on #7 and had difficulty getting
the center leg to bend properly. After joining parts #7 and #8, the roof is
attached. There is also a set of stairs to fold, but those can't be set in place
until the Machine House is installed in the tower.
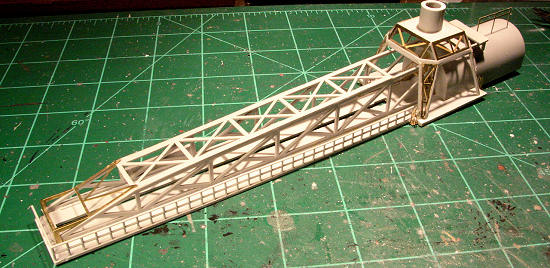
HAMMERHEAD CRANE CONSTRUCTION: This is where buying a partially started kit is a
bad idea. The crane in my kit was already assembled and I had to tear it down to
install the LVM set. After disassembly, I removed as much glue residue as I
could.
 Thank God whoever built this didn't do a very good job. I was unable to
do all the modifications to the crane platform as called for in the LVM
instructions as the machinery housing was already assembled. I was, however,
able to notch the front corner.
Thank God whoever built this didn't do a very good job. I was unable to
do all the modifications to the crane platform as called for in the LVM
instructions as the machinery housing was already assembled. I was, however,
able to notch the front corner.
PE1 is
glued to the bottom of kit part 60. Take care here as I bent the side rails the
wrong way the first time. Note that one of the sides is offset, use that to help
you bend the rails correctly. You will also want to apply some CA to the bottom
corners where the rails bend, as they are quite fragile and could be easily
broken off at some point. I was unable to figure out how PE3 is supposed to look
attached, so I left it off for now. I will attach it
 later after I do a bit of
research.
later after I do a bit of
research.
When
installing the rail on top of the crane housing, use the rail to mark the holes.
The instructions don't tell you how high the rail should be and I think I
installed mine a bit too high. I also left off the antenna until I can figure
out how long it should be.
I have
to admit, the stairs for the crane h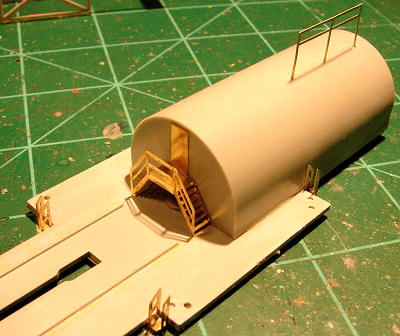 ousing (PE4, 5 and 6) are a marvel in
engineering. It's a complex set of stairs, but folded properly, they fit
together beautifully.
ousing (PE4, 5 and 6) are a marvel in
engineering. It's a complex set of stairs, but folded properly, they fit
together beautifully.
The
mounting for the lightning mast was also assembled in my kit. This made the
procedure for attaching the detail parts a bit different then the instructions
call for. I first cut off the mast itself. I'll replace that later with a
section of plastic rod. I was able to get the mount off the crane base, but was
afraid to try and take the framing apart. Once I had
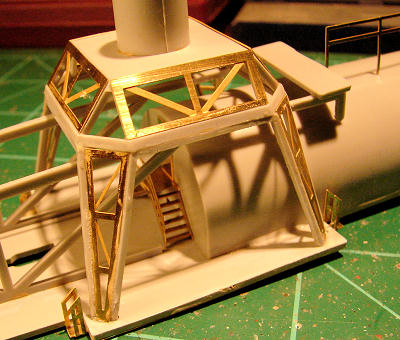 it off, I then followed the
instructions attaching the parts. The bottom edges required a bit of trimming to
get it to fit back on the base.
it off, I then followed the
instructions attaching the parts. The bottom edges required a bit of trimming to
get it to fit back on the base.
The
instructions have you modify the crane structure itself, but don't tell you why.
As it is, it allows you to slide the structure a little farther back on the base
and provides clearance for the stairs. After installing the structure, you can
then installed part PE7. Take care bending this part, as the areas the need
bending are very small.
As
with LC39S2, there are stairs that you will need to attach after the crane has
been installed on top of the
Once finished, complete the assembly as per the complex kit instructions.
| CONCLUSIONS |
As easy to install as LC39S1, the parts make the Elevator Shaft and Hammerhead stand out. The stairs are particularly impressive. Again, I was able to do basic assembly in only a single night.
March 2012
Thanks to LVM via your editor for the detail set. Here is a look at set 2 and set 3
If you would like your product reviewed fairly and fairly quickly, please contact the editor or see other details in the Note to Contributors.