The Space Shuttle was a remarkable machine, but it
was super expensive. Every mission cost a small fortune, and
it was a lot of weight to put into orbit. If you just wanted
to get a few astronauts up to a space station, then it was a
lot of dead weight, too. It was also extremely
sophisticated, meaning that there was plenty of scope for
things to go wrong (and not just disastrously wrong like the
two fatal accidents, but wrong enough to delay launches).
 So in the 80s and 90s, NASA was thinking about other ways to
get astronauts into orbit - ways that were simpler and
cheaper than using the shuttle, but more efficient than
using a disposable spacecraft (like Soyuz) every time.
So in the 80s and 90s, NASA was thinking about other ways to
get astronauts into orbit - ways that were simpler and
cheaper than using the shuttle, but more efficient than
using a disposable spacecraft (like Soyuz) every time.
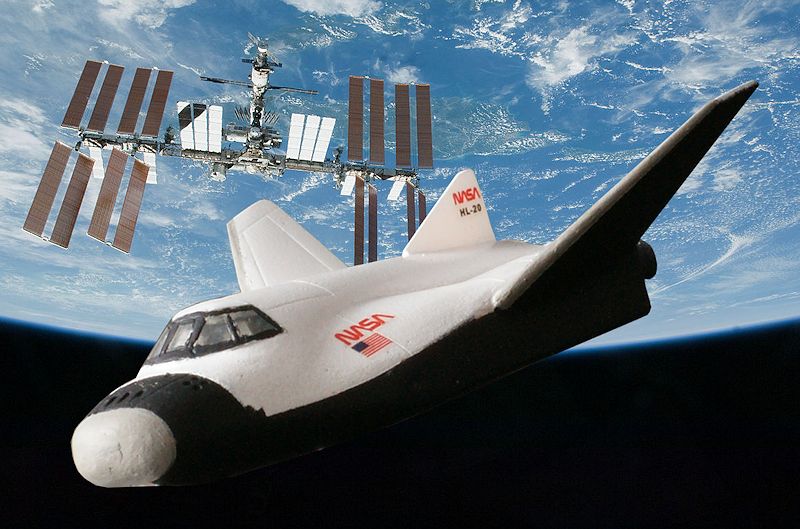
Drawing on research from the 60s conducted by lifting bodies
- research that fed directly into the design of the Space
Shuttle - they came up with the HL-20 "Personnel Launch
System". This was a small space plane, which would be
blasted into space on top of a regular rocket, then fly up
to a space station (at that point, the "Freedom", which
never flew but morphed into the ISS) and dock with it. Crew
could switch over, and there could be a small amount of
cargo too. Then, the HL-20 would undock and zoom back down
to earth. Using its belly as a heatshield, just like the
Shuttle, it would then re-enter and glide down to a normal
landing on a runway somewhere. The whole thing could be done
in 72 hours and the planned turnaround time was only 43
days.
A mockup was built and NASA teamed up with two
universities in North Carolina to test out crew capacities
and interior design concepts. Supposedly they figured out
that 10 people could ride to orbit in this little craft. It
would have been a tight squeeze, but hey, "it beats the
airlines!" The craft itself was supposed to be able to fit
into a Shuttle's cargo bay, with folded wings. That would
have allowed a spare HL-20 to piggy back up to the space
station and stay there, as a lifeboat in case of trouble
(the Soyuz fulfils this role in real life).
The second link under references has a few interior
shots including of the cockpit and the passenger cabin.
 Ultimately the HL-20 never flew and the only
available ride for US astronauts up and down to the ISS is
now the Russian Soyuz spacecraft, tried and true, but
essentially old-school technology that can only move three
people at a time. It's a whole lot better than nothing, but
perhaps someday some variant of a lifting body crew
transport vehicle will do the same job more effectively and
economically.
Ultimately the HL-20 never flew and the only
available ride for US astronauts up and down to the ISS is
now the Russian Soyuz spacecraft, tried and true, but
essentially old-school technology that can only move three
people at a time. It's a whole lot better than nothing, but
perhaps someday some variant of a lifting body crew
transport vehicle will do the same job more effectively and
economically.
And that variant might just be the "Dream Chaser". If the
pictures of this thing, at the 3rd and 4th links under
references, look familiar, it's because the Dream Chaser is
really exactly the same concept as the HL-20, but with 7
crew and mission profiles that include operating as a small
orbital laboratory as well as doing crew and supply runs to
the ISS.
Drop tests of the Dream Chaser are due to start in the first
half, probably second quarter, of 2013.
 I previewed
this cool little combo set from Anigrand right
here on MM:
I previewed
this cool little combo set from Anigrand right
here on MM:
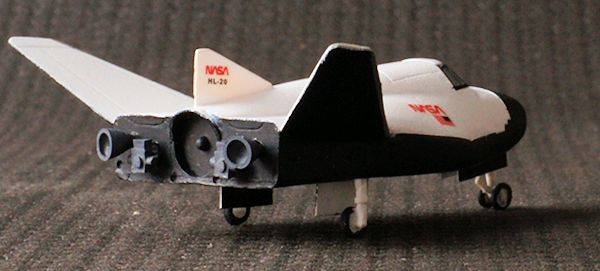
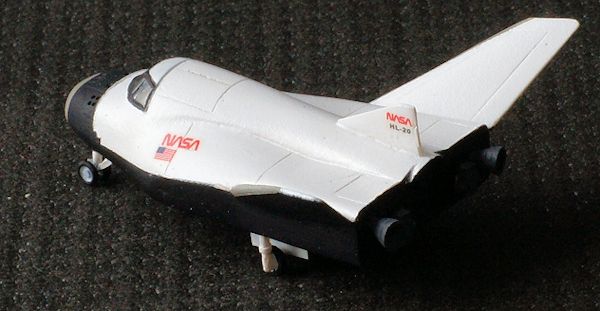
The HL-20 has 15 parts, all resin, and a small sheet of
decals to make the NASA version. Mine didn't have too many
of the little air bubbles or pinholes that apparently
blemish some resin kits, but it did end up with a big
sinkhole right on the nosecone which I had to deal with when
finishing up the model.
It has a rudimentary
cockpit with two seats.
This was my first ever resin kit.
Wearing a safety mask over my mouth, I sanded off
the seams on the main fuselage and I used a blade to trim
the winglets and the undercarriage parts. As there are so
few parts and everything is small this didn't take too long,
but I was a bit more cautious than usual with the sanding
just to be sure I didn't get resin dust over everything.
Assembling the HL-20 is pretty
easy and the two little winglets and centreline tail fit
very nicely. A little more sanding later and I thought the
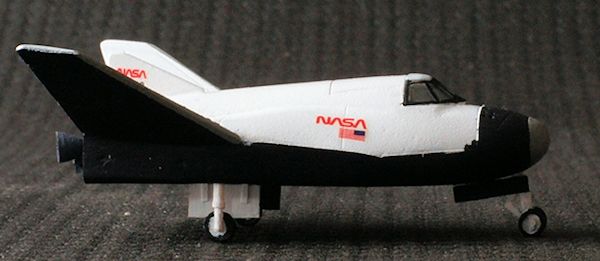
body was smooth enough to start painting.
I sprayed the whole thing with Mr Surfacer (from a can),
figuring it might need some kind of primer. I don't really
know whether that was important or not but it didn't take
long. I masked off the demarcation lines and
 then the
underside of the little space plane was painted Tamiya matt
black, with a brush. When that was done to my satisfaction,
I masked up the whole thing and used Tamiya white spray
(again from a can) to do the glossy white upper surface. I
gave it two coats which seemed to be just fine. I used a
fine brush and freehanded the little "steps" of black paint
at the nose cone.
then the
underside of the little space plane was painted Tamiya matt
black, with a brush. When that was done to my satisfaction,
I masked up the whole thing and used Tamiya white spray
(again from a can) to do the glossy white upper surface. I
gave it two coats which seemed to be just fine. I used a
fine brush and freehanded the little "steps" of black paint
at the nose cone.
After that, I taped up
the leading edges and brush painted on some light grey. Last
of all, I used XF-20 for the nosecone. Here I discovered a
really deep and quite wide hole, bang in the middle of the
nose. I swear it wasn't there when I started - I suppose
with more practice on resin kits I'll uncover that little
mystery. Anyway I filled it up with Mr White Putty and then
smoothed it over once it was dry. A quick repaint and it was
finished. There are two little rockets that go on the back,
along with what are supposed to be small manouvering rocket
packs. I painted those a dark grey.
Last, I attached the
landing gear, which I'd prepainted, and scratch built some
wheel bay covers. I thought the resin parts for that were
way too thick. I suppose these doors would be thick on the
real thing, give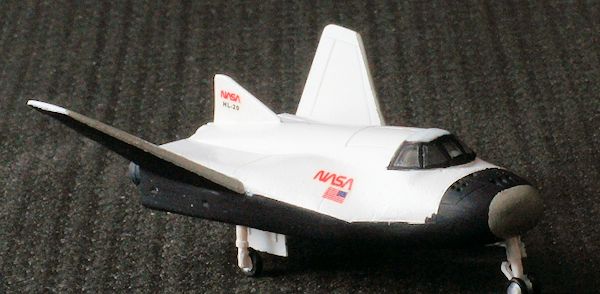 n they are part of the heat shield, but
still, it looks better this way. The gear itself fits nicely
into the holes, but I guess it's not as detailed (especially
the wheels) as some more modern kits. But the wheels are
tiny and it's hard to notice that from anywhere further away
than "right up close".
n they are part of the heat shield, but
still, it looks better this way. The gear itself fits nicely
into the holes, but I guess it's not as detailed (especially
the wheels) as some more modern kits. But the wheels are
tiny and it's hard to notice that from anywhere further away
than "right up close".
The canopy fit very
nicely, and I freehanded the black canopy frames with a fine
brush. I think the superglue left a bit of a blemish on the
front window panel.
Decals were easy to
apply, and just a little dab of Mr Mark Softer was all I
used, just to ward off any potential silvering.
Well, here she is, my first ever resin kit. I like it well
enough, and it gave me a bit of confidence for tackling the
other lifting bodies in the set.