Hobbycraft 1/32 Spad XIII
| KIT #: | HC 1687 |
| PRICE: | $19.50 MSRP |
| DECALS: | Two options |
| REVIEWER: | Bill Michaels |
| NOTES: |
| BACKGROUND |
Please visit the preview of the kit for both the history and a photo of the contents of the kit.
Accuracy:
As described in the preview, the kit sure looks like a SPAD. As I mentioned in my preview, the rib and fabric detail on the wings is a little overdone. I considered some sanding to subdue it, but ended up not doing it. (Because I forgot about it until after the model was mostly painted, and I didn’t want to re-do all that work!)
| CONSTRUCTION |
I won this model almost 2 years ago in a show raffle, at the second contest I had ever entered. At the time, I was building 1/72 WW1 aircraft, so I set it aside for a while. As I started to get into going to contests more, I discovered that most local clubs put all rigged aircraft in the same category, regardless of scale. I noticed that models in 1/48 scale often fared better- the larger scale allowed for more detail and made it more feasible to add more rigging. So, I thought, why not do one better, and build a 1/32 scale biplane?
This is really a fairly simple model—it is after all, a 1/32 scale aircraft with about 60 parts, and a quarter of them are the struts. I decided the kit was big enough to make it worth the effort to add some extra detail, so I bought the Tom’s 1/32 WW1 French detail set. I also went to my local model RR shop and picked up fine steel wire in .010, .012, and .015 diameters.
 Construction
starts, as usual, with the cockpit. The kit cockpit is basically accurate,
but a little sparse compared to the real thing. Given that the rest of
the aircraft is fairly simple, I decided to improve the cockpit with some
additional detail. The Tom’s set has several useful bits here. The
cockpit actually consists of two stages— the floor and its parts are
assembled as a unit and installed when the fuselage is assembled. The
stage of the cockpit, the upper area, is assembled after the fuselage is
assembled.
Construction
starts, as usual, with the cockpit. The kit cockpit is basically accurate,
but a little sparse compared to the real thing. Given that the rest of
the aircraft is fairly simple, I decided to improve the cockpit with some
additional detail. The Tom’s set has several useful bits here. The
cockpit actually consists of two stages— the floor and its parts are
assembled as a unit and installed when the fuselage is assembled. The
stage of the cockpit, the upper area, is assembled after the fuselage is
assembled.
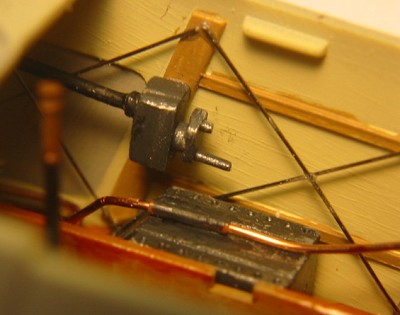
The lower part of the cockpit is made up from a floor, seat, rudder bar, stick, and oil tank. The seat is molded as a single solid piece, The Tom’s set has a perforated seat back and a solid seat bottom. Rather than try to join to thin brass pieces to each other at a right angle, I figured it would be easier to cut the seat back off of the kit part, and attach the brass back to the thicker plastic seat.
The kit oil tank has only some of the plumbing it should have—it has a just one short stub, in the wrong spot, that goes nowhere. I cut the plastic pipe off, and replaced it with a piece of copper wire in the correct place. I also improved the kit rudder bar by adding pieces of .010 wire for the cables running through the cockpit back to the rear of the fuselage.
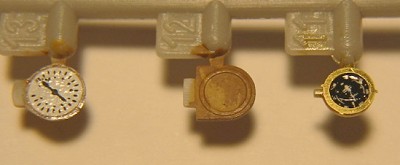 There’s no
instrument panel in a SPAD—the few instruments are scattered about the
cockpit. The kit includes plastic instrument bodies, with individual
decals for the faces. I painted the wood brackets a brown color, and
applied the decals. I then added the brass bezels from the Tom’s detail
set, finished them off with a small puddle of canopy glue to simulate the
glass. A couple of the instruments go in before the fuselage is
assembled, while the rest are used later.
There’s no
instrument panel in a SPAD—the few instruments are scattered about the
cockpit. The kit includes plastic instrument bodies, with individual
decals for the faces. I painted the wood brackets a brown color, and
applied the decals. I then added the brass bezels from the Tom’s detail
set, finished them off with a small puddle of canopy glue to simulate the
glass. A couple of the instruments go in before the fuselage is
assembled, while the rest are used later.
Builders of the kit
need to watch out when assembling the instruments—the parts, decals, and
instructions don’t agree with each other. The instrument faces on the
decal sheet are labeled with the kit part they go on. Problem is that the
numbers don’t match the parts— the big decal has the part number of one of
the smaller faces, for example. Also, there are a couple of instruments on
the sprue that aren’t in the instructions at all- and there’s no empty spot
to mount them. As far as I can
 tell, you just end up with a couple of
extra parts.
tell, you just end up with a couple of
extra parts.
Fuselage:
 The
fuselage has some molded in frame and stringer detail. I started off by
painting the interior of the fuselage with Pollyscale’s linen color, with
the framework a medium brown. Photos of the SPAD show that the fuselage
had diagonal wire cross bracing. I added this detail by gluing in pieces
of .010 wire. A couple of other details are added now, and then it is
time to assemble the fuselage.
The
fuselage has some molded in frame and stringer detail. I started off by
painting the interior of the fuselage with Pollyscale’s linen color, with
the framework a medium brown. Photos of the SPAD show that the fuselage
had diagonal wire cross bracing. I added this detail by gluing in pieces
of .010 wire. A couple of other details are added now, and then it is
time to assemble the fuselage.
The lower cockpit
with the floor, etc., goes in when the fuselage is assembled. Fit was good
here. Once the fuselage has been glued together, the upper part of the
cockpit can be assembled. The SPAD had a wooden shelf-like area that
ringed the pilot- the instruments were mounted to it. These wooden parts
were varnished,
 and somewhat protected from the elements. I painted them a
medium brown, and then overcoated with a coat of Tamiya clear orange. I
find that this gives some depth to the finish, and really looks like
varnished wood—a much more convincing effect than just a coat of brown
paint.
and somewhat protected from the elements. I painted them a
medium brown, and then overcoated with a coat of Tamiya clear orange. I
find that this gives some depth to the finish, and really looks like
varnished wood—a much more convincing effect than just a coat of brown
paint.
I used the seatbelts from the Tom’s set. At the time I was building my model, I had no information about whether or not I should add shoulder belts, so I just used a lap belt. None of the pictures in my reference book showed shoulder straps, so I left them off. After I finished the model, I found a cockpit photo of the National Air and Space Museum’s SPAD, which has both lap and should belts. (If there is a next time, I’ll add them.)
The bottom wing fits the fuselage well- no putty was needed at the joint. The basic fuselage shape is completed by the addition of the top and bottom pieces forward of the cockpit and wing. The cooling louvers are molded as lumps— a more adventurous modeler may have tried to drill them all out, but I decided the irregular shape would make this more trouble than it was worth.
The stab fits pretty well, with a tiny only a small amount of filler needed to fill the seam. I did not attached the fin/rudder at this time—I figured it would be easier to paint and decal the part before it was attached- a decision that turned out well. The cowl and landing gear were added to the nose, and the basic airframe was ready for paint.
| COLORS & MARKINGS |
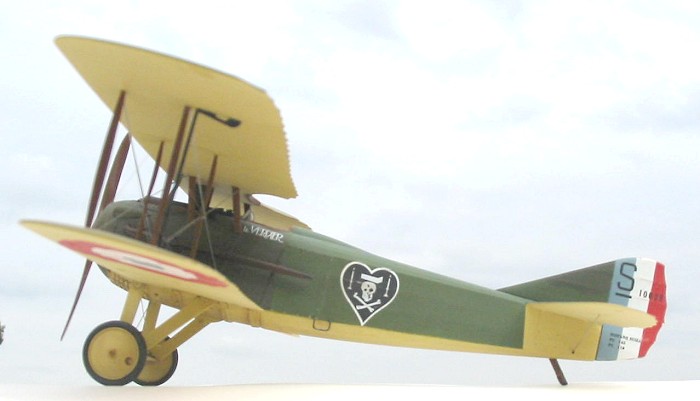
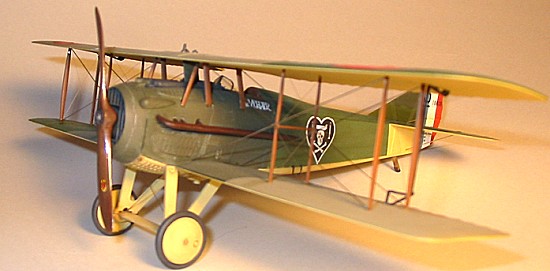
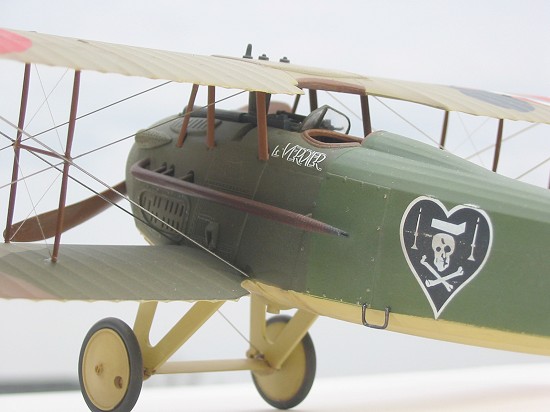
I built my model as Nungesser’s plane, primarily because it seemed a little less common than Rickenbacker’s plane. (Recently, xx has released a nice sheet of markings for this kit, so now there are more choices.) On a model such as this, I find it easier to all the painting and decalling before attaching the top wing.
Determining the
colors of WW1 aircraft can be challenge, as one might imagine. SPADs were
painted at the factory, so they generally all carried standard camouflage
patterns and colors. I’ve seen a number of profiles in different sources
of SPADs,  with a variety of colors and hues for the same model, but they
all generally agree in terms of the shapes and patterns of the different
colored areas. I vaguely remembered reading somewhere that the
undersides of SPADs were a yellower than clear doped linen, and my
reference agreed, so I went with Model Master “Tallow Coating” from the
Marine Colors line for the underside—it was little bit more yellow than the
PollyScale CDL.
with a variety of colors and hues for the same model, but they
all generally agree in terms of the shapes and patterns of the different
colored areas. I vaguely remembered reading somewhere that the
undersides of SPADs were a yellower than clear doped linen, and my
reference agreed, so I went with Model Master “Tallow Coating” from the
Marine Colors line for the underside—it was little bit more yellow than the
PollyScale CDL.
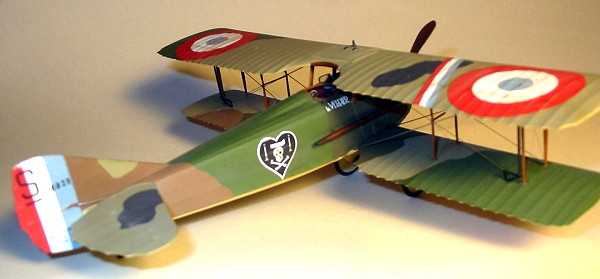
The topsides of the plane are painted in standard 5-color camouflage. I used PollyScale Acrylics, following the chart in the kit’s instructions. Painting a 5-color scheme like this will involve a lot of masking. With the bottom of the model painted and masked, I started the painting by airbrushing the model with the beige color. I let that dry for a couple of days, and then did the next color. I repeated the mask, paint, and wait process for the medium green, dark green, dark brown, and black areas. (For the black area, I used scale black.)
After the model was painted, I prepped the areas where the decals would be going by brushing on a coat of Future. After that had dried for a day, I applied the decals. The decals are thin, and went on with little difficulty. I did have to use Solvaset on the cocardes on the wing, to get them to settle down over the raised strut bracket detail.
Once the decals
had fully cured, a second thin coat of Future was brushed on to make the
edges disappear. I then took some very fine sandpaper (1200 grit, I
think it was) and lightly sanded the decals. This took
the shine off the decals, and also wore them away over some of the raised
detail. I then made a couple of light passes with the sandpaper over
the raised stringer and rib areas. The gentle sanding lightens the
paint over the natural wear areas, because it is undercoated by the lighter
colors. Done with a gentle hand, the end results is a finish
that looks a little worn on the corners and edges, and the markings loo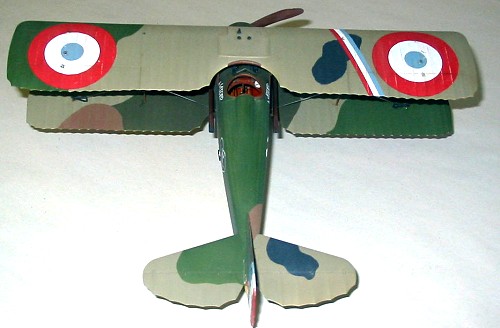 k
painted on, with a consistent amount of wear.
k
painted on, with a consistent amount of wear.
The next step was to take my silver artist’s pencil and gently highlight some of the seams and panel lines of the metal covered portion of the front of the fuselage. Once that was finished, I then airbrushed a coat of clear flat to further even out the tone of the overall finish.
Details
There are lots of opportunities to work on the detail parts while all those camouflage colors are drying. I had ordered a couple of aftermarket metal Vickers guns, but when I got them, they weren’t really any better than the kit guns, so I just used the kit guns. The kit guns were assembled, and the muzzles were drilled out. I then painted them, and then highlighted the edges with my silver pencil. (I find that the pencil gives the same drybrush effect, but offers better control when working on small parts.)
The exhaust pipes are a prominent feature, and deserve some attention. I drilled out the ends, and also drilled out the center of the support brackets. I painted the pipes with a blend of scale black, dark red, and red-brown. When the paint had dried, the pipes had the colors I wanted, but they looked like they were made of mahogany, not metal. I then very gently ran my silver pencil over the pipes, and rubbed it in with a piece of paper towel. It gave the parts a slight metallic sheen, without changing the underlying color. A final dusting of rust colored pastels, rubbed in, with a light coat of flat clear completed the effect—I’m very pleased with how they turned out.
 The prop in my kit
had a concave sink area where the hub detail is molded. I wrote to
HobbyCraft, and they promptly sent me a replacement, but it was just like
the first one. The only way to fix it is to fill the area, but doing that
will cause you to lose most of the prop boss detail. I went ahead and
fixed mine. I replaced the lost detail with a new disk from the Tom’s set,
and new bolt detail taken from a 1/35 scale armor detail set. I painted
the prop brown, and then added a coat of future to give it a glossy
finish. Pictures of SPADs show a manufacturer logo on the prop, which is
not included on the decal sheet. I used something appropriate looking
from my scrap box…..
The prop in my kit
had a concave sink area where the hub detail is molded. I wrote to
HobbyCraft, and they promptly sent me a replacement, but it was just like
the first one. The only way to fix it is to fill the area, but doing that
will cause you to lose most of the prop boss detail. I went ahead and
fixed mine. I replaced the lost detail with a new disk from the Tom’s set,
and new bolt detail taken from a 1/35 scale armor detail set. I painted
the prop brown, and then added a coat of future to give it a glossy
finish. Pictures of SPADs show a manufacturer logo on the prop, which is
not included on the decal sheet. I used something appropriate looking
from my scrap box…..
Final Assembly:
At this point I added the rest of the fuselage details—the guns, exhaust pipes, wheels, and windscreen. During handling, one of the tail braces had broken, so I replaced both parts with .015 steel wire.
It was now time to install the top wing. The instructions tell you install the cabanes and inner H struts first, and then mount the top wing to them. I found that this system worked great. A nice feature of the instructions is they show what angle the cabane struts should be—if you follow them, they will be in the right place, lined up with the holes in the top wing.
 An aside: Some
modelers use super glue to install struts, but I prefer regular model
glue. This way, I can install the struts, and let them dry, and then mount
the top wing. If alignment is off, a small amount of liquid cement will
soften the joint a little, and allow you to adjust the wing to get the
alignment just right, without bending or breaking any struts.
An aside: Some
modelers use super glue to install struts, but I prefer regular model
glue. This way, I can install the struts, and let them dry, and then mount
the top wing. If alignment is off, a small amount of liquid cement will
soften the joint a little, and allow you to adjust the wing to get the
alignment just right, without bending or breaking any struts.
The struts are nicely molded by the way—they have a good shape, and they don’t look over scale. The outer struts are molded long, so that they may be trimmed to fit exactly. Because they are thin, it easy to bow them a bit and snap them into place. Once fitted, a drop of liquid cement will bond them in place.
Rigging:
As I recall, the kit includes a nice rigging diagram, but I didn’t use it. (Somehow, over the course of construction, I lost mine, so didn’t have it available when I needed it.) Instead, I studied the pictures in my primary reference, and was able to figure out how the model was rigged. One thing that was apparent when looking at the photos was the obvious differences in the sizes of the rigging wires used on the plane.
I used a couple of
different materials to rig my model. On my 1/72 scale biplanes, I like to
use “smoke” colored invisible thread. On this model, I used this
material only for the lightest weight wires- the diagonal cross wires on
the wing struts. For the heavier wires on the landing gear and running
span-wise on the wings, I used different diameters of steel wire.
One feature of the SPAD that clearly shows up in the old pictures is the fact that the span-wise wires forming an X from the fuselage to wing tips have different size wire on the legs of the X. I used .010 steel for one leg, and .015 steel wire for the other.
| FINAL CONSTRUCTION |
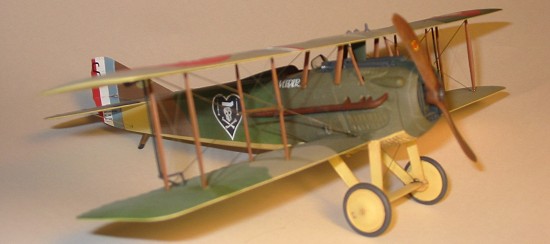
With the model rigged, it was time for a few touchups and final weathering. I applied a dark colored oil wash to the underside of the nose, to bring out the detail of the louvers and fuel tank. Using pastels, I added a little exhaust staining to the fuselage sides behind the exhausts. (If you look carefully, you can see a little wear and staining on the fuselage decal just aft of the exhaust pipe.) I used a mix of earth tone pastels on the wheels and landing gear. A final light coat of flat clear sealed everything in, and took some of the shine off of the steel wires.
| CONCLUSIONS |
Highly Recommended. This was an enjoyable build. Fit throughout was very good, and the parts are generally well molded. Built out of the box, the model will look nice, and the combination of large scale and relatively simple equipment makes it easy to add extra detail if you wish. Even though it is 1/32 scale, the finished model isn’t too big. I would definitely recommend this kit as a good place to start for someone who wants to try a WW1 biplane.
Finally, I also liked the Tom’s WW1 French detail set. It includes generic parts applicable for both SPADs and Nieuports, as well as some Nieuport-specific parts. It isn’t too expensive, It is a relatively small set, and as a result is not that expensive. (I don’t like to spend more on the detail set than I did for the kit to begin with!)
Review kit courtesy of the GraniteCon X kit raffle and my lucky dollar.
| REFERENCES |
Aircam Aviation Series No. 9: SPAD Scouts SVII-SXIII, by J.M. Bruce.
Postscript: After I completed the model, I found a reference on the WW1 modeling mailing list that referred to a website with WW1 French color information. I’d recommend this page by Matt Bitner from the WW1 mailing list site to anyone considering building a SPAD:
http://www.wwi-models.org/misc/FrenchWW1/pollyscale.html
November 2004
Copyright ModelingMadness.com. All rights reserved. No reproduction in any form without express permission from the editor.
If you would like your product reviewed fairly and fairly quickly, please contact the editor or see other details in the Note to Contributors.