|
KIT: |
AMtech 1/48 P-40E Warhawk |
|
KIT # |
? |
|
PRICE: |
Probably around $20? |
|
DECALS: |
The sheet will be killer with many options. |
|
REVIEW & |
|
|
NOTES: |
Kit is a test shot with no decals or instructions |
|
HISTORY |
 The P-40 Warhawk was made famous by the Flying Tigers, a band of
mercenary pilots who fought for money and glory. Most of us don't like to think
of these men as such, but it is the truth. They were allegedly paid handsomely to fly and
paid a $500 bonus for every plane shot down. Not your standard operating policy
in a military that at the time paid pilots less than $100 a month. However, it
did ingrain the P-40 into the minds and fantasies of an air-minded public.
The P-40 Warhawk was made famous by the Flying Tigers, a band of
mercenary pilots who fought for money and glory. Most of us don't like to think
of these men as such, but it is the truth. They were allegedly paid handsomely to fly and
paid a $500 bonus for every plane shot down. Not your standard operating policy
in a military that at the time paid pilots less than $100 a month. However, it
did ingrain the P-40 into the minds and fantasies of an air-minded public.
It was also the best aircraft in the USAAF inventory. Decidedly outmatched at altitude against German planes, it was a match for them at lower altitudes. Though not as maneuverable as the Japanese planes, it was faster and able to take battle damage that the other could not. It was with this aircraft that the US entered the war in the Pacific. Until the advent of the P-38, it, along with a some P-39s, were all that were available to fight the Army's Pacific war.
Fortunately, this wasn't a war of high altitude as in Europe, so the sluggish performance of the P-40 and P-39 above 15,000 feet wasn't a real problem. Even when removed from the front lines, the P-40 soldiered on in China, Burma and India as well as in the Southwest Pacific as a fighter bomber, staying in action until almost the end of the war.
|
THE KIT |
Well, I messed up and didn't take any photos of the kit on the sprues. However, if you have seen any of the AMT P-40 kits, then this one will not be new to you. This is basically the kit that AMT never released. AMT decided to get out of the airplane kit business in 1997/98 so halted any additional work on upcoming models. With the take-over by Racing Champions, these molds went into storage.
 AMtech has made arrangements with Racing Champions to lease the molds and
produce several kits that AMT had scheduled. The P-40E is the first of those
kits, with several others in 1/72 to follow. The big benefit to this kit is that
you don't have to kitbash the AMT P-40K and P-40F kits to build an E. I did this
last year to produce the P-40E and a
P-40L. A bonus is that you get the P-40K tail as well as different exhaust
and engine cowlings. P-40Es had at least two types of exhaust installed so you
need to have some sort of photo evidence to accurately do yours.
AMtech has made arrangements with Racing Champions to lease the molds and
produce several kits that AMT had scheduled. The P-40E is the first of those
kits, with several others in 1/72 to follow. The big benefit to this kit is that
you don't have to kitbash the AMT P-40K and P-40F kits to build an E. I did this
last year to produce the P-40E and a
P-40L. A bonus is that you get the P-40K tail as well as different exhaust
and engine cowlings. P-40Es had at least two types of exhaust installed so you
need to have some sort of photo evidence to accurately do yours.
The kit itself is well molded. Absent on this one was the amount of flash that was present in the AMT P-40s. However, it is the AMT mold, so little else is changed. The sliding part of the canopy is still thicker on one side than the other, the molding of the fuel tank and tailplane edges are still ragged, and the detailing of the instrument panel is still poor on the lower section. However, I'm sure that none of these items are beyond the skills of the average modeler to either fix or hide!
|
CONSTRUCTION |
 Construction was started in the time honored way. Subassemblies. The
seat was glued to the armor plating and the plating glued to the cockpit floor.
The control stick was glued in place. Then the wings were glued together. With
the other two kits, I had real problems getting the engine covers to fit. This
time, it was only half as bad. One side fit well but the other did not. Unlike
previously, I matched up the very forward section of the panel. This left the
gap at the rear, which was then filled with superglue. When dry, the part that
jutted out was sanded down some to get it close. Then the join was slathered
with filler and smoothed out. Lost detail was rescribed with an Xacto that has a
broken tip. I find this works just as well as anything else.
Construction was started in the time honored way. Subassemblies. The
seat was glued to the armor plating and the plating glued to the cockpit floor.
The control stick was glued in place. Then the wings were glued together. With
the other two kits, I had real problems getting the engine covers to fit. This
time, it was only half as bad. One side fit well but the other did not. Unlike
previously, I matched up the very forward section of the panel. This left the
gap at the rear, which was then filled with superglue. When dry, the part that
jutted out was sanded down some to get it close. Then the join was slathered
with filler and smoothed out. Lost detail was rescribed with an Xacto that has a
broken tip. I find this works just as well as anything else.
The interior bits and pieces were painted US Interior Green from Aeromaster, while the wheel wells and other places were painted with Model Master Chromate Green that had been darkened just a touch with black.
Returning to the wings, there are holes predrilled for under wing bomb racks. As I mentioned in the previous P-40 review, I have only found two pictures of these racks installed on a plane, and both were on very late war P-40Ns used by the RAAF and RNZAF. You can fill these holes with putty, but probably the best way to do it without having to sweat filler shrinkage is to install the bomb racks, and when dry, cut them off and sand smooth the little nubs that are left. Any tiny holes that are there can be easily filled and sanded. That is what I did and it works quite well. When dry, the gun barrels were drilled out and the wings generally filled and cleaned up along the leading edge where I had gouged some plastic.
Back to the fuselage, the nose radiator inlet was
glued in place, the prop shaft trapped between the fuselage halves and the
fuselage glued together. This was not an easy task as I had several alignment
holes that were not open so the pins wouldn't mate. Despite drilling them out
again, I must have been off as they were not a help so I removed the pins from
the other half. 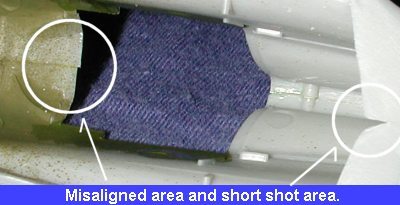 Once the
fuselage was glued together, I took a look at it. Now I want to reiterate that
this is a test shot so you cannot expect perfection. The most glaring areas were
just behind the cockpit where the section was slightly short shot, the
anti-glare panel area which seems to be further back on one side than the other,
and an area just at the back of the wing on the the underside, which was also
short shot. The last area is no concern as it is covered by the wing fairing
when it goes on.
Once the
fuselage was glued together, I took a look at it. Now I want to reiterate that
this is a test shot so you cannot expect perfection. The most glaring areas were
just behind the cockpit where the section was slightly short shot, the
anti-glare panel area which seems to be further back on one side than the other,
and an area just at the back of the wing on the the underside, which was also
short shot. The last area is no concern as it is covered by the wing fairing
when it goes on.
The upper cockpit area was filled and sanded smooth as was the area around the anti-glare panel. Actually, a section of that was built up somewhat with filler and the part that juts into the cockpit will be trimmed back. The sill where the windscreen/canopy will fit is in good alignment and there will not be a problem there.
 With the fuselage together, there was the usual
slathering on of filler to take care of gaps, mostly on the bottom aft portion
of the kit. Then the cockpit was installed. Thankfully, the kit is designed to
have this done from the underside, so it just makes things so much easier. Next
are the tailplanes. One of mine did not have the upper section totally complete
and there was about a 1/16th ledge along the back section that will need to be
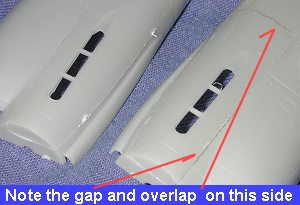
filled. Again, this is a test shot. This molding would be rejected in a normal
kit run. I found that if the stabilizers were to be glued on as is, there would
be a misalignment at the very front. If you look at the image, you can see the
unmodified stabilizer on the right. At this point, what most modelers would do
is to trim back a touch on the mounting tongue at the front. This is what I did
on the left stabilizer and you can see the results on the left side of the
image. It gets it close, but it still isn't spot on. The key to fixing this is
to trim the mounting tab and trim back a bit on the aft portion of the
fuselage mount (see the red circle). This completely cures the problem, and I
did that on both stabilizers.
With the fuselage together, there was the usual
slathering on of filler to take care of gaps, mostly on the bottom aft portion
of the kit. Then the cockpit was installed. Thankfully, the kit is designed to
have this done from the underside, so it just makes things so much easier. Next
are the tailplanes. One of mine did not have the upper section totally complete
and there was about a 1/16th ledge along the back section that will need to be
filled. Again, this is a test shot. This molding would be rejected in a normal
kit run. I found that if the stabilizers were to be glued on as is, there would
be a misalignment at the very front. If you look at the image, you can see the
unmodified stabilizer on the right. At this point, what most modelers would do
is to trim back a touch on the mounting tongue at the front. This is what I did
on the left stabilizer and you can see the results on the left side of the
image. It gets it close, but it still isn't spot on. The key to fixing this is
to trim the mounting tab and trim back a bit on the aft portion of the
fuselage mount (see the red circle). This completely cures the problem, and I
did that on both stabilizers.
 With the
stabilizers fixed, the interior was installed and when dry, the wing glued in
place. Fit is fair, but there were problems. First of all the front fit very
well and only a small amount of filler was needed. Moving to the upper surface,
the right wing fit quite well. The left wing, however, had a step between it and
the wing root. No cure other than several filler applications and sanding.
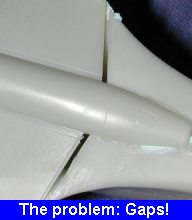
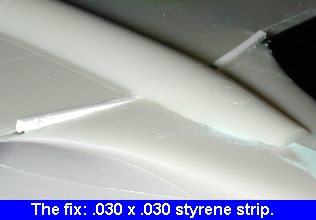
Moving to the aft underside shows another problem. First I should mention that
the wing covers the short shot shown above so there is no need to fix that.
However, there is a gap at the back that MUST be filled. When confronted with
gaps of this size, filler won't do it. It needs to be filled with plastic first.
I found that a strip of Evergreen .030 x .030 plastic fit right in there with no
trouble. The area was then securely glued and when dry, sanded down flush.
Smaller gaps were filled with filler or thick paint.
With the
stabilizers fixed, the interior was installed and when dry, the wing glued in
place. Fit is fair, but there were problems. First of all the front fit very
well and only a small amount of filler was needed. Moving to the upper surface,
the right wing fit quite well. The left wing, however, had a step between it and
the wing root. No cure other than several filler applications and sanding.
Moving to the aft underside shows another problem. First I should mention that
the wing covers the short shot shown above so there is no need to fix that.
However, there is a gap at the back that MUST be filled. When confronted with
gaps of this size, filler won't do it. It needs to be filled with plastic first.
I found that a strip of Evergreen .030 x .030 plastic fit right in there with no
trouble. The area was then securely glued and when dry, sanded down flush.
Smaller gaps were filled with filler or thick paint.
Once the aft wing gap was smoothed out, the radiator flaps were glued on. Fastidious modelers will undoubtedly want to find something to fill in the large hole back there, for at the proper angle, you can see out of it from the carb intake on the nose. AMT missed putting something there to block this when the engineered the molds. Perhaps some enterprising aftermarket maven will include a radiator exhaust area in a set.
Moving to the upper fuselage area, the cockpit got some final touch-ups and then the windscreen and canopy were installed. True to its AMT roots, the sliding hood is thicker on one side than the other, so most of you will probably glue it shut or get an aftermarket vacuformed version. Once attached, these items were masked. The plane I am modeling had no radio mast, so that hole was filled and smoothed. The plane was now ready for some paint.
|
PAINT & DECALS |
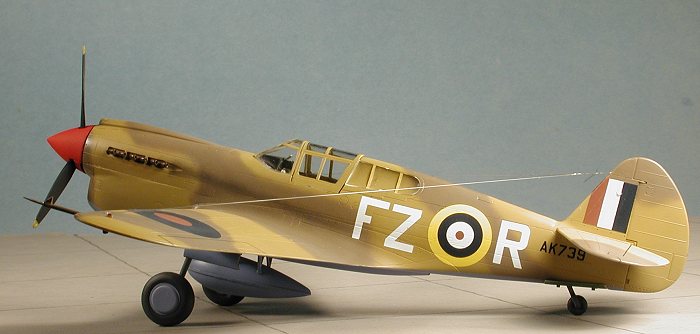
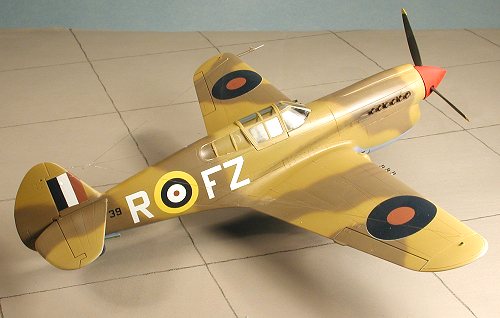
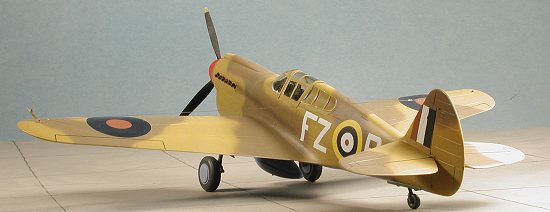
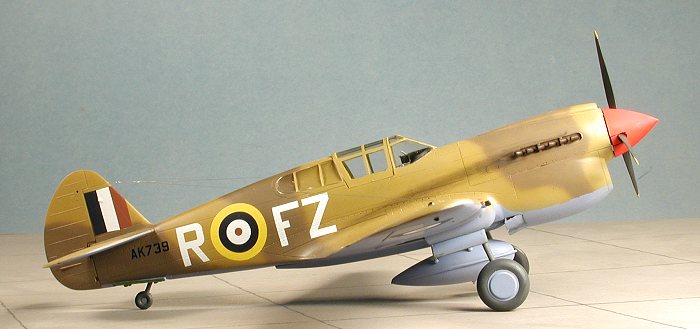
Like many of you, this is my favourite part. I had initially decided on doing a 49th FG Warhawk from New Guinea in 1942, however, I had just received the latest copy of R/T from IPMS Canada, and this year they had decided to send us all a decal sheet with Canadian WW2 aces aircraft. In amongst the Spitfires was a lone Kittyhawk from the desert air forces, and my choice switched to this plane. I sorta like desert schemes and thought I'd add this one to the collection.
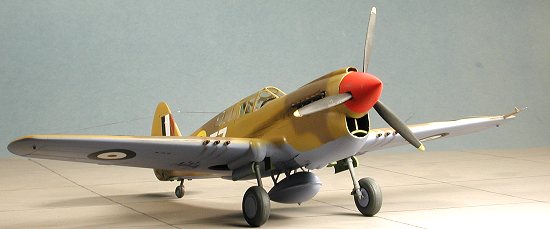 The underside was painted azure blue from the Aeromaster acrylic
line. When dry, the tailplanes were masked and the upper surface painted
middlestone, an Aeromaster enamel color. With aircraft of this size, I generally
freehand the camouflage. I know that the British used masks to do the real
planes, but I'm going to say that this one was repainted in the field! It isn't
that far from true as often aircraft arrived with temperate schemes and were
repainted in desert colors before being issued to a squadron. I had used up all
my Aeromaster dark earth so went to Xtracolor for that shade. The Xtracolor was
thinned more than usual and the air pressure turned way down for this job so I
could get a respectably thin line. Once done, the kit was returned to the
workbench for more gluing.
The underside was painted azure blue from the Aeromaster acrylic
line. When dry, the tailplanes were masked and the upper surface painted
middlestone, an Aeromaster enamel color. With aircraft of this size, I generally
freehand the camouflage. I know that the British used masks to do the real
planes, but I'm going to say that this one was repainted in the field! It isn't
that far from true as often aircraft arrived with temperate schemes and were
repainted in desert colors before being issued to a squadron. I had used up all
my Aeromaster dark earth so went to Xtracolor for that shade. The Xtracolor was
thinned more than usual and the air pressure turned way down for this job so I
could get a respectably thin line. Once done, the kit was returned to the
workbench for more gluing.
|
CONSTRUCTION CONTINUES |
At this time the masks were taken out of the wheel wells (which had been painted a darkened Testors chromate green), and the area touched up. The gear struts were painted neutral grey and glued in place as was the tail wheel. Then the main wheels were glued on. The kit then had a coat or two of clear gloss sprayed on it in anticipation of the decals.
The IPMS Canada decals are superb and fit quite well. I used the weaker Microscale setting solution and they went on beautifully. One thing I did notice is that the white was slightly off register causing it to peek out from under an edge of all the wing roundels. It also seemed as if the wing decals were slightly oversized compared to the decal placement sheet, though they matched the size callouts required by the written instructions. Most odd.
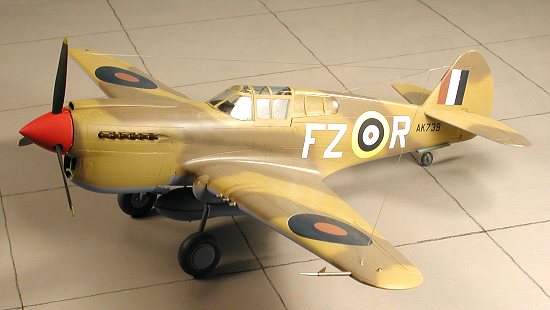 This model represents an aircraft that was the mount of James 'Stocky'
Edwards when he was with 94 Sq in 1941. Though no indication is given,
apparently he shot down no enemy aircraft flying the Kittyhawk with this unit.
He then transferred to 260 Sq where he shot down 15 1/2 aircraft. He then went
on to 92 Sq in Italy with Spit VIII's and then to command 274 Sq. Prior to
D-day, his unit moved back to England and in 1944 converted to the Tempest. Late
in the war he was made wing commander and replaced Johnny Johnson as head of 127
wing. He ended the war with 16 victories and stayed in the RCAF, retiring in
1969.
This model represents an aircraft that was the mount of James 'Stocky'
Edwards when he was with 94 Sq in 1941. Though no indication is given,
apparently he shot down no enemy aircraft flying the Kittyhawk with this unit.
He then transferred to 260 Sq where he shot down 15 1/2 aircraft. He then went
on to 92 Sq in Italy with Spit VIII's and then to command 274 Sq. Prior to
D-day, his unit moved back to England and in 1944 converted to the Tempest. Late
in the war he was made wing commander and replaced Johnny Johnson as head of 127
wing. He ended the war with 16 victories and stayed in the RCAF, retiring in
1969.
His Kittyhawk was a very bland aircraft with little to distinguish it other than code letters. However, it has the early war fuselage and underwing roundels that add some interest to it.
With the decals on and properly settled in, the model was given a cleanup to remove any setting solution or glue that had dried on it. It was then taken to get a coat of clear matte sprayed on it.
Returning from that sortie, the landing gear covers were glued in place and any paint touched up. Then the prop was glued into the red-painted spinner and that attached to the nose. The gun barrels were painted gunmetal and the exhaust was given a few coats of RustAll after the drilled out areas were filled with flat black paint.
At this time, the masking was removed from the plane and the radio aerials attached using clear stretched sprue. Finally, the exhaust and guns were given some stains using pastels and the kit was complete.
|
CONCLUSIONS |
At last the 1/48 modeling world has an accurate P-40E without having to resort to kitbashing or modifying existing kits. Why it took so long to finally get one of accurate shape on the market is beyond me, but it has happened. While it would have been nice to get an all-new kit, the AMT version that AMtech is releasing is still a very nice kit with no surprises. It has a few areas of concern as related above, but nothing that is beyond the abilities of most modelers. I, for one, am quite glad to see it finally hit the market and I'm sure that you will be just as pleased with the kit once you have it in your collection.
November 2001
Thanks to
 for the review sample.
If you would like your product reviewed fairly and quickly by a site that averages over 100,000 visitors a month, please contact me or see other details in the Note to Contributors.