Minicraft 1/144 B-29 Superfortress
|
KIT # |
14404 |
|
PRICE: |
$7.59 |
|
DECALS: |
One aircraft |
|
REVIEWER: |
|
|
NOTES: |
Ex-Crown kit |
|
BACKGROUND |
For a look in the box and a brief history, please visit the preview.

|
CONSTRUCTION |
I'm not sure if I mentioned this before, but much of my personal model building is driven as much by a decal sheet as it is by the model itself. Frankly, until I received the very nice Mike Grand 1/144 B-29 decal sheet a bit back, the thought of doing this kit was basically non-existent. While I like 1/144 as much as any other scale, it is something I do it fits and spurts. Like airliners.
 Anyway, I decided, upon looking at the toy-like
wheels, that this one would be built gear up as I did the B-1B. First thing I
did was to glue the main gear doors onto the nacelles. The larger doors fit
perfectly with no problem. The smaller ones fit in place, but they are flat vice
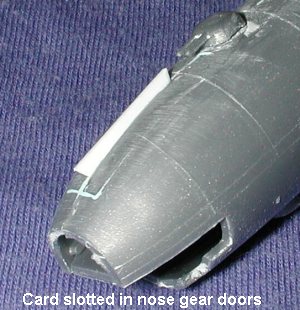
the curved surface they should be. I then went to the nose gear doors. These do
not fit at all well and so I had to use judicious amounts of glue to get them in
place in each fuselage half. They are also not curved enough and a bit flat.
Anyway, I decided, upon looking at the toy-like
wheels, that this one would be built gear up as I did the B-1B. First thing I
did was to glue the main gear doors onto the nacelles. The larger doors fit
perfectly with no problem. The smaller ones fit in place, but they are flat vice
the curved surface they should be. I then went to the nose gear doors. These do
not fit at all well and so I had to use judicious amounts of glue to get them in
place in each fuselage half. They are also not curved enough and a bit flat.
Following this, I glued the upper and lower wing halves together and glued the small stubs in the bottom of each of the four gun turrets. These are poorly molded as they have flat sides and the guns themselves are conical instead of tubular. The next step was to glue in the 'cockpit'. This is basically a flap piece that prevents you from looking into the canopy and seeing through the nose gear well. With that done, the fuselage gunners windows were installed. These are flat-based and so do not fit flush with the curved inner fuselage. However, they are a tight fit.
 At this point, I slotted in the horizontal
stabilizer from the inside the then glued the upper gunner's dome. Then the
other fuselage half was glued, making sure that the gun turrets were installed
and the upper dome was properly glued in place. I didn't glue in the horizontal
stab at this time as there is a lot of play in it and gluing to one side of the
fuselage or the other would result in one side sticking out farther than the
other. After gluing, I applied filler to all the joins. The nose gear doors had
a rather large gap in them that was filled with a sliver of sheet card.
At this point, I slotted in the horizontal
stabilizer from the inside the then glued the upper gunner's dome. Then the
other fuselage half was glued, making sure that the gun turrets were installed
and the upper dome was properly glued in place. I didn't glue in the horizontal
stab at this time as there is a lot of play in it and gluing to one side of the
fuselage or the other would result in one side sticking out farther than the
other. After gluing, I applied filler to all the joins. The nose gear doors had
a rather large gap in them that was filled with a sliver of sheet card.
Back at the wings, the seams were also puttied where needed. Biggest area of concern were the engine nacelles. One side fit well, the other needed filler. While that was drying, the engines were painted flat black. You are given a forward and second row and frankly, they are a bit small in diameter for the real things, but give the proper illusion and that is the best one can expect. The engines were painted black and drybrushed to bring out detail. The engines fit quite well onto the wings and then the wings were glued to the fuselage. Fit here is also rather good, though I did need some filler.
With the wings on, attention turned to the cockpit area. This was first painted flat black as there really is nothing to see in there anyway. Then the transparencies were attached. These beasties were actually a bit too large. They also didn't fit well. No real cure other than filler, sanding and polishing. Once that was done, the rather poor excuses for cockpit frames were simply scribed in as a single line. There has to be a better way, but I can't think of what it is as these parts are really poorly done. The tail gunners position was glued in and also puttied and sanded.
With all the airframe bits actually attached, the clear bits were masked and it was time to paint.
|
PAINT & DECALS |
 First the entire airframe was
painted gloss black in preparation for the Alclad II. This black is a prep that
is offered by Alclad just for their very shiny metallics. I thought I'd use it
as a regular gloss black, but it isn't designed for that as it never really
dries. Even a week after painting on it was still a bit sticky. After the upper
metallics were applied, the lower panel was given a Future coat to cut down on
the stick. I had forgotten to paint the engine cowlings and tail tip so these
were first painted with Floquil Reefer White and then with the red from those
small square bottles of Testors enamels. When dry, they were masked. Then the
entire upper surface was painted with polished aluminum Alclad II. This was
followed by several other shades of aluminum then a repainting of the bottom in
black. All of this involved much masking and though only takes a sentence or two
to explain, took over a week for me to do.
First the entire airframe was
painted gloss black in preparation for the Alclad II. This black is a prep that
is offered by Alclad just for their very shiny metallics. I thought I'd use it
as a regular gloss black, but it isn't designed for that as it never really
dries. Even a week after painting on it was still a bit sticky. After the upper
metallics were applied, the lower panel was given a Future coat to cut down on
the stick. I had forgotten to paint the engine cowlings and tail tip so these
were first painted with Floquil Reefer White and then with the red from those
small square bottles of Testors enamels. When dry, they were masked. Then the
entire upper surface was painted with polished aluminum Alclad II. This was
followed by several other shades of aluminum then a repainting of the bottom in
black. All of this involved much masking and though only takes a sentence or two
to explain, took over a week for me to do.
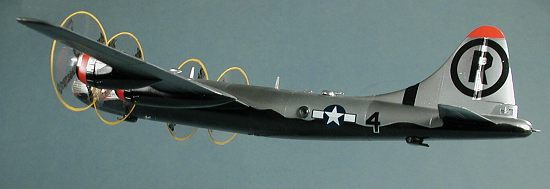
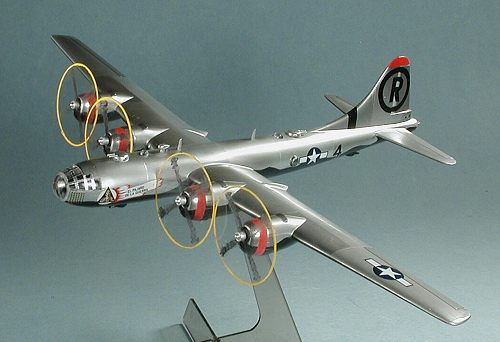
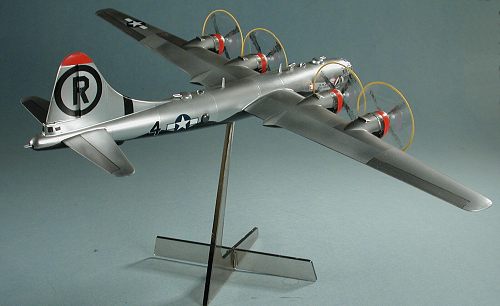
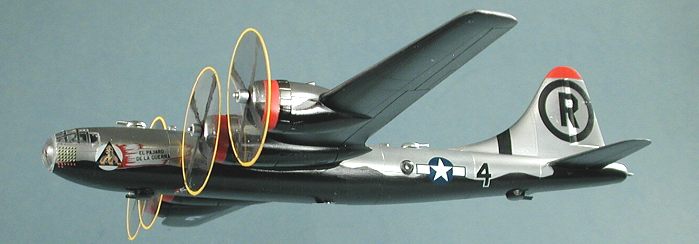
The masking was removed and the decals then applied. I used Mike Grant's new B-29 sheet to do the black bottomed 313 BW plane. I chose this scheme for two reasons. One was that I like the black underside. The other is that it didn't have any de-icer boots so I wouldn't have to mess with masking these items!. These decals are done on an ALPS and like other Mike Grant work, are just superbly printed. They are also rather susceptible to scratches so care needs to be taken when working with them. After cutting them out of as much of the carrier as possible, they went down just great. These are quite thin and I only used the very mild Microscale setting solution on them. The large Circle R on the tail shows just how short the kit fin really is! These
|
CONSTRUCTION CONTINUES |
 With the decals on, I then
drilled a hole in the bottom for the stand. I used one of the spare Hasegawa
1/200 'Love Liner' stands and it works just fine. At this time, I decided to try
using some small strips of Bare Metal matte aluminum foil to make a semblance of
cockpit framing. Not sure I like it, but it does look a bit better than nothing.
For props, the kit offers some rather gross bladeless prop shafts. These were
painted aluminum. Using a compass with a cutting blade I cut some clear circles
from a sheet of clear acetate. These then had the edges painted yellow and the
blades sort of dry-brushed on to make it look like they were spinning. Maybe
hokey, but again, better than nothing. I had some touch up painting to do where
there were problems and once that was done, the plane was plunked on its stand
and is done.
With the decals on, I then
drilled a hole in the bottom for the stand. I used one of the spare Hasegawa
1/200 'Love Liner' stands and it works just fine. At this time, I decided to try
using some small strips of Bare Metal matte aluminum foil to make a semblance of
cockpit framing. Not sure I like it, but it does look a bit better than nothing.
For props, the kit offers some rather gross bladeless prop shafts. These were
painted aluminum. Using a compass with a cutting blade I cut some clear circles
from a sheet of clear acetate. These then had the edges painted yellow and the
blades sort of dry-brushed on to make it look like they were spinning. Maybe
hokey, but again, better than nothing. I had some touch up painting to do where
there were problems and once that was done, the plane was plunked on its stand
and is done.
|
CONCLUSIONS |
OK, now I have a nice stand 1/144 B-29 to go along with the B-1 done a bit back. An interesting comparison of 40 years of technology. Would I build another B-29. Perhaps. First I'd make a concentrated effort to fix that tail. Frankly, this old Crown kit is 30 years old and shows it. I seriously doubt if there will be a replacement any time soon, though it wouldn't be a bad idea for some Chinese manufacturer to give it a try. The kit isn't as easy to build as one initially thinks but it can be slapped together if that is what one wants. I'm sure the kids will like it!
November, 2002
#1249 in a series
Copyright ModelingMadness.com. All rights reserved.
If you would like your product reviewed fairly and fairly quickly, pleasecontact the editor or see other details in the Note to Contributors.