Arii/Otaki 1/48 P-47D Razorback
|
KIT # |
16 |
|
PRICE: |
Currently $13.98 (2001) |
|
DECALS: |
See Review |
|
REVIEW : |
|
|
NOTES: |
Ex-Otaki Mold |
|
HISTORY |
The P-47 was the first really successful turbo-supercharged single engine fighter. It is because of all the plumbing required for the turbo-supercharger system that the aircraft was so large. Add to that the huge R-2800 radial engine and you had a real beast! Pilots converting from other aircraft were highly disdainful of the 'Jug' when they first encountered it. However its speed and rugged construction soon won them over.
Despite the turbo-supercharging system that was designed to give the aircraft good high altitude performance (needed for the bomber escort mission), it was a bit of a pig in terms of climb rate. It was also not very fuel efficient. This factor was a real problem for the early models that were not plumbed for exterior fuel tanks. Additional hard points for fuel and weapons was part of the fit for the revised P-47D and truly helped its lame endurance problems and turned the Thunderbolt into a viable fighter.
Once the even more superlative Mustang had become more common in Europe, the P-47 was turned into a ground attack aircraft, a role that was much more hazardous than bomber escort. Again, the ruggedness of the airframe along with the air-cooled engine allowed badly damaged P-47s to return to base or at least to an area where bail-out wouldn't mean time in a German Stalag.
|
THE KIT |
For those of you not familiar with Arii kits, they are basically Otaki kits. Otaki was a company renowned for producing quality kits in the late 1960s and early 1970s. The kits all have engraved panel lines and a full cockpit with sidewall detail, something that the 'big boys' didn't do until well over a decade later. Even today, many of the later Otaki kits stand up very well against the Hasegawa and Tamiya kits of today. Interestingly, the Japanese aircraft modeled by Otaki had major shape flaws while the Corsair, Hellcat, P-47 and others are quite accurate. It may be an urban legend, but it is told that after the failure of Otaki, the CEO of the company committed suicide in shame for the company's bankruptcy. All of the molds switched over to a new company called Arii and several are also reboxed by Airfix.
|
CONSTRUCTION |
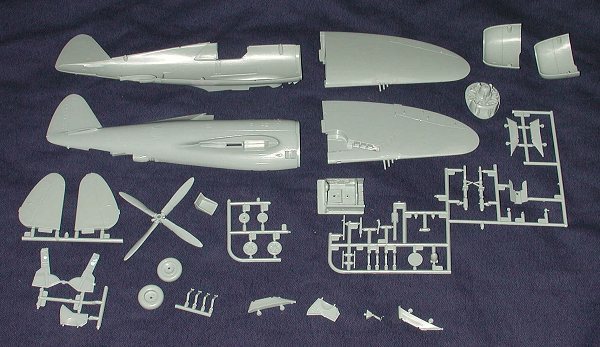
To be quite frank, the only reason I started building this kit is that it was already started when I bought it. Additionally, the kit was missing instructions, decals and some parts. Those parts were mostly confined to drop tanks and bombs. The interior had already been glued together (minus stick and seat) and the wings with machine guns had already been glued together. Somewhere along the line, a spare set of under wing pylons had ended up in the box.
The first thing to do was to paint the cockpit interior green
and then pick out some details in flat black. The cockpit was drybrushed and the
control stick installed. The gun sight was one of the missing parts so none is
installed. The cockpit was then glued in place and the fuselage glued together.
The kit has a number of sink marks where the alignment pins are located so will
need filled. There were also some gouges where the fuselage was removed from the
sprues so those were filled as well. While this was drying, the engine was
painted and drybrushed. The worst part of the fuselage is back where the
turbo-supercharger exhaust is located. This takes more than sandpaper and filler
and the files had to be brought into play to fix this area.
With the fuselage filled and sanded, the wings were attached. Fit is OK, but will need filler. The right wing fit well on top with a small step on the lower surface. The left wing was just too large all around and so there is a step on both the top and bottom. This required several applications of filler to smooth things out. With this done, the tailplanes were glued in place with no trouble whatsoever. The cowling halves were glued together, trapping the engine. This also had some sink marks on it and needed some filler. I now had a complete airframe so it was time to start doing a bit of painting.
|
COLORS & MARKINGS |
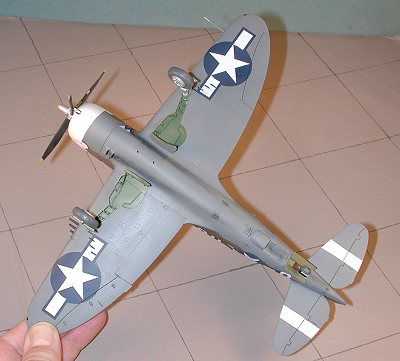
 Stuffing the engine with tissue, the whole front of the cowling was painted
white as were the fin and tail planes. This was for the ID stripes. They always
look much better painted on than if decals are used and it prevents problems
from less than opaque decals.
To get the proper width of tape for the tail bands, the decals were
placed under a piece of clear plastic and the masking tape placed atop them.
Then they were cut using a straight edge and applied to the tail areas. The
white cowling front was also masked off.
Stuffing the engine with tissue, the whole front of the cowling was painted
white as were the fin and tail planes. This was for the ID stripes. They always
look much better painted on than if decals are used and it prevents problems
from less than opaque decals.
To get the proper width of tape for the tail bands, the decals were
placed under a piece of clear plastic and the masking tape placed atop them.
Then they were cut using a straight edge and applied to the tail areas. The
white cowling front was also masked off.
At this time, the gun sight glass was installed as was the canopy. This was then
masked and the kit returned to the paint booth and the underside was painted
neutral grey using Aeromaster enamel. The outer gear doors were also painted at
this time. With the underside dry, it was masked off as needed and the top
portions sprayed with faded OD, again, an Aeromaster enamel. When it dried, it
looked too light for my liking. I then took some regular olive drab, this time a
Model Master enamel and painted a few panel lines. I generally do not do the
panel line shading, but decided to give it a go on this one. Then the entire
upper surface was given a misting of the darker olive drab to darken things up a
bit. I tried not to spray any of this darker color on the control surfaces so
that there would be a contrast.
|
CONSTRUCTION CONTINUES |
 Returning to the workbench, some
more construction was needed. First of all, I brush painted the wheel wells
where overspray had gotten in. Then the landing gear were glued in place. The
fit was a bit sloppy, but not that bad. When the glue had dried, I was dismayed
to find one of the landing gear had dried in a terrible position. No choice but
to snap it off, drill out the end, install a bit of paper clip and reglue it.
During this evolution, the axle piece broke off. This is a VERY flimsy section
of the gear so don't be surprised if you have a wheel break off. The offending
bit was reglued, the wheel attached, and then the gear door glued in place. I
made sure the wheel fork was glued to the door to give it some strength.
Returning to the workbench, some
more construction was needed. First of all, I brush painted the wheel wells
where overspray had gotten in. Then the landing gear were glued in place. The
fit was a bit sloppy, but not that bad. When the glue had dried, I was dismayed
to find one of the landing gear had dried in a terrible position. No choice but
to snap it off, drill out the end, install a bit of paper clip and reglue it.
During this evolution, the axle piece broke off. This is a VERY flimsy section
of the gear so don't be surprised if you have a wheel break off. The offending
bit was reglued, the wheel attached, and then the gear door glued in place. I
made sure the wheel fork was glued to the door to give it some strength.
Turning to the tail wheel, the wheel well insert was glued in. It isn't complete and there is a gap at the back. You can box that in if you wish, but I didn't. Then I got to the tail wheel. It is some sort of odd abomination that looks like it came off a Mosquito. It has two thin parts on the outer edges that touch the ground with a huge groove in the middle. Doesn't look like any P-47 tail wheel I've ever seen. Scrounging in the spare parts bin, I found one from a Bf-109K that looked about right and installed it. It may be a teeny bit undersize, but most probably wouldn't be able to tell. With gear on it, the kit was then given its gloss clear coat in preparation for the decals.
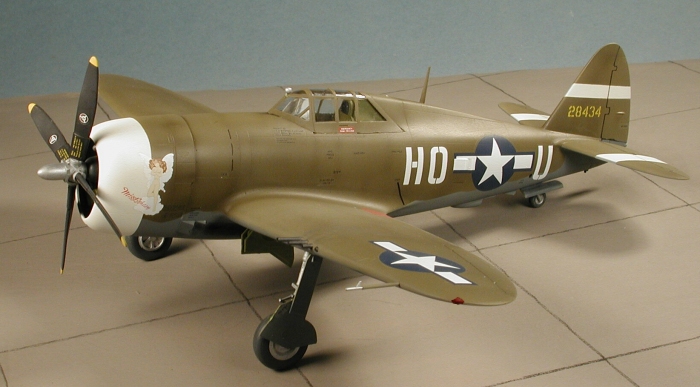
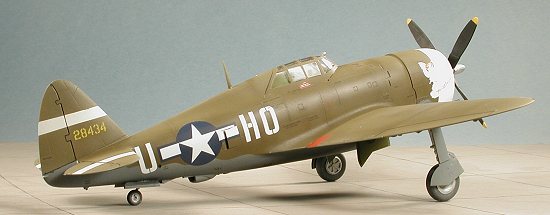
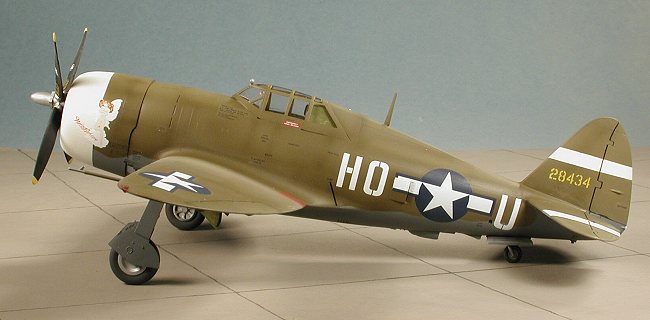
Many of the newer Superscale decals are for various 'razorback' P-47s. I looked for one with nekkid women on it and found it in sheet 48-725. I used the markings for Lt. Robert Berkshire's 'MissBehavin' of the 487th FS/352nd FG. It is basically code letters and nose art. This plane also has the huge national insignia under both wings. The decals went on quite well and succumbed to the Microscale system and the tough ones got a dose of Solvaset. About the only glitches I could see had to do with the national insignia that go near the turbocharger outlet doors on the fuselage side. There was no long decal piece for the doors in the closed position as stated on the instructions (no worry for me as the Otaki kit has them molded open), and the end piece on the door had no blue border on the vertical. This has been added on the more recent releases. It is also possible that the end piece would disappear when the door was open. I don't know as I'm not very Thunderbolt literate. The rest of the decals, including the data ones went on just fine. One thing I did notice is that the white is a bit transparent. You can see an intensity shift on the areas where the nose art goes from OD to white. It is noticeable on the opening image.
 With the decals on and dry, the
final bits were added. This included installing the prop (a press fit) and the
inner gear doors. These doors have a retraction strut that is basically a piece
of straight sprue. Not very prototypical, but it does give a good effect. The
last piece added was the rear view mirror. On the plane in question, it is
supposed to be a wedge type mirror, but one is not included in the set so I used
what was given. It seems to me that the mount for this mirror is too far
forward, but by not using it one is left with a hole to fill.
With the decals on and dry, the
final bits were added. This included installing the prop (a press fit) and the
inner gear doors. These doors have a retraction strut that is basically a piece
of straight sprue. Not very prototypical, but it does give a good effect. The
last piece added was the rear view mirror. On the plane in question, it is
supposed to be a wedge type mirror, but one is not included in the set so I used
what was given. It seems to me that the mount for this mirror is too far
forward, but by not using it one is left with a hole to fill.
With the bits on, the plane was given a clear matte coat and then some pastels to dirty things up a bit. Final painting was a bit of touchup and the wing/tail lights. Oh yes, I didn't install the belly drop tank shackles as they disappeared during construction. I have two small holes there that are begging for the shackles. I'm sure they will turn up at some time.
|
CONCLUSIONS |
I know that purists will probably not build this kit. The Monogram one is more accurate and probably has a much nicer interior, the Hasegawa one is undoubtedly the choice for most as it combines accuracy with very nice detailing. The Otaki/Arii kits may be 30 years old, but for the money, they are nice kits. Easy to build, engraved panel lines, relatively good detail and they can be had for well under ten dollars at any model swap meet! A good kit for those who just want a nice model.
December, 2001
Review kit courtesy of me and my wallet!
Copyright ModelingMadness.com. All rights reserved. No reproduction in part or in whole without express permission from the editor.
If you would like your product reviewed fairly and quickly, please contact the editor or see other details in the Note to Contributors.
Back to Reviews Page 2024