
ICM 1/48 P-51C Mustang
| KIT #: | 48121 |
| PRICE: | $16.98 |
| DECALS: | Two options |
| REVIEWER: | Scott Van Aken |
| NOTES: |
| HISTORY |
It always continues to amaze me how close the USAAF came to not having an aircraft with the quality and performance of the Mustang. Despite desperately needing a long range escort fighter, the brass at Wright Field continued to support 'going nowhere' designs such as the P-60 and the XP-75. This was especially true of the P-60 range of aircraft, into which millions of dollars were poured, only to result in an aircraft that was too slow, overweight and plagued with problems. It eventually was cancelled near the end of the war.
 The Mustang, however, was a proven
airframe and once the British stuck a Merlin into it, it became a real
world-beater. However, though designed and built by North American, it was
originally built for the British and so the 'not designed for us' mentality
kept it from being seriously considered. It wasn't until after a number of
US pilots had flown the Mustang and crowed about how great an aircraft it
was that the generals in the US finally decided to take a look at it. The
result was that it wasn't until late 1943/early 1944 that the Mustang
started equipping us fighter groups that had been plugging away with P-47s
and P-38s, both types which were not suited for high altitude escort
because of short range for the P-47 and high altitude engine detonation
problems for the P-38, neither of which were satisfactorily 'cured' by the
end of the European war.
The Mustang, however, was a proven
airframe and once the British stuck a Merlin into it, it became a real
world-beater. However, though designed and built by North American, it was
originally built for the British and so the 'not designed for us' mentality
kept it from being seriously considered. It wasn't until after a number of
US pilots had flown the Mustang and crowed about how great an aircraft it
was that the generals in the US finally decided to take a look at it. The
result was that it wasn't until late 1943/early 1944 that the Mustang
started equipping us fighter groups that had been plugging away with P-47s
and P-38s, both types which were not suited for high altitude escort
because of short range for the P-47 and high altitude engine detonation
problems for the P-38, neither of which were satisfactorily 'cured' by the
end of the European war.
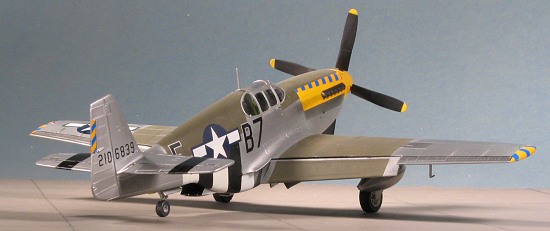
The P-51B was the first Merlin production version with the P-51C differing only by being built in Dallas instead of Inglewood. These 'fastback' Mustangs served until near the end of the war, by which times the bubbletop D model had taken over in European Mustang fighter groups.
| THE KIT |
This kit is from the 'old' ICM. As
such it is pretty much a copy of the Tamiya P-51B, though in softer
plastic, with more sink areas on it, and with less exemplary fit. I know,
how can you make a copy of a 'shake and bake' kit and have it not fit as well? It is a puzzle, but there it is! I
mean, it looks just like the Tamiya kit and everything, but from my
experience with the P-51B (same mold), fit isn't
as good.
bake' kit and have it not fit as well? It is a puzzle, but there it is! I
mean, it looks just like the Tamiya kit and everything, but from my
experience with the P-51B (same mold), fit isn't
as good.
 Sprues
are identical in the B and C kits. The only difference is in the decal
sheet that is provided. The decals are matte and if like the ones in the B
kit, won't be worth using as they are somewhat transparent, won't succumb
to setting solutions and are just not worth the effort. Fortunately, there
are oodles of aftermarket decals and those will be used with this one. It
is too bad, really as the markings on the sheet are most desirable,
offering 'Ding Hao' and 'Salem Representative'; markings for two very
interesting American Aces, Jim Howard and 'Kidd' Hofer.
Sprues
are identical in the B and C kits. The only difference is in the decal
sheet that is provided. The decals are matte and if like the ones in the B
kit, won't be worth using as they are somewhat transparent, won't succumb
to setting solutions and are just not worth the effort. Fortunately, there
are oodles of aftermarket decals and those will be used with this one. It
is too bad, really as the markings on the sheet are most desirable,
offering 'Ding Hao' and 'Salem Representative'; markings for two very
interesting American Aces, Jim Howard and 'Kidd' Hofer.
| CONSTRUCTION |
The first thing I did was to start
digging through the aftermarket box for some things to use on the kit. I
found a nice set of replacement
prop blades (they kit ones seem a bit skinny and long by comparison),
and wheels. Both are by Ultracast and are designed as direct replacements.
No drilling required. I used the
diamond pattern wheels. I also found some generic US shoulder harnesses
by True Details to add to the interior.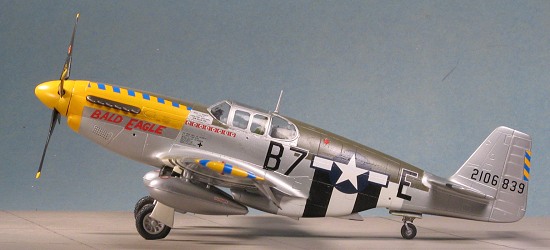
Well, step one was to start building the interior. There are two seats offered and I just chose one at random as I didn't have a clue which was used by the plane I was doing. The seat was glued to the armor plating and most of the interior bits were glued in place to both the tub and the side walls. On the right side, you'll have to cut away the small black box on the sidewall to get the framing to fit in place. Make sure this framing is flush with the upper cockpit sills and is a sort of continuation of the framework already in the fuselage sides. Various boxes were painted black as were the radios and the hand grip.
Then the interior and fuselage bits were painted US Interior Green. The instructions would have you use Chromate Yellow, but that was only for non-interior bits and as such was used to paint the exhaust area, tail wheel doors and parts of the wheel wells.
Meanwhile, I assembled the two spinner halves and installed the center wheel well. The outer well bits are part of the upper wing halves and these were glued into place. Once dry, the wing was assembled and filler was used on the seams along the edge of the wing and the wheel wells had a preliminary coat of paint applied as mentioned in the paragraph above. I also drilled out the gun barrels at this time.
Returning to the interior, I added
the seat belts and harness, painting them Ivory using Vallejo acrylics.
Then the rudder pedals were glued to the instrument panel (which had been
painted black) and the pedals were painted Interior Green.
 These didn't fit too well to
the back of the instrument panel. Meanwhile, the interior itself was glued
into the left fuselage side and left to dry.
These didn't fit too well to
the back of the instrument panel. Meanwhile, the interior itself was glued
into the left fuselage side and left to dry.
The next step was to glue on the wings. These had been cleaned up and were a bit of a struggle to get into place. What's more, they didn't have any dihedral to them, looking very much as a Hurricane does with its straight wings. I used tape to pull them up as I flooded the upper wing joins with cement to soften things a bit. These were left to dry overnight.
When the tape was removed, there was some improvement, but still too flat for my tastes. I then glued on the upper cowling, leaving the exhaust off until the final steps. The tailplanes were then cleaned up and glued in place. Fit is fair, but filler is needed.
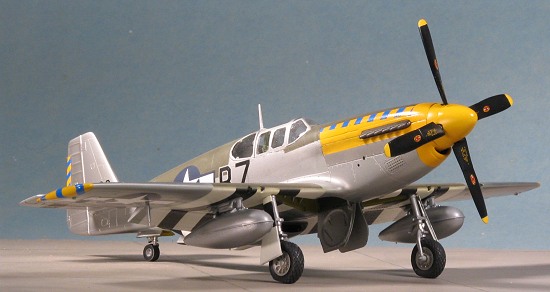
A gun sight was glued in place after it and the upper anti-glare panel were painted black. I then masked the canopy with the Malcolm hood, glued the clear bits in place, and turned the kit upside down. Since I had to do D-Day stripes, I fit the main gear in the closed position. It was obvious that this kit was not meant to be built gear up as the fit isn't good; the central doors are a bit too large. I used some modeling putty to hold the flaps in place and headed for the paint shop.
| COLORS & MARKINGS |
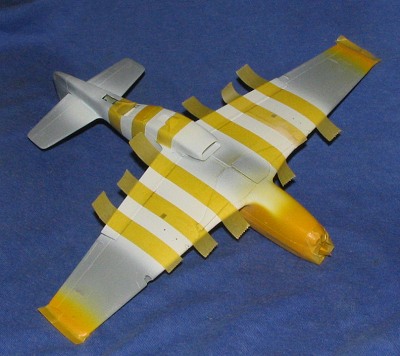
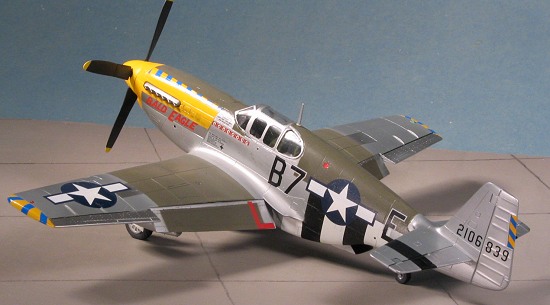 Since I wanted to do 'Bald Eagle'
from Aeromaster sheet, it meant a lot of painting. First, I painted all the
areas that were going to be yellow or carry invasion stripes with Floquil's
Reefer White. I also sprayed all the filler joins with this color. When
dry, I took 10mm Tamiya tape and masked off the white areas for the
stripes. These stripes are supposed to be 18 inches wide, which equates to
9.5 mm in 1/48. 10mm is close enough. With the white masked, the areas to
be yellow were sprayed with Model Master Insignia Yellow. This included the
prop spinner.
Since I wanted to do 'Bald Eagle'
from Aeromaster sheet, it meant a lot of painting. First, I painted all the
areas that were going to be yellow or carry invasion stripes with Floquil's
Reefer White. I also sprayed all the filler joins with this color. When
dry, I took 10mm Tamiya tape and masked off the white areas for the
stripes. These stripes are supposed to be 18 inches wide, which equates to
9.5 mm in 1/48. 10mm is close enough. With the white masked, the areas to
be yellow were sprayed with Model Master Insignia Yellow. This included the
prop spinner.
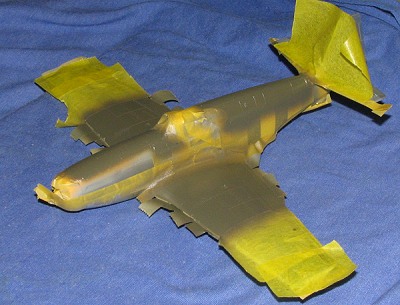
Next, the yellow areas were masked
off and the black bands were painted using Floquil Engine Black. Once that
had dried, it was masked off and I did several light coats of Alclad II
Aluminum on the remaining airframe. I didn't sweat the bits of tape that
went on the fuselage sides as those areas were going to be painted over
later. It was at this time that dawned on me
 that
'Bald Eagle' didn't have a Malcolm hood. As carefully as I could, I pried
the wrong canopy from the kit. Then, after masking it, I place the standard
part in its place. Interestingly, this canopy is narrower than the Malcolm
hood and so leaves some of the sill quite visible on both sides. It also
doesn't fit quite as well. This was then painted over with aluminum.
that
'Bald Eagle' didn't have a Malcolm hood. As carefully as I could, I pried
the wrong canopy from the kit. Then, after masking it, I place the standard
part in its place. Interestingly, this canopy is narrower than the Malcolm
hood and so leaves some of the sill quite visible on both sides. It also
doesn't fit quite as well. This was then painted over with aluminum.
I then masked off several sections of the airframe and used some other Alclad II shades; Dark Aluminum under the exhaust, White Aluminum on the fabric control surfaces, and Duralumin for the upper wing gun covers and the ailerons. In reality, there should be no panel lines on the wings aside from the access covers as the wing was puttied smooth and painted in aluminum lacquer to maintain the laminar flow characteristics.
 When dry, I unmasked enough to allow
me to get to the areas that were to be painted Olive Drab. For this I used
some Xtracolor enamel tha
When dry, I unmasked enough to allow
me to get to the areas that were to be painted Olive Drab. For this I used
some Xtracolor enamel tha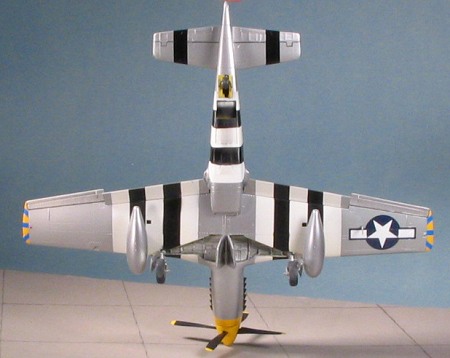 t I had already mixed up. Much masking had to be
done for this and it was with some disgust that I managed to have some
water mix in with the paint to screw up areas done in OD. No choice but to
let it dry, sand it down and repaint it. With that done and the paint dry,
I removed the masking to look for errors. I found a few, but nothing major.
I did find a couple of spots of overspray so took care of those with
Aluminum. Then, I sprayed the entire kit with Testors Metallizer Sealer. I
used this instead of Future as it dries VERY quickly and any help in time
was needed.
t I had already mixed up. Much masking had to be
done for this and it was with some disgust that I managed to have some
water mix in with the paint to screw up areas done in OD. No choice but to
let it dry, sand it down and repaint it. With that done and the paint dry,
I removed the masking to look for errors. I found a few, but nothing major.
I did find a couple of spots of overspray so took care of those with
Aluminum. Then, I sprayed the entire kit with Testors Metallizer Sealer. I
used this instead of Future as it dries VERY quickly and any help in time
was needed.
For the decals, I used Aeromaster 48-692 and chose 'Bald Eagle' of the 374 FS/361 FG. I picked this scheme as I liked the combination of colors on it. One thing I can say about the decals is that if you didn't pick them up from the backing as soon as they would come free, then the all the glue would disappear and it was a real chore picking the decal off the paper. These were printed in Mexico and while the color was good, this problem with the seeming lack of glue could catch some unawares. The white was also out of register so regardless of which set of kill markings you used, the white circles stuck out below the red borders. I used Solvaset on them with no problems. The white is a bit transparent as I could see color changes under the insignia.
| FINAL CONSTRUCTION |
With the decals in place, I returned
to putting on bits and pieces. There really were quite a few of them for
this aircraft. I started with the landing gear. The tail wheel was glued
into its rather loose mounting base. Then, after wrapping the main g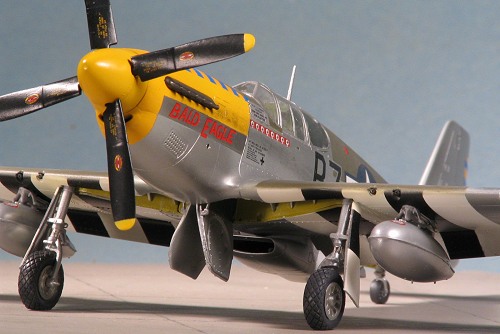 ear
oleos in Bare Metal Foil, those had the outer gear doors glued to them and
then were glued into their mounting bases. Fit here was a bit loose as
well. The inner gear doors and their actuating arms were next. Fit was
quite good. Moving to the nose, the exhaust were snapped into place as the
fit is really quite snug. Tail wheel doors were next, again with a good
fit.
ear
oleos in Bare Metal Foil, those had the outer gear doors glued to them and
then were glued into their mounting bases. Fit here was a bit loose as
well. The inner gear doors and their actuating arms were next. Fit was
quite good. Moving to the nose, the exhaust were snapped into place as the
fit is really quite snug. Tail wheel doors were next, again with a good
fit.
The flaps for this kit do not have the mounting lugs on them that the Tamiya kit provides. This is good in one respect as you can glue them up if you wish. However, Mustang hydraulics were such that within a short period of time after engine shut down, the center gear doors and flaps usually slowly dropped down. With minimal attachment locales for the flaps, I resorted to super glue to get them in place after some touch-up painting. It was during this that I somehow scratched the upper wing insignia so had to resort to a section from an old Microscale insignia sheet. A close match though not perfect as the Microscale insignia shredded due to age and all that was left was a section of the center to use as a patch.
 I glued on the Ultracast
resin wheels with little trouble after trimming the axles about half. The
holes for the pylons had to be enlarged. The pylons themselves are
definitely not Tamiya quality thanks to the huge ejector towers. Some
trimming was needed here! These had been painted aluminum as I figured the
crews would have removed them to keep from getting paint into the
mechanism. I could be wrong. They were then glued in place, followed by the
pitot tube. The prop was assembled using the kit hub and Ultracast blades.
Unfortunately, I broke one blade installing it and don't think I got it
just right at all.
I glued on the Ultracast
resin wheels with little trouble after trimming the axles about half. The
holes for the pylons had to be enlarged. The pylons themselves are
definitely not Tamiya quality thanks to the huge ejector towers. Some
trimming was needed here! These had been painted aluminum as I figured the
crews would have removed them to keep from getting paint into the
mechanism. I could be wrong. They were then glued in place, followed by the
pitot tube. The prop was assembled using the kit hub and Ultracast blades.
Unfortunately, I broke one blade installing it and don't think I got it
just right at all.
I added a few more of the stencil decals at this time, but not too many as this plane had been repainted . The formation lights were painted and some light exhaust stain was added. Then the aircraft was given a coat of sealer again before having matte clear sprayed on the OD portions. I'm not sure if the D-Day bands were in gloss or matte, though they probably 'flattened' out after a bit if they were gloss. Final step was to remove the masking, glue on the drop tanks and the prop. Another kit turned into a model.
| CONCLUSIONS |
I don't build that many Mustangs, but is seems that when I do, I don't pick the best out there. I've still not built a Hasegawa P-51D in 1/48, but tend to gravitate towards those that are not straight-forward. This ICM kit is an example. If you have the bucks, get the Tamiya. If not, then this isn't a bad kit, it just takes a bit of additional work that the Tamiya one doesn't require. The end result is pleasing and it will look great on the shelf.
June 2005
#1367 in a series
Thanks to Ultracast for the resin bits.
If you would like your product reviewed fairly and quickly, please contact me or see other details in the Note to Contributors.