Anigrand 1/144 Northrop M2-F2/F3
|
KIT #: |
AA-5007 |
|
PRICE: |
$64.00
|
|
DECALS: |
one option |
|
REVIEWER: |
Richard F |
|
NOTES: |
Resin. Part of a set of five kits |
"Steve Austin, astronaut. A man barely alive."
[cue footage of a terrible plane crash; add some funky 70s
music]
"Gentlemen, we can rebuild him. We have the technology. We have
the capability to make the world's first bionic man. Steve
Austin will be that man. Better than he was before.
Better...stronger...faster."
The Bionic Man. All Six Million Dollars of him.
 Who couldn't be awed by the concept? Well, perhaps you had to be
about 8 years old when the show first came out, but still, it
was a cool idea.
Who couldn't be awed by the concept? Well, perhaps you had to be
about 8 years old when the show first came out, but still, it
was a cool idea.
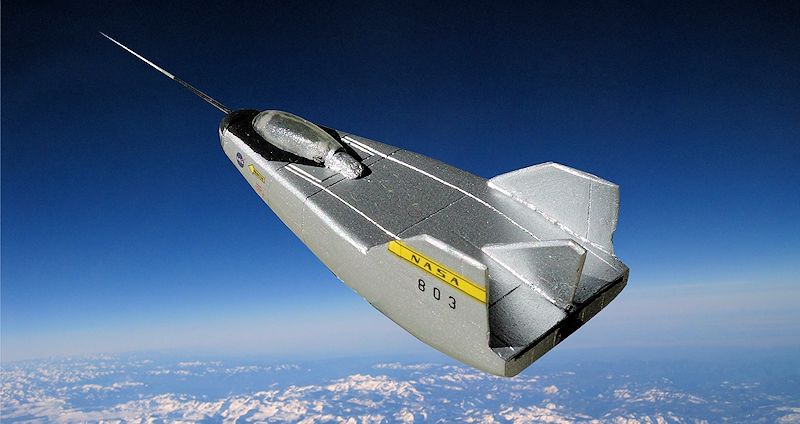
The plane that Steve Austin crashed was actually a lifting body,
called the HL-10 in the show (after the real Northrop HL-10,
reviewed
right here on MM)
but actually the Northrop M2-F2. The footage is real - it was
made the day test pilot Bruce Peterson pranged it at Dryden
Flight Research Center (now known as the (Neil A) Armstrong
FRC). Peterson, just like the Bionic Man, suffered the loss of
an eye among his other injuries. He kept flying though,
including on the F-8 used for fly-by-wire research (and didn't
get a bionic eye, much less a nuclear powered heart).
The M2-F2 was a rocket-powered lifting body but none of its 16
flights were powered. After the terrible crash, the M2-F2 was
rebuilt into the M2-F3. Because of the lateral control problems
that the F2 had demonstrated - which contributed to the crash -
the F3 was given a third tail fin in between the two winglets.
This made a bit of a difference to the flight characteristics
and so after three glide test flights, they finally felt
confident enough to light the candle and try out the rocket.
Eventually the M2-F3 flew 27 missions. Highest speed was Mach
1.6 and the highest altitude achieved was 71,500 feet.
It resides in the Smithsonian in Washington DC.
I previewed this cool little combo set from Anigrand
right here
on MM.
So far I have built the
HL-20
and the
HL-10.
 The first thing to remember is that there are four other lifting
bodies in the combo set, which reduces the sticker shock a
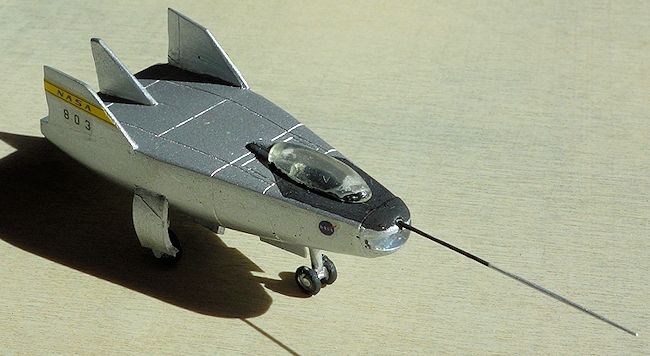
little bit. The second thing to note is that the M2-F2 in this
kit is actually the M2-F3, because it has the central fin. So
far as my cursory research tells me, the fin is the only obvious
difference. According to the plans on the two wikipedia pages
(linked in references), the dimensions of the F2 and F3 are the
same (they are, after all, actually the same plane). Quite why
it took them three years to redesign it just to add a new fin is
a bit beyond me, but probably the changes were internal, to do
with systems or avionics. I guess!
The first thing to remember is that there are four other lifting
bodies in the combo set, which reduces the sticker shock a
little bit. The second thing to note is that the M2-F2 in this
kit is actually the M2-F3, because it has the central fin. So
far as my cursory research tells me, the fin is the only obvious
difference. According to the plans on the two wikipedia pages
(linked in references), the dimensions of the F2 and F3 are the
same (they are, after all, actually the same plane). Quite why
it took them three years to redesign it just to add a new fin is
a bit beyond me, but probably the changes were internal, to do
with systems or avionics. I guess!
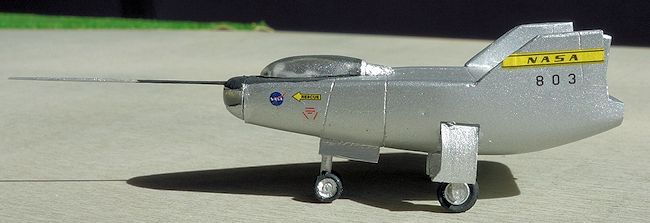
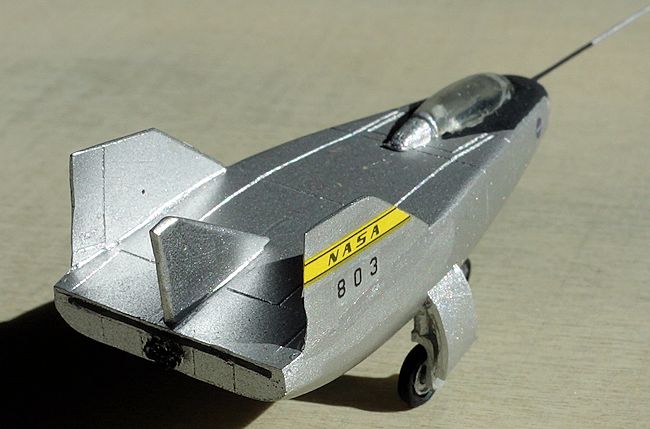
Like the other lifting bodies in the set, this one has a single
piece fuselage, three winglets or tail fins, canopy parts, and
bits for the undercarriage. There is not much to it. It has a
cavity for the cockpit but no detail in there.
 Sanding - with a safety mask to avoid inhaling resin dust - was
my first task. Small kit and the seam from the mould isn't too
bad so this didn't take that long. I had to do it again after
the first coat of paint and I'll quietly confess that even now
it could use a bit of work.
Sanding - with a safety mask to avoid inhaling resin dust - was
my first task. Small kit and the seam from the mould isn't too
bad so this didn't take that long. I had to do it again after
the first coat of paint and I'll quietly confess that even now
it could use a bit of work.
Next job is to stick the fins on. Three of those, each fits
well, so again, not much trouble there. I guess if you left the
center one off and tidied up there you could build an M2-F2 if
you wanted to.
Unfortunately, the superglue (well, my poor use of it) crazed
the cockpit transparency on this one. Also, through lack of
careful reference to pictures, I managed to cut of the fairing
that goes behind the canopy, so I had to rebuild it with putty.
Yes, I did a pretty lame job.
After that a bit more sanding and the lifting body was ready to
paint.
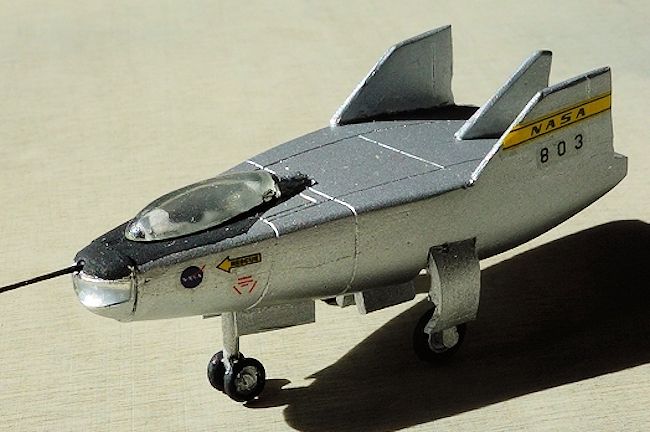 This is one of the simplest of the lifting body schemes. It's
bare metal overall, with a black anti-glare panel on the
front. I used Tamiya TS-17 from a spray can.
This is one of the simplest of the lifting body schemes. It's
bare metal overall, with a black anti-glare panel on the
front. I used Tamiya TS-17 from a spray can.
I carefully free handed the black anti-glare patch using a fine
brush and Tamiya flat black. In the photos I notice I smudged
some onto the windscreen - all I can say is that this thing in
real life is smaller than it appears in these photographs. I
will go back to clean that up one day, I guess, but didn't
notice it when I did it!
The decals were equally straightforward. I used a bit of Mr Mark
Softer on them which seemed to help. The only difficult bit was
with the yellow NASA tail stripes. The decals are rectangles
while the tailfin is sloped at the front. I lined up the decals
and used a sharp blade to trim it to shape. Of course one of
them ripped but I was able to piece it together again.
Another cool lifting body. Easy to build, great for
your first go at resin, or if you like real space, or if you're
a diehard fan of the Six Million Dollar Man. Recommended.
Richard F
April 2015 Thanks to If you would like your product reviewed fairly and
fairly quickly, please
contact
the editor or see other details in the
Note to
Contributors.
Back to the Main Page
Back to the Review
Index Page